

How to Crochet a Ripple Stitch Scarf — Free Step-by-Step Pattern

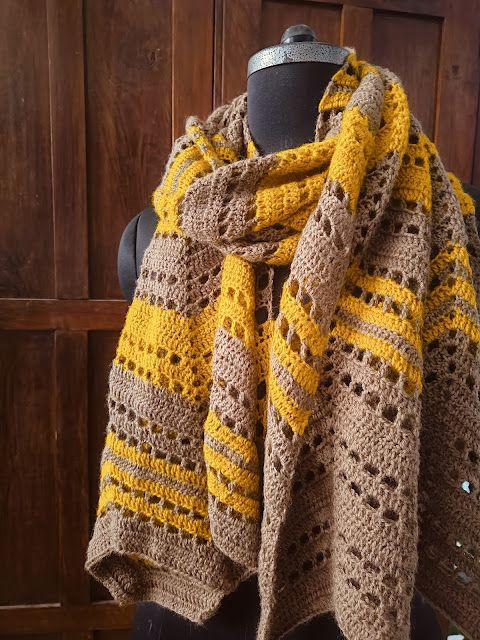
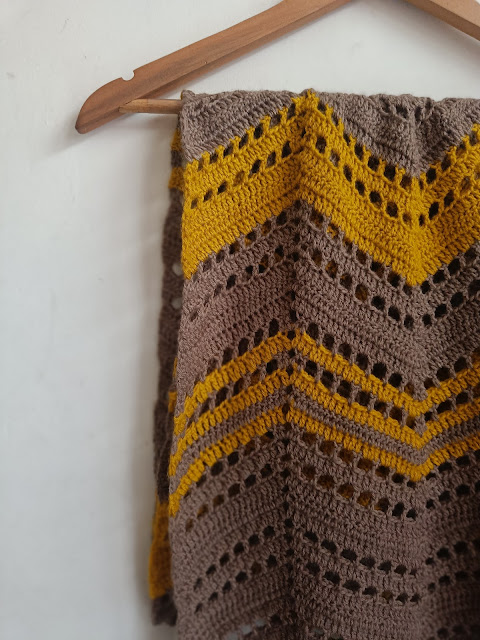
Create a cozy, eye-catching accessory with this Crochet Ripple Stitch Scarf pattern. This tutorial includes full materials, stitch explanations, and row-by-row instructions so you can make a textured zigzag scarf like the sample (about 16" wide and 74" long). The ripple stitch creates a rhythmic up-and-down wave that shows off color changes and stitch texture—great for beginner-intermediate crocheters who want a relaxing project with a striking result.
The Crochet Ripple Stitch Scarf is a delightful project that combines the cozy appeal of a scarf with the fun and stylish design of the ripple stitch. It's perfect for adding a pop of color and texture to any outfit while keeping you warm and fashionable. The rhythmic up and down pattern of the ripple stitch creates a visually appealing piece that is sure to stand out. Whether you're a seasoned crocheter or new to the craft, this scarf is a great way to showcase your skills and creativity. So grab your hook and some yarn, and let's start crocheting your very own Ripple Stitch Scarf that's as unique as you are!
Materials
- Light worsted weight/category 3 yarn approximately 2.5 to 3 balls weighing 100 gm each (350 meters in 1 ball). I used 2 balls of brown and about half a ball of mustard.
- G/4 mm crochet hook
- Yarn needle
Size
About 16 inches wide after blocking. Length can be adjusted. I made it 74 inches long.
Stitches/Abbreviations Used
- [ ] - Repeat instructions within brackets as a set as many times as directed
- st/sts - stitch/stitches
- ch - chain
- dc - double crochet
- yo - yarn over
- dc2tog/dc3tog - double crochet worked together in 2/3 consecutive stitches (double crochet decrease)
Techniques
dc3tog with ch sp in between
yo and insert hook in next ch and pull up a loop, yo and pull through 2 loops on hook (you’ll have 2 loops on hook), yo, skip next ch, insert hook in the next ch and pull up a loop, yo and pull through 2 loops on hook, yo, skip next ch, insert hook in the next ch and pull up a loop, yo and pull through 2 loops on hook, yo and pull through all loops on the hook.
dc2tog with ch space in between
yo and insert hook in the next ch and pull up a loop, yo and pull through 2 loops on hook, yo, skip next ch, yo and insert hook in next ch and pull up a loop, yo and pull through 2 loops on hook, yo and pull through all loops on hook.
Instructions
Row 1:
Ch 100, skip 5 ch, dc in 6th ch from hook, dc in 21 ch, [dc, ch 3, dc] in next ch, dc in next 21 ch, dc3tog with chain space in between, dc in 21 ch, [dc, ch 3, dc] in next ch, dc in next 21 ch, dc2tog with ch space in between. Turn.
Row 2:
Ch 2, dc in next st (counts as dc2tog), dc in 21 sts, [dc, ch 3, dc] in ch-3 space, dc in 21 sts, dc3tog, dc in next 21 sts, [dc, ch 3, dc] in the next ch-3 space, dc in 21 sts, dc2tog. Turn.
Row 3:
Repeat row 2.
Row 4:
Ch 2, dc in next st (counts as dc2tog), [ch 2, skip 2 sts, dc in next st] 7 times, [dc, ch 3, dc] in ch-3 space, [dc in next st, ch 2, skip 2 sts] 7 times, dc3tog, [ch 2, skip 2 sts, dc in next st] 7 times, [dc, ch 3, dc] in ch-3 space, [dc in next st, ch 2, skip 2 sts] 7 times, dc2tog. Turn.
Row 5:
Ch 2, dc in ch-2 space (together counts as dc2tog), dc in same space, [dc in next dc, 2 dc in ch-2 space] 6 times, dc in next 2 dc, [dc, ch 3, dc] in ch-3 space, dc in next 2 dc, [2 dc in ch-2 space, dc in next dc] 6 times, dc in next ch-2 space, dc3tog working into the ch-2 space, next st and the next ch-2 space, dc in the same ch-2 space, [dc in next dc, 2 dc in ch-2 space] 6 times, dc in next 2 dc, [dc, ch 3, dc] in ch-3 space, dc in next 2 dc, [2 dc in ch-2 space, dc in next dc] 6 times, dc in next ch-2 space, dc2tog working into ch-1 space and the last st. Turn.
Row 6:
Repeat row 4.
Row 7:
Repeat row 5.
Repeat rows 2 to 7 until you reach the desired length.
Rows 1 to 3: dc row
Row 4 – chain space row
Row 5 – dc row
Row 6 – chain space row
Finishing Tips
- Weave in ends securely with a yarn needle and trim any excess.
- Block lightly to open up the ripple waves and reach the stated width (about 16"). Pin to shape and steam or wet-block according to yarn care instructions.
- Adjust length by repeating rows 2–7 until you reach your desired scarf length; the sample is 74" long.
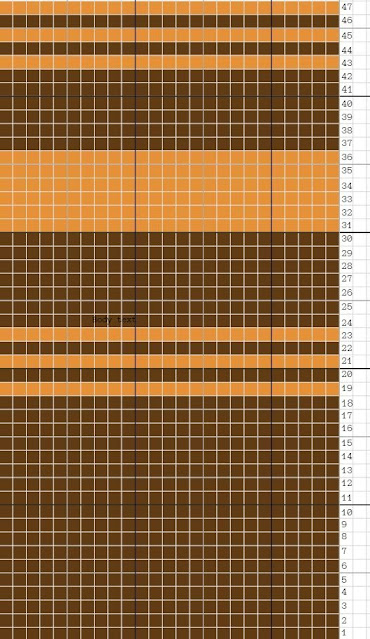
- To change the color balance, substitute colors where desired—this pattern showcases color changes well.
Happy crocheting! If you have questions about any step, leave a comment and include which row or technique you need help with.