Create Your Own Adorable Crochet Amigurumi Pope

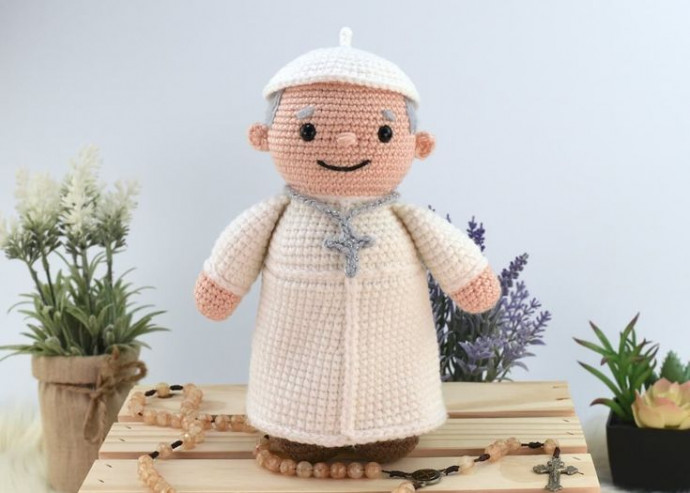
How adorable is a Crochet Amigurumi Pope! This unique and charming creation combines the intricate art of crochet with the whimsical world of amigurumi. Just imagine a tiny crochet version of the Pope, complete with his distinctive attire and gentle smile, ready to bring joy and positivity into your day. Whether you're a crochet enthusiast or simply a fan of cute and handmade crafts, the Crochet Amigurumi Pope is sure to bring a sprinkle of delight to your collection. So go ahead, embrace the creativity and spread smiles with this delightful creation!
Materials
- Worsted-weight (4) yarn – more on the yarn below.
- 3.5 mm (E) crochet hook – my favorite.
- 2 mm crochet hook for the pectoral cross.
- A pair of 10 mm safety eyes with washers.
- Safety eye placement tool.
- Stuffing tool, I like to use a hemostat.
- Two stitch markers.
- Stuffing fiber, like poly fil.
- Scissors.
The Yarn Specifics
I used 100% acrylic yarn from various brands in my stash to make this crochet Pope. Skin-toned yarns are not always the easiest to find, but Amazon carries many brands if you’re in the US. I used Skein Tones by Lion Brand. Yarn colors and approximate amount needed:
- Brown: 20 yards, for the shoes.
- Black: 50 yards, for the pants.
- Skin tone: 60 yards, for the hands and the head.
- White: 125 yards, for the robe and the hat.
- Golden Yellow or Silver Gray yarn or metallic thread, about 8-10 yards, for the pectoral cross.
- A small amount of light gray crochet lightweight yarn or thread to embroider the hair and eyebrows.
Abbreviations (USA Terms)
- ch: chain
- inc: increase (2 sc in next stitch)
- dec: invisible decrease (two single crochet together)
- FO: fasten off
- hdc: half double crochet
- rep: repeat
- Rnd: Round
- sl st: slip stitch
- st(s): stitch(es)
- sk: skip
- sc: yarn under single crochet
- ( ): repeat instructions within parentheses as many times as directed.
- [ ]: stitch count in a round
Pattern Notes
Measurements: The doll will be about 9 inches tall (23 cm), excluding the skull cap.
Stitch tension: Eight rounds of the cap pattern equal 3” (7.5 cm) with a 3.5 mm/E hook and worsted-weight yarn.
Skill Level: Intermediate
This Amigurumi crochet pope pattern uses US Crochet Terms.
Instructions
Step 1: Hands and Arms (x2)
Start with the skin-tone yarn, stuff the hands well to the wrist line, and add only a small amount of stuffing to the crochet pope’s upper arms. The pictured doll was created with the yarn under single crochet stitch.
Tip: Use a stitch marker to mark the first or last stitch in the current round, moving it up as you go.
Rnd 1: sc 6 in a magic circle
Rnd 2: (inc) x 6. [12]
Rnd 3: (inc, sc 3) x 3. [15]
Rnd 4-7: sc around. [15]
FO. Cut the yarn and switch to white.
Rnd 8: sl st around. [15]
Rnd 9: sl st in blo of rnd 7 around. [15]
Rnd 10: (inc, sc 4) x 3 in blo of rnd 9 around. [18]
Rnd 11-17: sc around. [18]
Rnd 18: (dec, sc 4) x 3. [15]
Rnd 19: (dec, sc 3) x 3. [12]
Rnd 20: (dec) x 6. [6]
Close the opening with 3 sc sts. FO. Cut the yarn and set them aside to assemble later with the crochet hook.
Step 2: Ears (x2)
Use the skin-tone yarn.
Rnd 1: Leave an 8” tail and hdc 6 in a magic circle.
FO. Cut the yarn and leave another long tail. Set them aside.
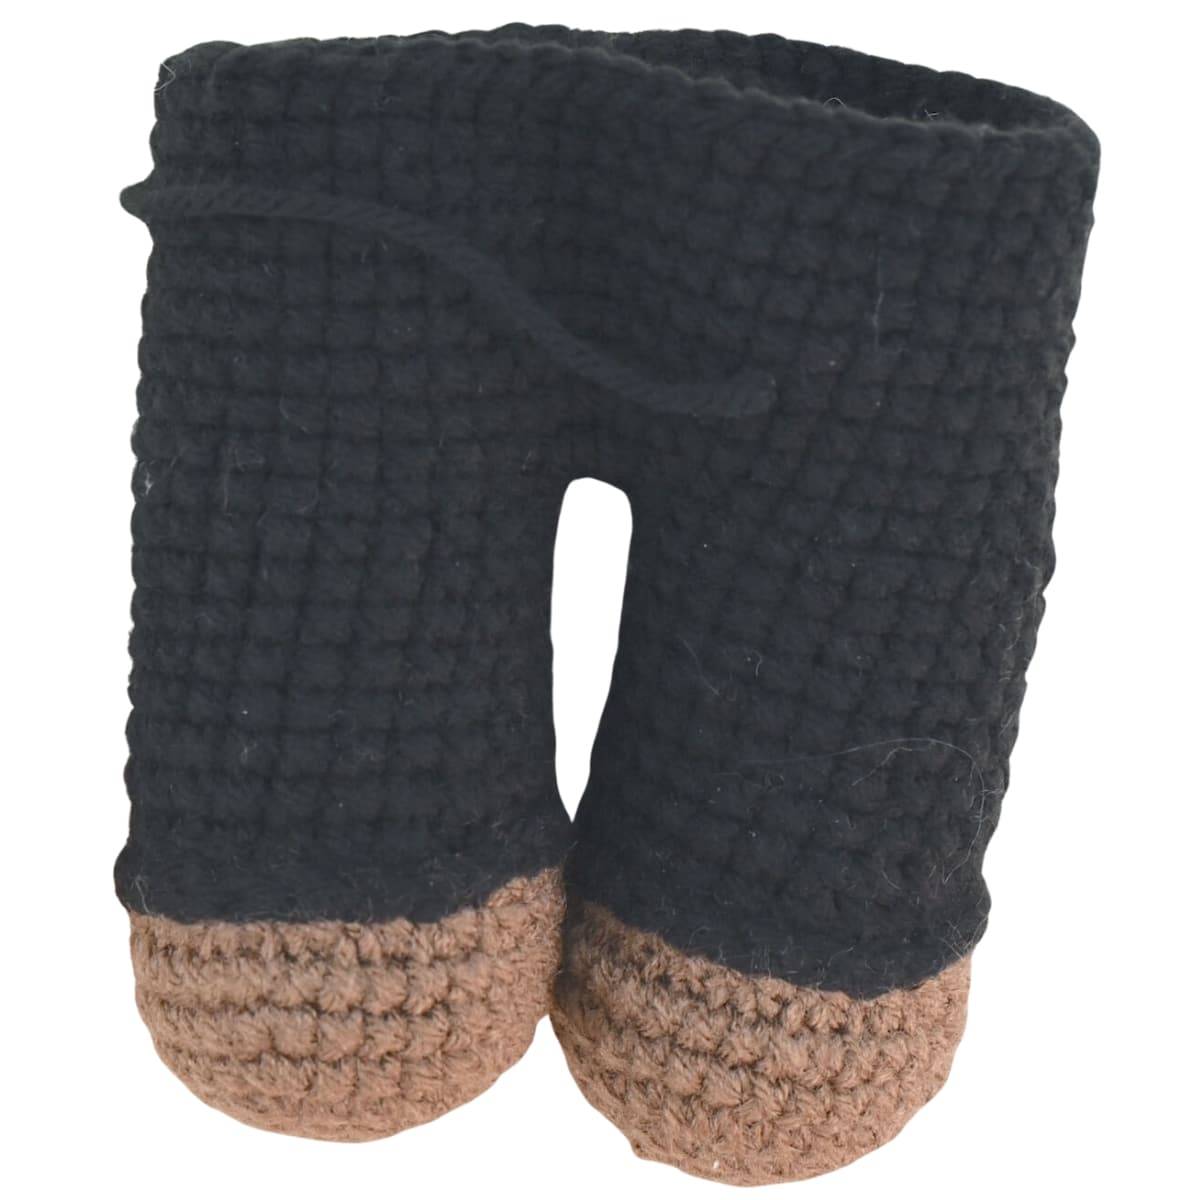
Step 3: Feet and Legs (x2)
Start with the brown yarn.
Rnd 1: sc 6 in a magic circle
Rnd 2: (inc) x 6. [12]
Rnd 3: (inc, sc) x 6. [18]
Rnd 4: (inc, sc 2) x 6. [24]
Rnd 5: (inc, sc 3) x 6. [30]
Rnd 6-7: sc around. [30]
Rnd 8: dec x 6, sc 7, dec x 2, sc 7. [22]
FO. Cut the yarn and switch to black.
Rnd 9: sl st in blo around. [22]
Rnd 10: sl st in blo of rnd 8 around. [22]
Rnd 11: sc in blo of rnd 10 around. [22]
Rnd 12-18: sc around. [22]
FO. Cut the yarn from the first leg only.
Joining the Legs
With the black yarn, continue from the last stitch on leg# 2. We now join the legs and work big rounds to create the crochet pope’s torso.
Rnd 19: Unravel the last st in round 18 of leg# 2. Then, pair the legs together, ensuring the toes are facing forward. Ch 1 – this is the crotch, sc in the 10th st of leg# 1 to join and mark that st as the first st of the current round. Sc 21 around leg# 1, sc in the back bump of the crotch ch, sc 22 around leg# 2, sc in top two loops of the crotch ch. [46]
From here, each round begins at the back of the doll.
Rnd 20: inc x 2, sc 19, inc x 4, sc 19, inc x 2. [54]
Rnd 21-29: sc around. [54]
FO. Cut the yarn and set it aside.
Step 4: Robe’s Skirt
Now, switch to the white yarn. We’re creating the crochet pope robe’s skirt separately with its own round count. To start, ch 60 and sl st to the first ch to form a loop.
Rnd 1: sc into the back bump of every ch across. [60]
Rnd 2-5: sc around. [60]
Rnd 6: (dec, sc 28) x 2. [58]
Rnd 7-11: sc around. [58]
Rnd 12: (dec, sc 27) x 2. [56]
Rnd 13-16: sc around. [56]
Rnd 17: (dec, sc 26) x 2. [54]
Rnd 18-21: sc around. [54]
Do not cut the yarn yet.
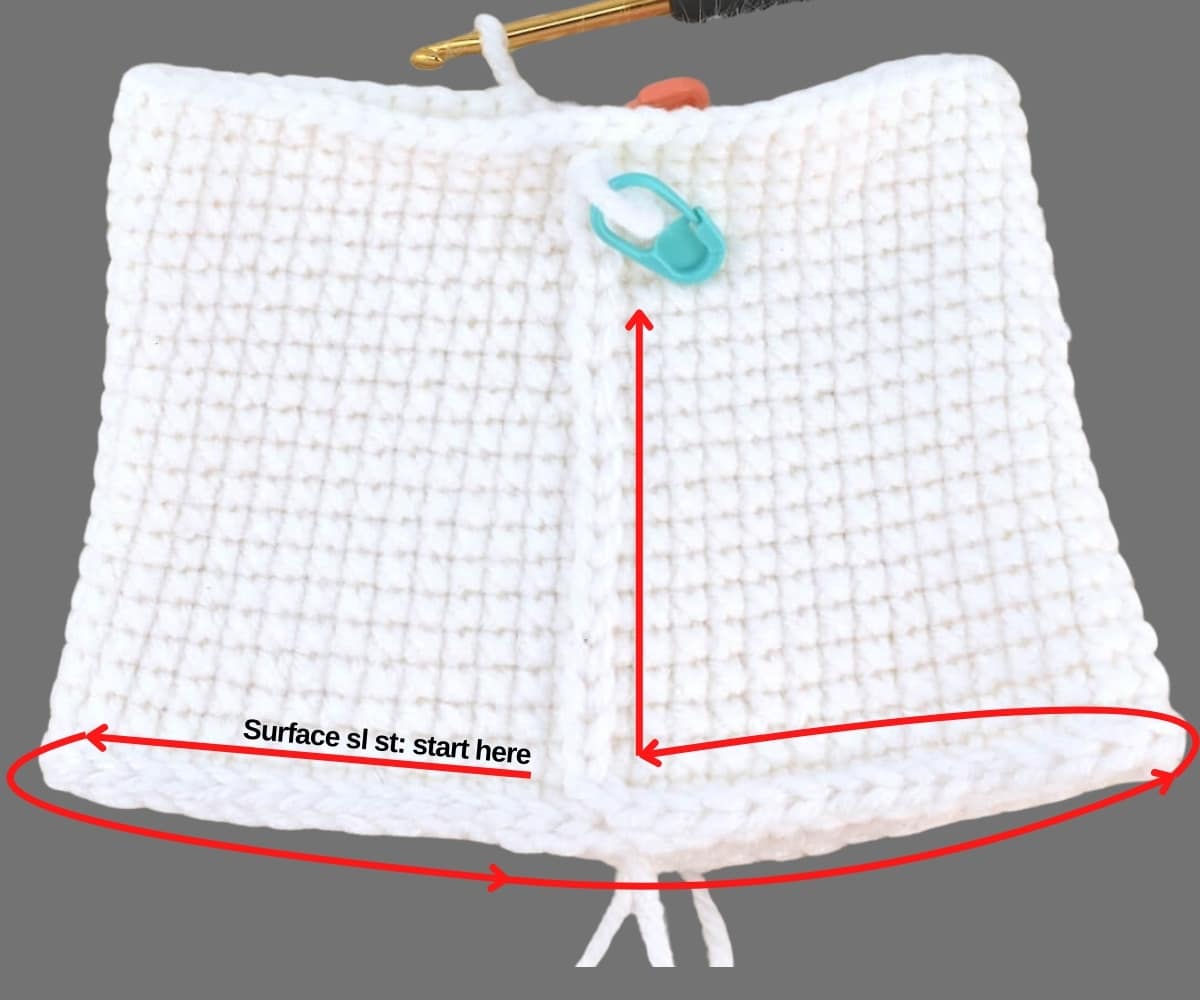
Robe’s Hem & Front Stitches
This step is optional, but adding details to the robe is recommended for a better-looking finish.
Cut the yarn and place a stitch marker in the current loop to prevent unraveling, leaving a tail about 25” (64 cm). We will use it later to surface-slipstitch up to the neckline.
Attach the other end (pull from the center) of the white yarn to the first round of the skirt, centered at the front (the back is where the round starts).
Then, surface-slipstitch around to give the robe’s hem a clean look. Do not cut the yarn at the end of this round. Be sure to keep the working yarn at the back of the work when doing surface slip stitches.
At the end of the hem’s round, surface-slipstitch in a straight line up to the waist to mimic the robe’s front opening.
Step 5: Back to Torso – Robe’s Top
Now, put the skirt on, aligning the last stitch’s loop with the last stitch on the waist of the previously started torso/pants’ waist. We’ll keep using the robe’s row count, up to the neckline.
Drop the tail left in the previous step between the two layers of stitches to do the surface slip stitch up to the neckline at the front of the crochet pope’s robe.
Tip: It’s best to wait to add stuffing to the crochet pope’s torso until we reach round 31 in the current pattern step.
Rnd 22: sc around using both the crochet pope’s pants’ waist and the robe’s layers of stitches. [54]
If all was done right so far, the rounds still begin at the back of the doll. Sl st around rnd 22 to create the waistline (this won’t count as a round).
Rnd 23: sc around. [54]
Rnd 24: (dec, sc 16) x 3. [51]
Rnd 25: (dec, sc 15) x 3. [48]
Rnd 26: (dec, sc 14) x 3. [45]
Rnd 27: (dec, sc 13) x 3. [42]
Rnd 28: (dec, sc 12) x 3. [39]
Rnd 29: (dec, sc 11) x 3. [36]
Rnd 30: (dec, sc 10) x 3. [33]
Attach the arms in the next round to the sides of the doll.
Rnd 31: dec, sc 5, sc 3 with the first arm, sc, dec, sc 9, dec, sc 3 with the second arm, sc 6. [30]
Rnd 32: (dec, sc 8) x 3. [27]
Sl st around rnd 32 (won’t count as a round). FO. Cut the yarn.
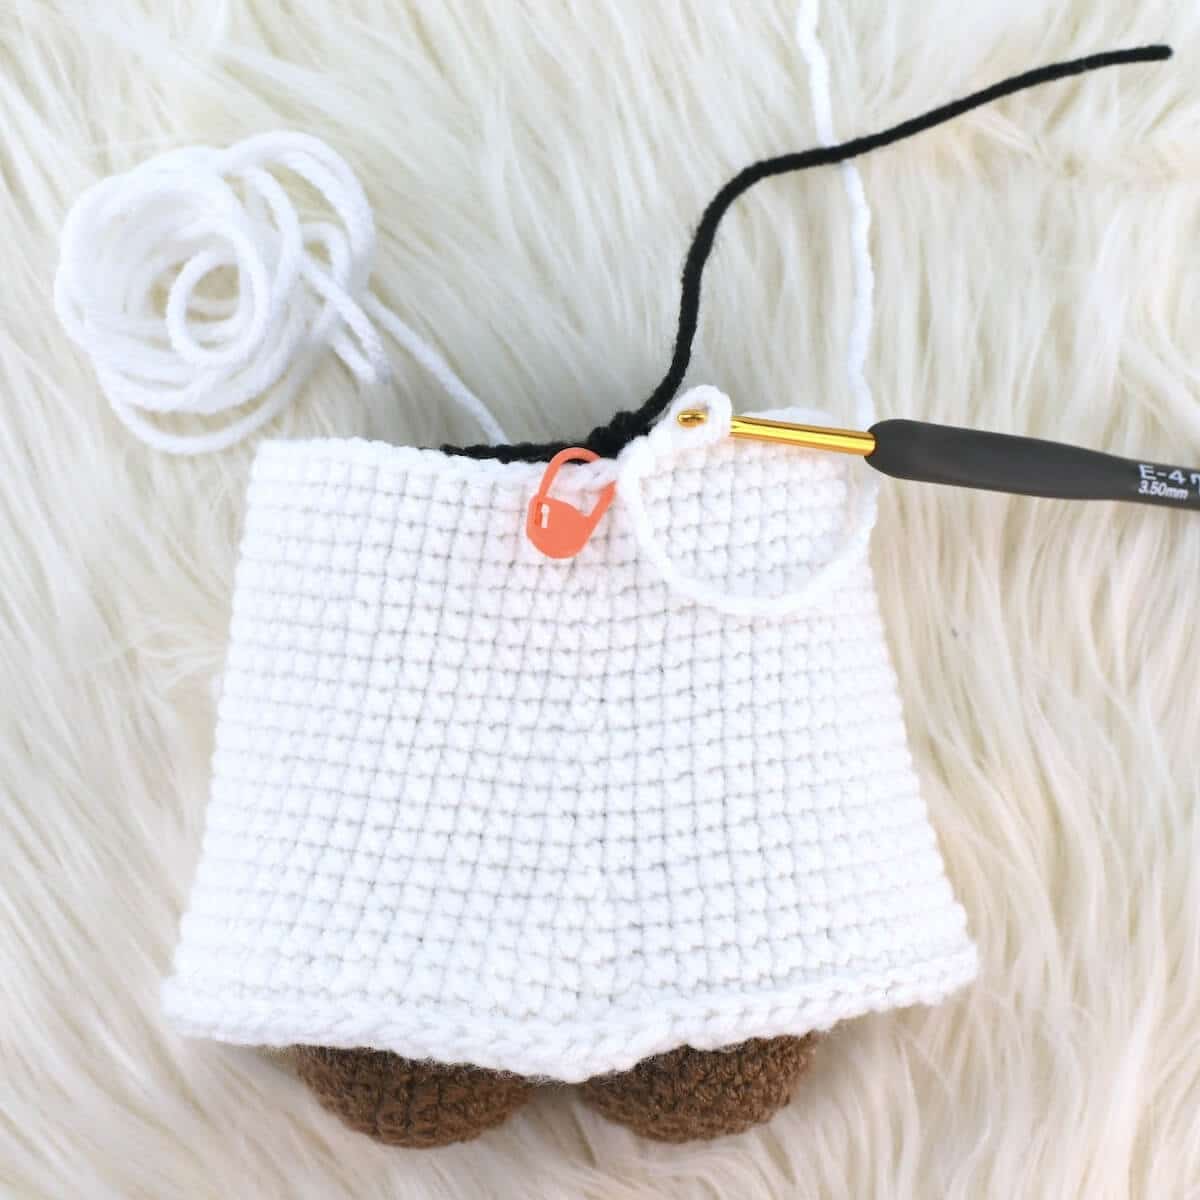
Before starting the crochet pope’s head, pick up the long white tail left behind and continue surface slip stitching straight to the neckline. FO and cut the white tail (and hide it inside the doll). This is also a good time to add stuffing fiber to the torso.
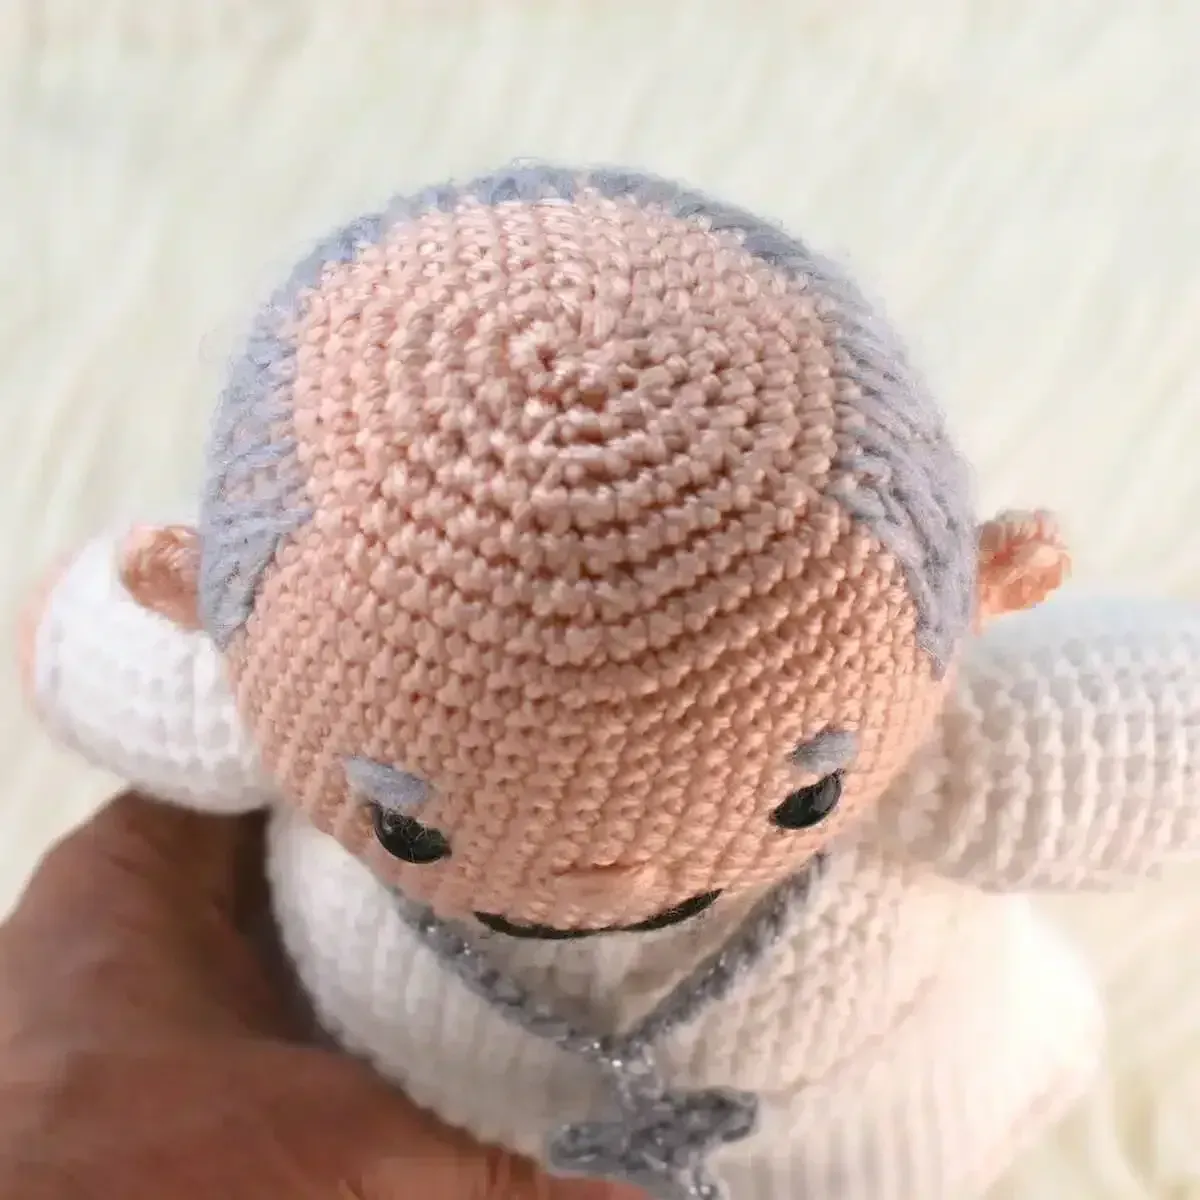
Step 6: Crocheting the Head
Attach the skin-toned yarn to the first st in round 32. The head also has its own row count.
Rnd 1: inc x 27. [54]
Rnd 2-16: sc around. [54]
Now, place the safety eyes centered on the crochet pope’s face between rounds 9 and 10, 10 stitches apart. This is also the best moment to attach the ears between rounds 7 and 9, aligning them with the shoulders.
Rnd 17: (dec, sc 7) x 6. [48]
Rnd 18: (dec, sc 6) x 6. [42]
Rnd 19: (dec, sc 5) x 6. [36]
Rnd 20: (dec, sc 4) x 6. [30]
Rnd 21: (dec, sc 3) x 6. [24]
Add stuffing fiber to the head and embroider the mouth, eyes, and eyebrows.
Rnd 22: (dec, sc 2) x 6. [18]
Rnd 23: (dec, sc) x 6. [12]
Rnd 24: dec x 6. [6]
FO. Cut the yarn.
Step 7: Embroidering the Hair
There is no exact way to embroider the hair on the crochet pope’s head. However, starting from the top was easier, using the ears as a reference for placement. We are creating a bold hairline that skips seven rounds from the top of the head.
Thread the needle with a long strand of thread or lightweight gray yarn.
Start from one side of the head to the other, creating rows of irregular, vertical stitches two to four rounds long.
Thread the needle again when needed and keep going back and forth until it reaches the bottom hairline.
Make it as full of a head as desired.
Step 8: Pectoral Cross
This step is done in one piece. Create a mc and place the stitches below in it:
Ch 3, sl st into the back bump of 2nd ch from the hook and in the next ch, sc in the mc.
Ch 4, sl st into the back bump of 2nd ch from the hook and in the next two chs, sc in the mc.
Ch 3, sl st into the back bump of the 2nd ch from the hook and in the next ch, sc in the mc.
Ch to 10 inches (25 cm), wrap it around the crochet Amigurumi pope’s neck, sk all chs but 3, sl st into the back bump of the next 3 chs, sc in the mc. FO. Cut ye yarn.
Step 9: Skull Cap
We are using the perfect circle method to create the cap for this crochet pope.
Rnd 1: sc 6 in a mc, leaving a long tail (20-25 inches) to create the stem later.
Rnd 2: inc 6x. [12]
Rnd 3: (inc, sc) 6x. [18]
Rnd 4: sc, (inc, sc 2) 5x, inc, sc. [24]
Rnd 5: (inc, sc 3) 6x. [30]
Rnd 6: sc 2, (inc, sc 4) 5x, inc, sc 2. [36]
Rnd 7: (inc, sc 5) 6x. [42]
Rnd 8: sc 3, (inc, sc 6) 5x, inc, sc 3. [48]
Rnd 9: (inc, sc 7) 6x. [54]
Rnd 10-11: sc around. [54]
FO. Cut the yarn. Optional: After cutting the yarn, leave a long tail and use it to stitch the cap onto the head after the following step.
For the stem at the top of the cap, pull the long tail to the right side, ch 4, sc into the back bump of the 2nd ch and each ch across. FO. Weave in all the ends.