Crochet Amigurumi Cat

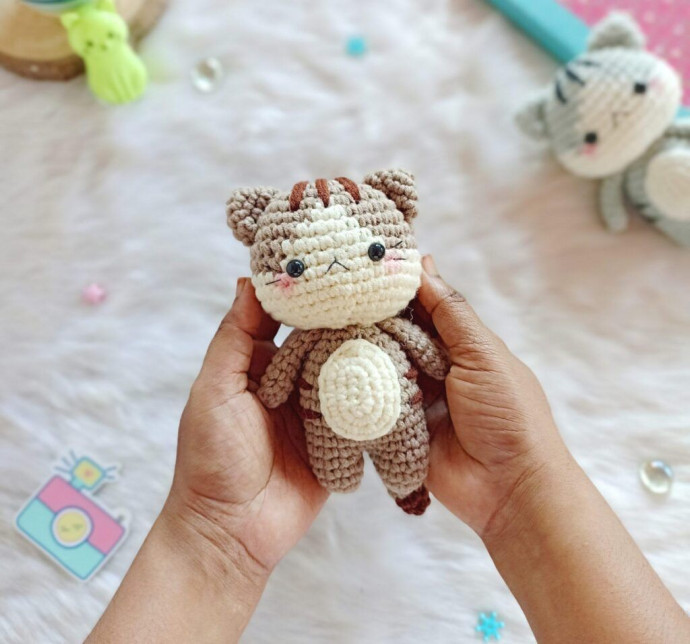
Crochet Amigurumi Cats are the purr-fect craft project for cat lovers and crochet enthusiasts alike! These adorable little felines are fun to make and even more fun to display or give as thoughtful handmade gifts. Whether you're a beginner or a seasoned crocheter, creating a cute Amigurumi Cat can be a relaxing and rewarding experience. With just a few basic crochet stitches and some yarn, you can bring these charming creatures to life with their big eyes, whiskers, and cute little tails. So gather your materials, put on your favorite show or podcast, and let your creativity flow as you stitch up your very own fluffy friend!
Instructions:
Amigurumi Cat Pattern Overview
The Amigurumi cat pattern is written in US English terms and is worked in continuous rounds unless stated otherwise.
Materials Needed
- 5ply milk cotton yarn in tan, cream, and brown color.
- 3 mm crochet hook.
- Fiberfill for stuffing.
- 8 mm safety eyes.
- Tapestry needle.
- Black embroidery thread and needle.
Stitches/Abbreviations
- R – round/row.
- Ch – chain.
- St(s) – stitch(es).
- Sc – single crochet.
- Inc – increase (2 sc in one st).
- Dec – decrease (sc 2 st together).
- Sl st – slip stitch.
- [..] – repeat the instructions given in between the brackets.
- (..) – total number of stitches.
Creating the Head
Using tan color yarn,
- R1: 7 sc in a magic ring (7).
- R2: Inc in each st (14).
- R3: [Sc, inc] x 7 (21).
- R4: [Sc 2, inc] x 7 (28).
We’ll start switching between tan and cream yarn from R5-R9. I have used black font to denote tan color and red font to denote cream color yarn.
- R5: (Sc 3, inc) x 3, sc 2, sc, inc, (sc 3, inc) x 3 (35).
- R6: Sc 16, sc 3, sc 16 (35).
- R7: Sc 15, sc 5, sc 15 (35).
- R8: Sc 14, sc 7, sc 14 (35).
- R9: Sc 14, sc 8, sc 13 (35).
We’ll fully work with cream yarn from R10.
- R10: (Sc 4, inc) x 7 (42).
- R11-12: Sc in each st (42).
- R13: [Sc 4, dec] x 7 (35).
- R14: [Sc 3, dec] x 7 (28).
Insert 8 mm safety eyes between R9 and R10 with 6 stitches in between. Start stuffing with fiberfill and continue to stuff as you go.
- R15: [Sc 2, dec] x 7 (21).
- R16: [Sc, dec] x 7 (14).
Stuff firmly and fasten off, leaving a long tail for sewing.
Creating the Ears (Make 2)
Using tan yarn,
- R1: 4 sc in magic ring (4).
- R2: Inc in each st (8).
- R3: [Sc, inc] x 4 (12).
- R4: [Sc 2, inc] x 4 (16).
Fasten off, leaving a long tail for sewing.
Creating the Arms (Make 2)
Using tan yarn,
- R1: 6 sc in magic ring (6).
- R2: [Sc 2, inc] x 2 (8).
- R3-R7: Sc in each st (8).
Sc through both the top layers to close. Fasten off, leaving a long tail for sewing.
Creating the Legs (Make 2)
Using tan yarn,
- R1: 6 sc in magic ring (6).
- R2: [Sc, inc 2] x 2 (10).
- R3-4: Sc in each st (10).
Fasten off the first leg but don’t cut off the yarn on the second one. Stuff the legs and continue to body part.
Creating the Body
- R5: With the second leg, chain 2 and join to the first leg and sc around the first leg (10 sts), sc in the 2 chains (2 sts), sc around the second leg (10 sts), and sc in the other side of 2 chains (2 sts). [24 sts in total].
- R6-12: Sc in each st (24).
- R13: [Sc 4, dec] x 4 (20).
- R14: Sc in each st (20).
- R15: [Sc 3, dec] x 4 (16).
- R16: [Sc 6, dec] x 2 (14).
Stuff the body, fasten off, and weave in the ends.
Creating the Tail
Start with brown color yarn,
- R1: 6 sc in magic ring.
- R2: [Sc 2, inc] x 2 (8).
- R3: Sc in each st (8).
- R4-R5: (tan color) Sc in each st (8).
- R6-R7: (brown color) Sc in each st (8).
- R8-R9: (tan color) Sc in each st (8).
- R10-R11: (brown color) Sc in each st (8).
- R12-R13: (tan color) Sc in each st (8).
Sc through both the top layers to close. Fasten off, leaving a long tail for sewing.
Creating the Belly Patch
Using cream color yarn,
- R1: Ch 5, starting from 2nd ch on hook, sc 3, 3 sc in the last ch. Continue to work on the other side of the chain and sc 2, inc in last (10).
- R2: Inc, sc 2, inc 3, sc 2, inc 2 (16).
- R3: Sc, inc, sc 2, (sc, inc) x 3, sc 2, (sc, inc) x 2 (22).
Fasten off invisibly.
Leave a long tail for sewing.
Assembling the Amigurumi Cat
Embroider an inverted V shape for the mouth. Sew the whiskers one stitch away from the eyes on either side. Using a tapestry needle and brown yarn, sew 2 long stripes from the top of the head to R5 at the center. Sew 2 more stripes on both sides from the center.
Sew the ears between R3 to R7 on either side of the head.
Attach the head to the body using the remaining yarn tail. Sew the arms where the head and body meet. Add in the belly patch to the center of the body. Add in two stripes on either side of the body. Finally, sew the tail slantingly at the back of the body.
And your little cat is now done!