How to Create a Crochet Amigurumi Dragon

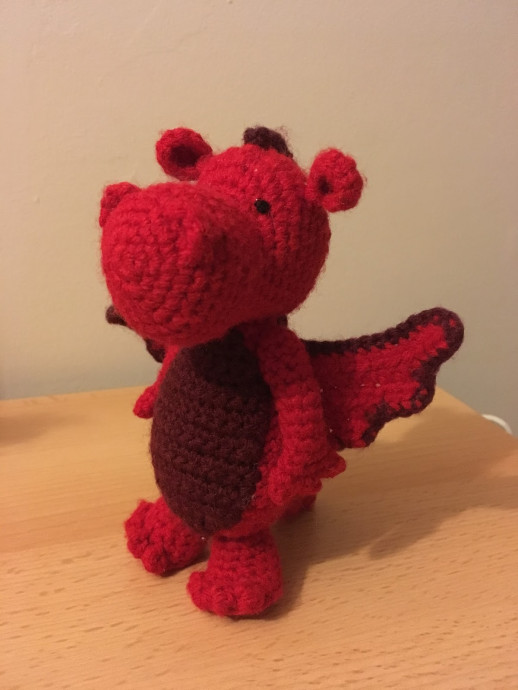
Creating a Crochet Amigurumi Dragon can be such a fun and rewarding project! From selecting the perfect colors of yarn to carefully crafting each tiny detail, the process of bringing this magical creature to life is absolutely enchanting. As you work stitch by stitch, transforming simple materials into a whimsical dragon companion, your creativity knows no bounds. Whether you gift your handmade dragon to a loved one or keep it to sprinkle some mythical vibes into your own space, the joy of crocheting this adorable creature is truly unmatched. So grab your crochet hook, unleash your creativity, and let the magic of crafting a Crochet Amigurumi Dragon fill your heart with warmth and joy!
Materials Needed
- Yarn needle
- Soft toy filling
- 3mm crochet hook
- 4mm safety eyes
- DK Yarn - Approx. 150m
Stitches and Abbreviations Used
(I use US crochet terms)
- MC - Magic circle/ring (sc unless otherwise specified)
- Ch - Chain
- SC - Single crochet
- HDC - Half double crochet
- DC - Double crochet
- Inc - Increase stitch (2 single crochets into one stitch)
- Dec - Decrease stitch (single crochet 2 stitches together)
- BLO - Back Loop Only
- FLO - Front Loop Only
- PC - Popcorn Stitch (3 hdc pc stitches are used in this pattern for the toes)
- ST - Stitch
- SLST - Slip stitch
- R - Round or Row
- FO - Finish Off
Additional Notes
This is worked in continuous rounds. It is helpful to use a stitch marker to keep track.
The number in ( ) at the end of each round indicates the total stitch count for that round.
* * indicates repeated series of stitches.
Use invisible decreases for a neater finished product. This is done by using the FLO of the stitches while making the decrease.
Stitches in [ ] are worked into one stitch.
Remember to stuff the product little and often as you work.
Creating the Head
Head – Red
- MC (6)
- *INC* (12)
- *1sc, inc* (18)
- *2sc, inc* (24)
- *3sc, inc* (30)
- 6-9. Sc (30)
- *3sc, dec* (24)
- Sc (24)
- *4sc, dec* (20)
- 7sc, FLO - Inc x6, both loops - 7sc (26) – mark the front loops in this row for future reference as they will make the top of the head.
- 10sc, inc x6, 10sc (32)
- 7sc, *1sc, inc* x4, 1sc, *1sc, inc* x4, 8sc (40)
- Sc (40)
- 10sc, dec x10, 10sc (30)
- 18-20. Sc (30) – start stuffing. Place eyes approx. between rounds 15-16 using the marked section from R13 to aid in placement.
- *3sc, dec* (24)
- *2sc, dec* (18)
- *1sc, dec* (12)
- *dec* (6)
- FO – add any extra stuffing needed. Close hole.
Creating the Body
Body – Red
- MC (6)
- *INC* (12)
- 1sc, inc x3, 3sc, inc x3, 2sc (18) – mark the increase sections on this round as they will become the sides of the body.
- 2sc, inc x3, 6sc, inc x3, 4sc (24)
- *3sc, inc* (30)
- *4sc, inc* (36)
- *8sc, inc* (40)
- 8-10. Sc (40)
- *8sc, dec* (36)
- 12-13. Sc (36) - Stuff the piece and continue stuffing to end.
- *7sc, dec* (32)
- Sc (32)
- *6sc, dec* (28)
- Sc (28)
- *5sc, dec* (24)
- Sc (24)
- *4sc, dec* (20)
- Sc (20)
- *3sc, dec* (16)
- Sc (16)
- FO – leaving yarn tail to sew to head.
Creating the Belly Patch
Belly Patch – Maroon
- CH 4.
- Turn, starting in 2nd ch from hook, inc, 1sc, inc
- Ch1, turn, inc, 3sc, inc
- Ch1, turn, 7sc
- Ch1, turn, inc, 5sc, inc
- Ch1, turn, inc, 7sc, inc
- 7-15. Ch1, turn, 11sc
- Ch1, turn, dec, 7sc, dec
- Ch1, turn, dec, 5sc, dec
- Ch1, turn, dec, 3sc, dec
- Ch1, turn, dec, 1sc, dec
- FO – Leaving very long yarn tail to whipstitch to the body. R1 is positioned at the last round of the body where the head is joined.
Creating the Legs
Legs x2 – Red
- MC (6)
- *Inc* (12)
- *1sc, inc* (18)
- BLO – 5sc, *pc, sc* x4, 5sc (18)
- Sc, skipping over the pc stitches from the above round (14)
- 4sc, dec, 2sc, dec, 4sc (12)
- 7-9. Sc (12) – Start stuffing the piece.
- FO – Leaving yarn tail to sew the legs to the bottom of the body.
Creating the Arms
Arms x2 – Red
- MC (6)
- *Inc* (12)
- 3-11. Sc (12) - Stuff the piece and continue stuffing until closing.
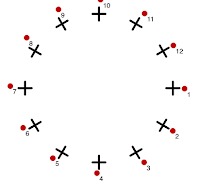
- Refer to this chart to make the fingers.
- 1st finger - A. 12
- 2nd finger - B. 12
- 3rd finger - C. 12
- A. 12. 1sc into stitches 1, 2, 11 & 12 (4)
- FO – leaving yarn tail to close hole and close up any gaps left in between the fingers.
- B. 12. 1sc into stitches 3, 4, 9 & 10 (4)
- FO – leaving yarn tail to close hole and close up any gaps left in between the fingers.
- C. 12. 1sc into stitches 5, 6, 7 & 8 (4)
- FO – leaving extra long yarn tail to close hole and close up any gaps left in between the fingers. Thread the yarn to R1 of the limb and sew to body.
Creating the Tail
Tail – Red
- MC (4)
- *Inc, 1sc* (6)
- Inc, 5sc (7)
- Inc, 6sc (8)
- Inc, 7sc (9)
- Inc, 8sc (10)
- Inc, 9sc (11)
- Inc, 10sc (12)
- Inc, 1sc, inc, 9sc (14)
- 1sc, inc, 1sc, inc, 10sc (16)
- 2sc, inc, 1sc, inc, 11sc (18)
- 3sc, inc, 1sc, inc, 12sc (20)
- *4sc, inc* (24)
- *5sc, inc* (28)
- FO – leaving yarn tail to sew to body. Stuff lightly and place with the increase sections from R9-12 facing upwards.
Creating the Ears
Ears x2 – Red
- MC (4)
- *Inc* (8)
- 1sc, inc x2, 2sc, inc x2, 1sc (12)
- FO – Leaving yarn tail to sew to the head. Pinch bottom together and sew into shape.
Creating the Nostrils
Nostrils x2 – Red
At approx. R5-6, join yarn into desired position. 1sc into the first st, [2dc] into the next st, 1sc into the 3rd st. To get a more rounded effect, make the 2dc on the round behind where you have made the sc.
Creating the Spine
Spine – Maroon
Join yarn into the center tip of the tail. *slst, [3dc]* repeat this sequence until you reach the top of the head.
Creating the Wings
Wings x2 - Red
- CH 15
- Turn, starting in the 3rd ch from hook, 13hdc
- Ch2, turn, 10hdc
- Ch2, turn, 6hdc, 2sc, sc2tog
- Ch1, turn, 2sc, 4hdc
- Ch2, turn, 3hdc, 1sc, sc2tog
- Ch1, turn, 3sc
- FO
- Attach Maroon to the edge of the wing and sc around evenly. Working [2sc] in the corners. Work the edging of the second wing in the opposite direction to what you worked the first.
- FO – leaving yarn tail to sew wings to the back of the body.
- (You may wish to starch spray them to make them firmer)