Crochet Miniature Dragon

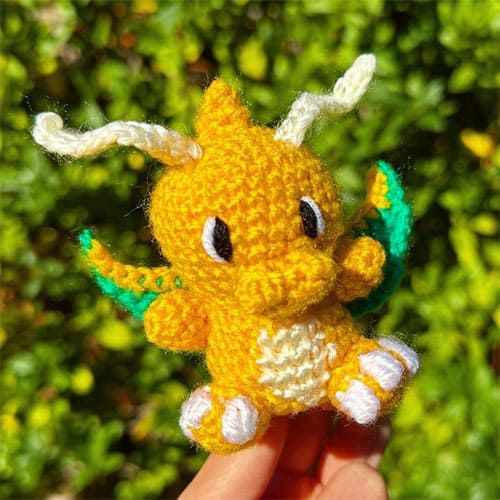
Creating a crochet miniature dragon is such a whimsical and delightful project that is sure to bring a touch of magic to your crafting endeavors! Whether you're an experienced crocheter or a beginner looking for a fun challenge, this tiny dragon will spark joy and creativity. Imagine the cuteness of this little mythical creature sitting on your shelf or hanging from a keychain, ready to add a sprinkle of enchantment to your day. Get your favorite yarn colors and crochet hooks ready, and let's embark on a charming crafting adventure together!
Abbreviations
FLO - front loops only
BLO - back loops only
FO - fasten off
MR - magic ring
bbl - bobble
ch - chain
dc - double crochet
dec - decrease
hdc - half double crochet
inc - increase
inv - invisible
rep - repeat
md - round
sc - single crochet
slst - slip stitch
st - stitch
Body and Head
R1: 6 sc in mr with primary color.
R2: 6 inc (12)
R3: (sc, inc) * 6 (18)
R4: (sc, inc, sc) * 6 (24)
R5: (3sc, inc) * 6 (30)
R6-10: 30 sc (6 rounds)
R11: (3sc, dec) * 6 (24)
R12: (2sc, dec) * 6 (18)
Begin stuffing the head. Do not stuff if you’re using safety eyes.
R13: (sc, dec) * 6 (12)
The body is continued. Don’t fasten off. Continue stuffing as you go if you’re not using safety eyes.
R14: FLO (sc, inc) * 6 (18)
R15: (sc, inc, sc) * 2, sc, change to secondary color, inc, change to primary color, (2sc, inc) * 3, sc (24)
R16-19: 8 sc, change to secondary color, 4 sc, change to primary color, 12 sc (24)
If you want to use safety eyes, place them between rnd 8-9, approximately 5 stitches apart. Align them with the colored part of the body. Alternatively, you can sew the eyes on later. Begin stuffing.
For the next round, you can adjust the placement of the secondary color stitches to be in the center of the body. Mine worked with this count.
R20: (2sc, dec) * 2, sc, change to secondary color, sc, dec, change to primary color, (2sc, dec) * 3 (18)
FO secondary color.
R21: (sc, dec) * 6 (12)
R22: 6 dec
FO and close the hole.
Snout
With the primary color,
R1: Ch5, start in 2nd chain from hook, 3 sc, make 3 sc in the last chain, make 2 sc on the other side of the chain, and 2 sc in the last chain (10)
The bobble stitches in the next round use 3 dc.
R2: 5sc, bbl, 2sc, bbl, sc
Slst and FO with a long tail for sewing. Sew under round 8. Slightly stuff the nose as you sew it on. Sew the eyes next to the snout.
Arms
Make two with primary color.
R1: 6 sc in mr
R2: (sc, inc) * 3 (9)
R3: 9 sc
R4: (sc, dec) * 3 (6)
FO with a long tail. Stuff and sew under the head.
Legs
Make two with primary color.
R1: 5 sc in mr
R2: 5 inc (10)
Make the bbl with secondary color. These bbl stitches use 4 dc.
R3: 3sc, bbl, sc, bbl, sc, bbl, 2 sc (10)
R4: 10 sc
FO with a long tail. Stuff and sew them aligned with the arms.
Tail
R1: 3 sc in mr with primary color.
R2: 3 inc (6)
R3: 6 sc
R4: 2 sc, 2 inc, 2 sc (8)
R5: 8 sc
R6: 2 sc, (sc, inc) * 2, 2 sc (10)
R7: 10 sc
FO with a long tail. Stuff and sew it on the back of the body.
Horns
Make two with secondary color.
R1: 4 sc in mr
R2-3: 4 sc
FO with a long tail for sewing. Sew them on round 4 of the head.
Ears
Make two with primary color.
R1: 6 sc in mr
R2: (sc, inc) * 3 (9)
R3: (2sc, inc) * 3 (12)
R4: (2sc, dec) * 3 (9)
R5: 9 sc
R6: Make 4 sc through both sides of round 5 to close the ear.
FO and fold round 6 in half when sewing. Sew under the horns.
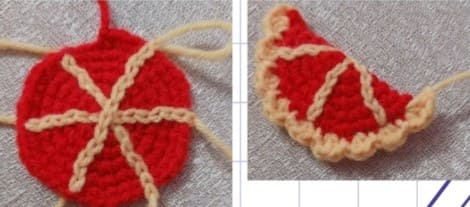
Spikes
Attach secondary color on round 3 at the center of the head in front and make a sc in the same stitch. Make 2 hdc over round 2 right behind the sc and then make 2 dc over round 1.
Continue to work in a straight line across the center of the back. Make a sc over the next round and continue by making (slst, sc, 2 hdc, 2 dc, 2 hdc, sc) * 3.
Then make a sc over the next round, slst over the next round, and to finish it, one more slst over the last round.
FO and hide tail ends.
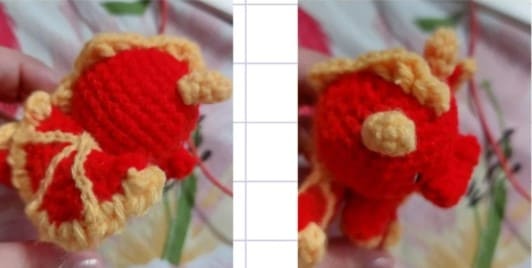
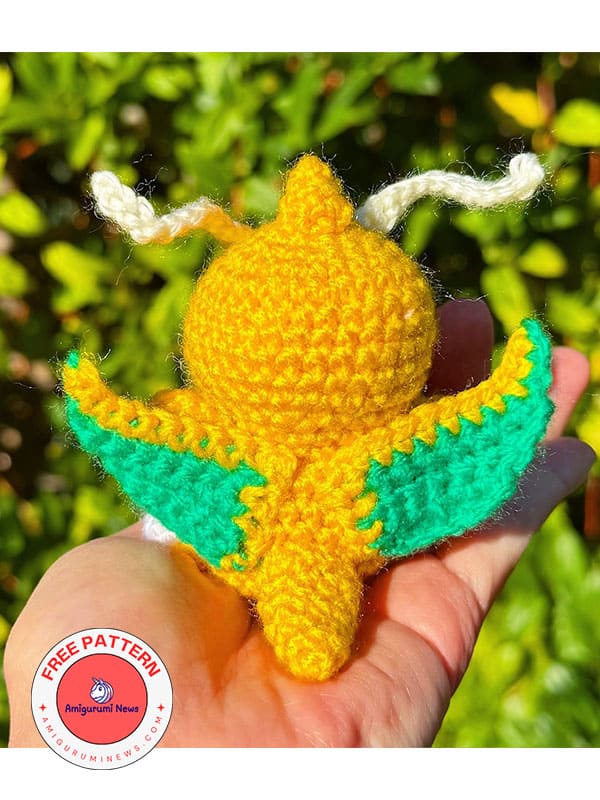
Wing (Version 1)
Ch7 with secondary color (purple in reference photo: make 2)
Row 1: Start in 2nd chain from hook make 6 sc.
Row 2: ch 1, turn, 6 sc
Row 3: ch 3, turn, start in 2nd chain from hook make 8 sc.
Row 4: ch 1, turn, 8 sc
Row 5: ch 3, turn, start in 2nd chain from hook 9 sc, 3 sc in the last stitch and 3 sc across the side.
Slst and FO with a long tail for sewing. Sew on the back of the body.
Wing (Version 2)
R1: 6 sc in mr with primary color (red in reference photo; make 2)
R2: 6 inc (12)
R3: (sc, inc) * 6 (18)
R4: (2sc, inc) * 6 (24)
R5: (3sc, inc) * 6 (30)
R6: (4sc, inc) * 6 (36)
FO (long tail not needed)
Reattach the secondary color yarn at any stitch and place a stitch marker 18 stitches from that stitch. Make surface slip stitches from where you attached the yarn through the center until you reach the stitch marker.
Chain 1 and fasten off (no tail required).
Reattach the yarn 6 stitches from where you previously reattached and mark the 18th stitch from this one with a stitch marker. Repeat the process of making surface slip stitches across.
Repeat the process one more time to have a 3rd line of surface slip stitches.
Fold the semi-circle and we work along both sides of the piece from here. Make sure to keep all the tail ends tucked in.
Chain one and make 3 hdc in the same stitch. (slst in the next stitch, 3 hdc in the next stitch) * repeat till the end (8 times).
FO and hide the tail end.
Cut a piece of primary color yarn and sew them to the body.