Crochet Beautiful Beaver: A Fun and Charming Craft Project

Crochet Beautiful Beaver is an adorable and enjoyable craft project that adds a touch of charm to any space. With its soft, fluffy texture and intricately designed features, the finished product is truly delightful. The process of crocheting the beaver involves using a combination of stitches and techniques that are both fun and rewarding. Whether you're a seasoned crocheter or just starting out, creating a Beautiful Beaver is sure to bring a smile to your face. Don't be surprised if this cute little critter becomes a beloved addition to your home decor or a cherished gift for a loved one. Get ready to embark on a creative journey filled with warmth and creativity as you bring this lovable creature to life through the art of crochet.
Materials Needed
Here’s what you will need for the project:
- Worsted weight yarn in dark brown, light brown, and other colors as needed
- F hook
- Safety eyes
- Black worsted weight yarn for embroidery
- White felt for teeth
- Invisible (clear) thread
Head and Body
Using an F hook and worsted weight yarn in dark brown, follow these instructions:
- Sc6 into a loop
- Sc twice in each st (12 sts)
- Sc1, sc twice into next st* around (18 sts)
- Sc2, sc twice into next st* around (24 sts)
- Sc3, sc twice into next st* around (30 sts)
- Sc4, sc twice into next st* around (36 sts)
- Sc even for 4 rounds
- Sc4, sc2tog (30 sts)
- Sc even for one round
- Sc3, 2tog* around (24 sts)
- Sc2, 2tog* around (18 sts)
- Sc2, sc twice into next st* around (24 sts)
- Sc3, sc twice into next st* around (30 sts)
- Sc4, sc twice into next st* around (36 sts)
- Sc5, sc twice into next st* around (42 sts)
- Sc6, sc twice into next st* around (48 sts)
- Sc even for 6 rounds
- Sc6, sc2tog* around (42 sts)
- Sc5, sc2tog* around (36 sts)
- Break yarn
Bottom
With light brown yarn, follow these steps:
- Sc6 into a circle
- Sc twice in each st (12 sts)
- Sc1, sc twice into next st* around (18 sts)
- Sc2, sc twice into next st* around (24 sts)
- Sc3, sc twice into next st* around (30 sts)
- Sc4, sc twice into next st* around (36 sts)
- Break yarn, leaving long tail to sew with
Muzzle
With light brown yarn, crochet the muzzle by following these steps:
- Ch6, sc into 2nd ch from hook, sc into remaining sts (5 sts)
- Turn, ch1, sc1, sc2 into next st, sc1, sc2 into next st, sc1 (7 sts)
- Turn, ch1, sc2, sc2 into each of the next 3 sts, sc2 (10 sts)
- Continue around and sc into back posts of first row of sts, and sc remaining even (15 sts)
- Sc even for one round
- Break yarn, leaving long tail to sew with
Ears
(Make 2)
- Sc5 in a circle
- Sc twice in each (10 sts)
- Break yarn, fold in half, sew around edges.
Tail
(Make 2)
- Ch 12
- Sc 10, sc 3 times in last st, continue around, sc into the back of each st (23)
- Turn, ch1. Sc 5, sc 2 into next, sc3, sc 2 into next, sc 3, sc2 into next, sc 3, sc2 into next, sc 5 (27)
- Sl st 7, sc2 into one, sc1, sc2 into one, sc1, sc2 into one, sc 3, sc2 into one, sc1, sc 2 into one, sc 1, sc 2 into one, sl st 7 (33)
- Sl st 7, sc 2 (sc 2 into one, sc 2) x5, sl st 7 (38)
- Break yarn and tie off
Limbs
(Make 4)
- Start with light brown yarn and sc 5 in a circle
- Sc twice into each st (10 sts)
- Switch to dark brown, sc into back loops
- Sc even for one round
- Break yarn and tie off
Assembly
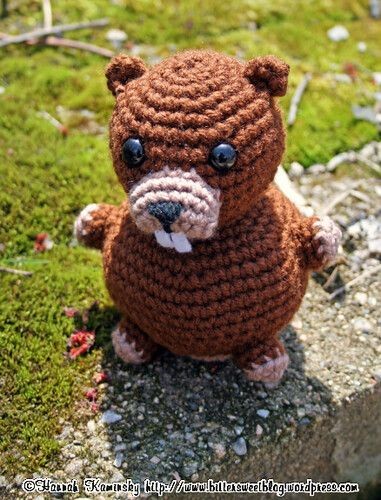
Embroider the muzzle with black worsted weight yarn. Cut small rectangles out of white felt for the teeth and sew them on by hand with invisible (clear) thread. Lightly stuff and sew the muzzle onto the head. Insert safety eyes and secure tightly. Stuff both the head and body with a gentle but firm touch, and sew the bottom to cover the open hole. Tie off and bury the knot.
Embroider one side of the tail as per the picture above, in a grid-like pattern with a mid-tone brown yarn, and sew the two pieces together. Sew the tail to the bottom of the body. Lightly stuff and attach limbs. Press the ears together and sew them on with a slight curve, so that they appear somewhat rounded. Enjoy your new friend, but keep an eye out for flooding!