How to Create a Crochet Snow Doily for Winter Decor

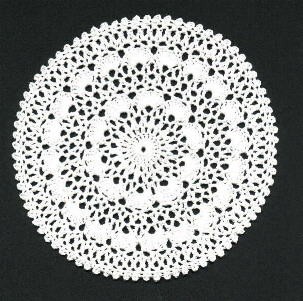
Creating a crochet snow doily is a delightful project that brings a touch of winter wonderland charm into your home decor. The intricate patterns and delicate stitches come together to form a beautiful piece that can be used as a centerpiece on your dining table or displayed on a mantel for a cozy ambiance. The process of crocheting a snow doily is not only enjoyable but also allows you to showcase your creativity and craftsmanship. Whether you are a beginner or an experienced crocheter, the finished doily is sure to impress with its intricate details and festive flair. So grab your crochet hook, some soft white yarn, and let's get crafting a magical snow doily to brighten up your space this winter!
Materials
- Size 10 crochet thread
- Crochet hook size 7
Finished Size
7”
Instructions
Ch 6, join with a sl st to form ring
Round 1
Ch 4 to count as first trc, work 19 more trc in ring; join with a sl st to the top of the ch 4. (20 trc)
Round 2
Ch 1, sc in the same st as joining, (ch 3, sc in the next sc) 19 times, ch 3, join with a sl st to the first sc. (20 ch 3 spaces)
Round 3
Sl st into the first ch 3 sp, ch 2, dc in the next ch 3 space, *ch 3, yo insert hook in the same ch 3 sp, yo pull up a loop, yo pull through 2 loops on hook, yo insert hook in the next ch 3 sp, yo pull up a loop, yo pull through 2 loops on hook, yo pull through 3 remaining loops on hook* Repeat from * to * 18 times; join with a sl st to the first dc (20 ch 3 spaces)
Round 4
Sl st into the first ch 3 space, ch 6 to count as the first dc and the first ch 3, dc in the same ch 3 sp; (dc, ch 3, dc) in each remaining ch 3 sp around; join with a sl st to the 3rd ch of beginning ch 6. (20 ch 3 spaces)
Round 5
Sl st into first ch 3 sp, ch 4 to count as first trc, work 8 more trc in the same ch 3 sp; (sc in the next ch 3 sp, 9 trc in the next ch 3 sp) around, sc in the last ch 3 sp; join with a sl st to the top of the beginning ch 4. (10 shells)
Round 6
*Sc in the next trc, ch 1, skip next trc, sc in the next trc, ch 3, skip next trc, sc in the next trc, ch 1, skip next trc, sc in the next trc, ch 3, skip next (trc, sc, and trc)* Repeat from * to * 9 times; join with a sl st to the first sc. (20 ch 3 spaces and 20 ch 1 spaces)
Round 7
Sl st in the first ch 1 sp, sl st in the next sc, sl st into the next ch 3, ch 1, (sc, ch 3) twice in each ch 3 space around; join with a sl st to the first sc. (40 ch 3 spaces)
Round 8
Repeat round 3, repeating from * to * 38 times. (40 ch 3 spaces)
Round 9
Repeat round 4. (40 ch 3 spaces)
Round 10
Repeat round 5. (20 shells)
Round 11
Repeat round 6, repeating from * to * 19 times. (40 ch 3 spaces and 40 ch 1 spaces)
Round 12
Repeat round 7 (80 ch 3 spaces)
Round 13
Repeat round 3, repeating from * to * 78 times (80 ch 3 spaces)
Round 14
Sl st into the first ch 3 sp, ch 1, sc in the same sp, (ch 2, sc in the next ch 3 sp) around, ch 2; join with a sl st to the first sc.
Round 15
Sl st into the first ch 2 sp, ch 1, sc in the same sp, (ch 3, sc around the post of the sc, sc in the next ch 2 sp) around; join with a sl st to the first sc. (80 picots) Fasten off. Weave in ends.