Craft Your Beautiful Crochet Snowflake Doily

Introduction
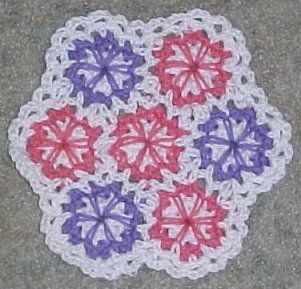
Create a beautiful doily featuring delicate snowflake designs using the art of crochet. This intricate project involves using a small hook and fine yarn to carefully craft each individual snowflake motif. The doily can be made in various sizes, from small coasters to larger table centerpieces, depending on your preference and skill level.
Crocheting a snowflake doily allows you to showcase your creativity and attention to detail, as each stitch contributes to the overall intricate design. Whether you are a beginner or an experienced crocheter, this project offers a fun and rewarding way to add a touch of winter charm to your home decor.
The finished doily can be displayed on tables, shelves, or even framed as a decorative wall hanging. Crochet snowflake doilies also make thoughtful handmade gifts for friends and family, showcasing your talent and thoughtfulness. So grab your crochet hook, pick out your favorite yarn, and get ready to create a stunning snowflake doily that will add a touch of elegance to any room in your home.
Specifications
9½" Diameter
Materials
- Red Heart Super Saver - 4 ply WW Yarn (Multiple Colors)
- Hook Size G
- Stitches: ch, sc, lsc, sl st.
Technique Overview
lsc: Insert hook in indicated stitch, yo, draw a loop through (2 loops on hook), yo, draw through both loops on the hook.
This is the same as a regular single crochet stitch... but it's worked into a stitch below the normal working row.
Difficulty: MEDIUM
Pattern Instructions
Row 1
With White, Ch2, (Sc, ch1) 6 times in 2nd ch from hook.
Join with sl st in 1st sc. -Right Side-
Row 2
Ch1, turn. (Sc, ch2, sc) in each ch1 sp. Join with sl st. -Wrong Side-
Row 3
Change colors, with right side facing, join new color in any ch2 sp.
* (Sc, ch2, sc) in ch2 sp. Ch1, lsc in center, ch1. Rep from * around.
Join with sl st in 1st sc.
Joining Motifs
With White, working back and forth between motifs in only the ch2 sp and the lsc sts.
Sc in one ch2 sp on the first motif, ch1.
Sc in ch2 sp on the second motif, ch1.
Sc in lsc on first motif, ch1.
Sc in lsc on second motif, ch1.
Sc in next ch2 sp on first motif, ch1.
Sc in next ch2 sp on 2nd motif, ch1.
Keep working in the same manner until all motifs are joined as shown in the picture above.
Border Instructions
Row 1
With white, working around the entire piece. *Sc in next ch2 sp or lsc. Ch2, Rep from * around.
Row 2
Do not turn. (Sc in next ch3 sp, ch3) around. Join with sl st.
Fasten off.