How to Make Crochet Pot Holders: A Comprehensive Guide

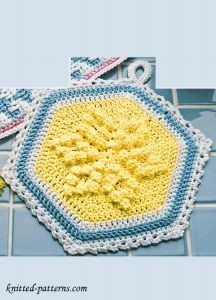
Crochet pot holders are not only functional but also a delightful addition to any kitchen! The intricate designs and vibrant colors that can be achieved through crochet make each pot holder a unique and charming piece. Whether you're displaying them as kitchen decor or using them to protect your hands from hot pots and pans, these handmade creations add a touch of warmth to your cooking space. The beauty of crochet pot holders is that they can be customized to match your kitchen's theme or to reflect your personal style. So, why not treat yourself to a few handmade crochet pot holders and bring a cozy and inviting vibe into your culinary haven?
Finished Measurement
8 inches across, excluding hanging loop
Materials
- Size 3 crochet cotton: 1 ball each yellow, blue and white
- Size F/5/3.75mm crochet hook or size needed to obtain gauge
- Tapestry needle
Gauge
9 double crochets (dc) = 2 inches; 5 dc rows = 2 inches
Pattern Notes
Weave in loose ends as work progresses.
Join with slip stitch as indicated unless otherwise stated.
Chain-3 at beginning of round counts as first double crochet unless otherwise stated.
Special Stitches
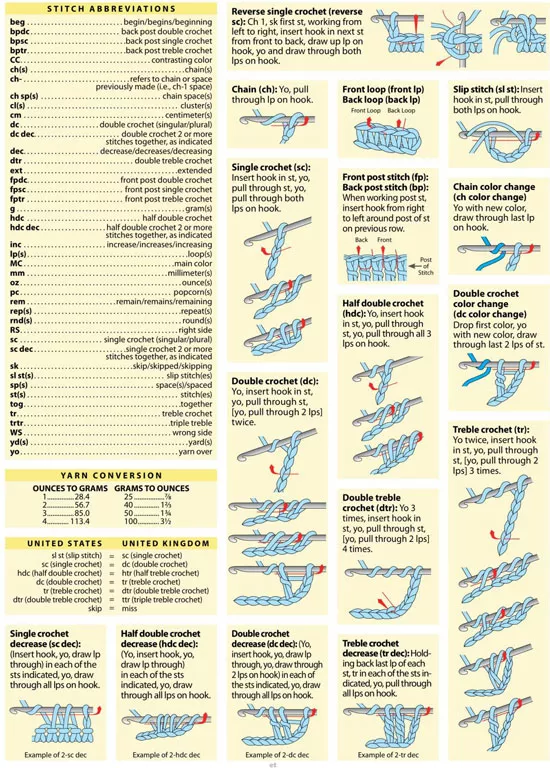
Beginning Popcorn (beg pc)
Ch 3, 4 dc in indicated stitch, drop loop from hook, insert hook in 3rd ch of beg ch-3, pull dropped loop through.
Popcorn (pc)
5 dc in indicated stitch, drop loop from hook, insert hook in first stitch of 5-dc group, pull dropped loop through.
Single Crochet Join (sc join)
Place slip knot on hook, insert hook in indicated stitch, yarn over and pull up a loop, yarn over and draw through both loops on hook.
Pot Holder
Front
Rnd 1 (RS): With yellow, ch 4, 11 dc in 4th ch from hook (3 skipped chs count as first dc), join in top of beg ch-3. (12 dc)
Rnd 2: Beg pc in first stitch, 3 dc in next stitch, [pc in next stitch, 3 dc in next stitch] around, join in beg pc. (18 dc, 6 pc)
Rnd 3: Ch 3, pc in next stitch, 3 dc in next stitch, pc in next stitch, [dc in next stitch, pc in next stitch, 3 dc in next stitch, pc in next stitch] around, join in top of beg ch-3. (24 dc, 12 pc)
Rnd 4: Ch 3, dc in next stitch, pc in next stitch, 3 dc in next stitch, pc in next stitch, [dc in each of the next 3 stitches, pc in next stitch, 3 dc in next stitch, pc in next stitch] around to last stitch, dc in last stitch, join in top of beg ch-3. (36 dc, 12 pc)
Rnd 5: Ch 3, *pc in next stitch, dc in each of next 2 stitches, 3 dc in next stitch, dc in each of next 2 stitches, pc in next stitch, dc in next stitch, repeat from * around, ending last repeat at **, join in top of beg ch-3. (48 dc, 12 pc)
Rnd 6: Beg pc in first stitch, dc in each of next 4 stitches, 3 dc in next stitch, dc in each of next 4 stitches, [pc in next stitch, dc in each of next 4 stitches, 3 dc in next stitch, dc in each of next 4 stitches] around, join in top of beg pc. (66 dc, 6 pc)
Rnd 7: Ch 3, dc in each of next 5 stitches, 3 dc in next stitch, [dc in each of next 11 stitches, 3 dc in next stitch] 5 times, dc in each of last 5 stitches, join in top of beg ch-3. Fasten off. (84 dc)
Rnd 8: With RS facing, join white in first stitch, ch 3, dc in each of next 6 stitches, 3 dc in next stitch, [dc in each of next 13 stitches, 3 dc in next stitch] 5 times, dc in each of last 6 stitches, join in top of beg ch-3. Fasten off. (96 dc)
Rnd 9: With RS facing, join blue in first stitch, ch 3, dc in each of next 7 stitches, 3 dc in next stitch, [dc in each of next 15 stitches, 3 dc in next stitch] 5 times, dc in each of last 7 stitches, join in top of beg ch-3. Fasten off. (108 dc)
Back
Rnd 1: With blue, ch 4, 11 dc in 4th ch from hook (3 sk chs count as first dc), join in top of beg ch-3. (12 dc)
Rnd 2: Ch 3, 3 dc in next stitch, [dc in next stitch, 3 dc in next stitch] around, join in top of beg ch-3. (6 groups of 3 dc, 6 dc)
Rnds 3-9: Ch 3, dc in each stitch around with 3 dc in center stitch of each 3-dc group, join in top of beg ch-3.
At end of last rnd, fasten off. (6 groups of 3 dc, 90 dc)
Border
Rnd 1 (RS): Holding Front and Back wrong sides together with Front facing, matching stitches, working through both thicknesses, sc join white in center stitch of any 3-dc group, sc in same stitch, sc in each stitch around with 3 sc in center stitch of each 3-dc group, sc in same stitch as first sc, join in beg sc. (120 sc)
Rnd 2: Ch 1, sc in each of first 2 stitches, turn, for hanging loop, (sl st, ch 10, sl st) in next stitch, turn, ch 1, 20 sc in ch-10 space just made, sl st in next stitch, [sc in next stitch, ch 3, skip next stitch] 9 times, (sc, ch 3, sc) in next stitch, *ch 3, skip next stitch, [sc in next stitch, ch 3, skip next stitch] 9 times, (sc, ch 3, sc) in next stitch, repeat from * 3 times, [ch 3, skip next stitch, sc in next stitch] 9 times, sc in last stitch, join in beg sc. Fasten off.