How to Make a Crochet Honey Pot

Oh, the Crochet Honey Pot is simply adorable! It's a delightful addition to any kitchen or dining room, adding a touch of sweetness and charm to the space. The intricate crochet design gives it a cozy feel, making it perfect for storing honey or even small trinkets. Imagine dipping a spoon into the honey pot on a lazy Sunday morning, spreading that golden goodness on a warm slice of toast – pure bliss! Its whimsical design is sure to bring a smile to your face whenever you use it. So go ahead, treat yourself to this lovely crochet honey pot and add a sprinkle of sweetness to your day!
Materials
- Crochet hook size E/4
- Worsted weight acrylic yarn in tan, yellow and black
- Tapestry / yarn needle
- Polyester stuffing
- White felt
- DMC/embroidery floss in black and white
- Sewing needle
- * Optional – pinking shears for crinkled edge around label.
You’ll Need to Know How to Do These Stitches
- Chain (ch)
- Double loop start
- Single crochet (sc)
- Single crochet together/ decrease
Honey Pot
Outer Shell:
with yellow yarn
Rnd 1: 6 sc into a double loop start and pull the loop closed (6).
Rnd 2: 2 sc in each sc around (12).
Rnd 3: [Sc in next sc, 2 sc in next sc] 6 times (18).
Rnd 4: [Sc in next 2 sc, 2 sc in next sc] 6 times (24).
Rnd 5: [Sc in next 3 sc, 2 sc in next sc] 6 times (30).
Rnd 6: [Sc in next 4 sc, 2 sc in next sc] 6 times (36).
Rnd 7: working in back loops only, [Sc in next 5 sc, 2 sc in next sc] 6 times (42).
Rnds 8-16: sc in each sc around (42).
Rnd 17: [Sc in next 5 sc, sc2tog] 6 times (36).
Rnd 18: sc in each sc around (36).
Rnd 19: sl st in each sc around (36). Finish off.
Inner Shell:
Rnd 1: 6 sc into a double loop start and pull the loop closed (6).
Rnd 2: 2 sc in each sc around (12).
Rnd 3: [Sc in next sc, 2 sc in next sc] 6 times (18).
Rnd 4: [Sc in next 2 sc, 2 sc in next sc] 6 times (24).
Rnd 5: [Sc in next 3 sc, 2 sc in next sc] 6 times (30).
Rnd 6: [1 sc in next 2 sc, 2 sc in next sc] 10 times (40).
Rnds 7-13: sc in each sc around (40).
Rnd 14: [1 sc in next 2 sc, sc2tog] 10 times (30).
Finish off leaving a 12" tail for sewing.
Label
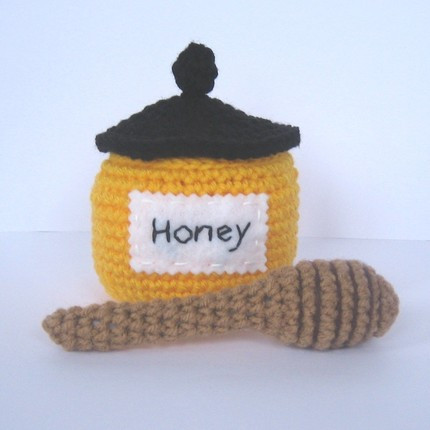
:Cut a piece of white felt that is approximately 3” by 2” (I used pinking shears to get the crinkled edge). Using black DMC/embroidery floss and a sewing needle, stitch the word “Honey” onto the felt as shown in the picture. Stitch the label onto the outer shell using a 12” length of white DMC/embroidery floss and a sewing needle.
Insert inner shell into outer shell. Using a length of yellow yarn and a yarn/tapestry needle, tack the bottom center of the inner shell to the bottom center of the outer shell. Using the tail you finished the inner shell with and a tapestry needle, sew Rnd 14 of inner shell to Rnd 17 of outer shell. Weave in ends.
Lid
:With black yarn
Rnd 1: 6 sc into a double loop start and pull the loop closed (6).
Rnd 2: 2 sc in each sc around (12).
Rnd 3: [Sc in next sc, 2 sc in next sc] 6 times (18).
Rnd 4: [Sc in next 2 sc, 2 sc in next sc] 6 times (24).
Rnd 5: [Sc in next 3 sc, 2 sc in next sc] 6 times (30).
Rnd 6: [Sc in next 4 sc, 2 sc in next sc] 6 times (36).
Rnd 7: [Sc in next 5 sc, 2 sc in next sc] 6 times (42).
Rnd 8: sl st in each sc around (42).
Knob:
With black yarn
Rnd 1: 6 sc into a double loop start and pull the loop closed (6).
Rnd 2: [1 sc in next sc, 2 sc in next sc] 3 times (9).
Rnd 3: [1 sc in next sc, sc2tog] 3 times (6).
Finish off leaving a 12" tail. Weave tail through remaining 6 sts and pull up firmly to close hole. Sew to top center of lid. Weave in ends.
Lip:
With black yarn
ch 30, join to first ch with a sl st to form a loop.
Sc in each ch around.
Finish off leaving a 12" tail for sewing.
Sew top edge of lip around the underside of lid at Rnd 5. This will create a “lip” that will extend approx ½” from the bottom of the lid that will fit inside the honey pot when the lid is put on the pot.
End Cap:
With black yarn
Rnd 1: 6 sc into a double loop start and pull the loop closed (6).
Rnd 2: 2 sc in each sc around (12).
Rnd 3: [Sc in next sc, 2 sc in next sc] 6 times (18).
Rnd 4: [Sc in next 2 sc, 2 sc in next sc] 6 times (24).
Rnd 5: [Sc in next 3 sc, 2 sc in next sc] 6 times (30).
Finish off leaving a 12" tail for sewing. Sew cap to lip about 3/4 of the way around, stuff lightly with polyfil and continue to sew closed. Weave in ends.
Dripper
With tan yarn
Rnd 1: 6 sc into a double loop start and pull the loop closed (6).
Rnd 2: 2 sc in each sc around (12).
Rnd 3: [Sc in next sc, 2 sc in next sc] 6 times (18).
Rnd 4: Sc in each sc around (18).
Rnd 5: [Sc in next 5 sc, 2 sc in next sc] 3 times (21).
Rnd 6: [Sc in next 5 sc, sc2tog] 3 times (18).
Rnd 7: Sc in each sc around (18).
Rnd 8: [Sc in next sc, sc2tog] 6 times (12).
Rnd 9: Sc in each sc around (12). Stuff.
Rnd 10: [sc2tog] 6 times (6).
Rnds 11-22: Sc in each sc around (6).
Finish off leaving a 6” tail. Stuff handle. Weave tail through remaining 6 sts and pull up firmly to close hole. Weave in ends.