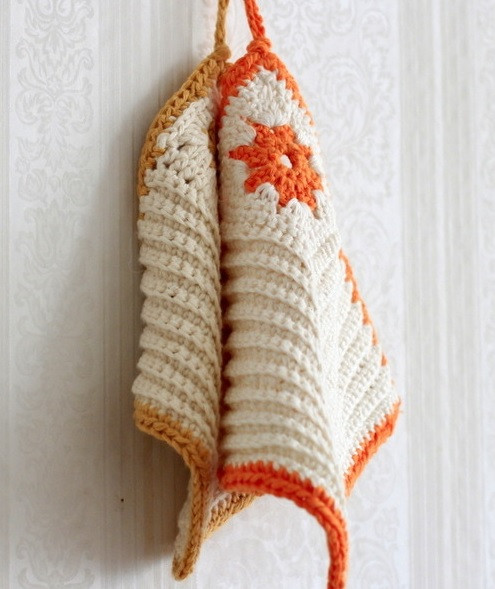
How to Crochet a Beautiful Flower Pot Holder

Susan
Mar 09, 2021 10:47 PM
You’ll Need:
2 colors of 100% cotton yarn;
Crochet hook 3.5 mm or 4 mm.
Instructions
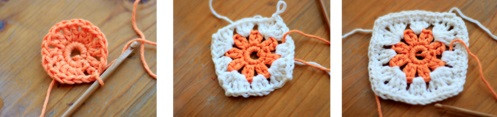
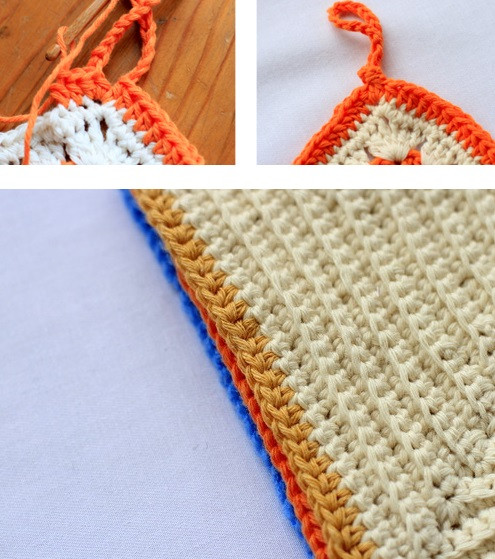
Start by making the flower in your bright colour.
Ch 6, join with ss to first ch to make a loop.
Row 1
: Ch 1, 7 sc into the hole, ss into first stitch. 8 stitchesRow 2
: Ch 2, 1 dc into same stitch, *ch 1, 2 dc into one stitch* 7 times, ch 1 then join with ss to first chain. 8 groups of 2 dc.Change to white.
Row 3
: Make into a granny square by stitching into the gaps between each group of 2 petals: (1st gap) Ch 2, 2 dc into first gap, ch 1, (2nd gap) 3 dc into next gap, ch 1, (3rd gap) 3 dc into next gap, ch 2 (corner), 3 dc into same gap, ch 1, (4th gap) 3 dc, ch 1, (5th gap) 3 dc, ch 2 (corner), 3 dc into same gap, ch 1, (6th gap) 3 dc, ch 1, (7th gap) 3 dc, ch 2 (corner), 3 dc into same gap, ch 1, (8th gap) 3 dc, ch 1 (1st gap) 3 dc into the gap you started with, ch 2 then join to top of first cluster of three. This means that you finish in the corner.Row 4
: Ch 1, then sc all the way around, putting 3 sc into each of the corner stitches.Now to start just stitching 2 sides to build up the rest of the holder.
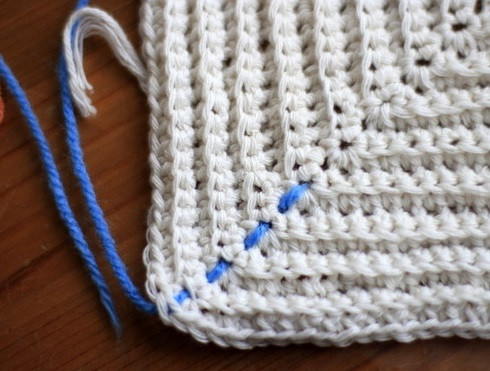
Row 5
: In the same anti-clockwise direction, stitch into the back of each of the first side of stitches (12 stitches), then 3 sc into the corner stitch to turn the right angle, then 12 sc into the back of the next side of stitches.Row 6
: Turn piece over, ch 1, then stitch into the back 13 stitches until you reach the corner, 3 sc into corner stitch then another 13 stitches to the end.You will probably need a stitch marker or piece of contrasting yarn to tell you which is the middle stitch. It’s harder to make out than it sounds, especially if you’re good at losing count like me.
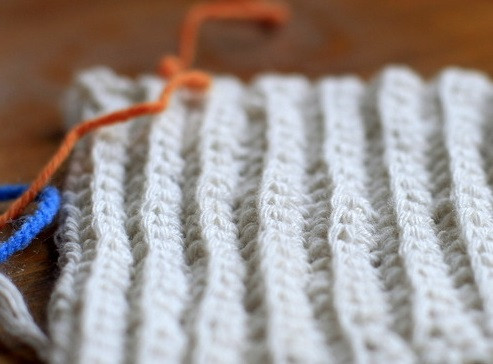
Rows 7 - 22
: Carry on until your piece measures around 15 cm. Crocheting into the back of each stitch gives you the lovely rib effect.And stitching 3 times into the corner stitch not only increases your piece, but gives you the wonderful right angle diagonally through your piece.
Final Row
: Once you’re done with the white, switch back to your colour and hdc all the way around the edge. When you reach the corner with the flower, stop and chain 30 then carry on. This will give you a loop to hang the pot holder by. Tie a little knot to neaten it up.Once you have stitched all the way around, fasten off and sew in your ends.
No comments
Write a comment