How to Crochet a Lucky Cat Key Chain for Good Fortune

Introduction
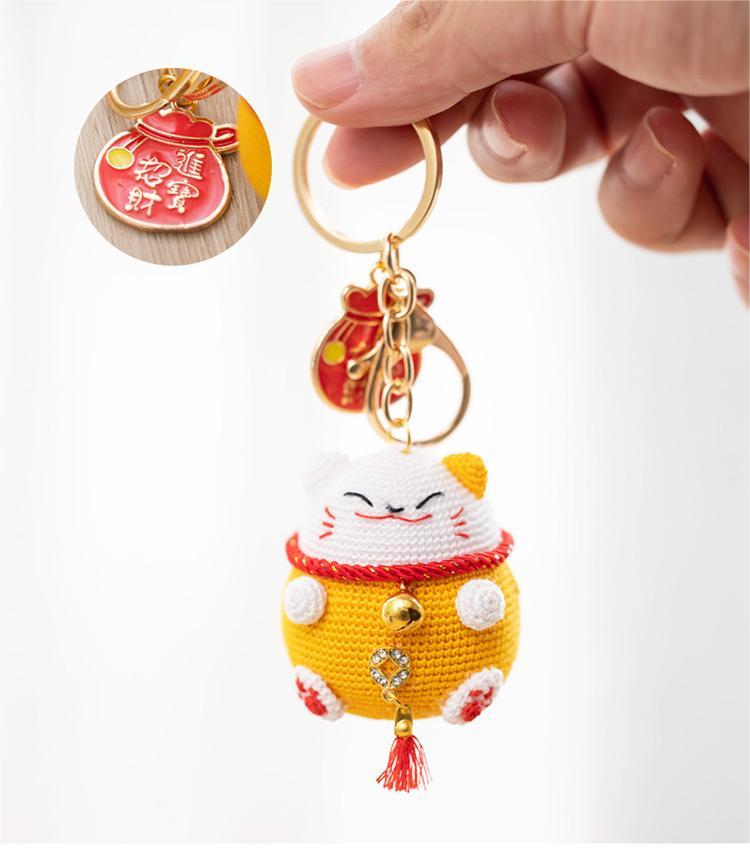
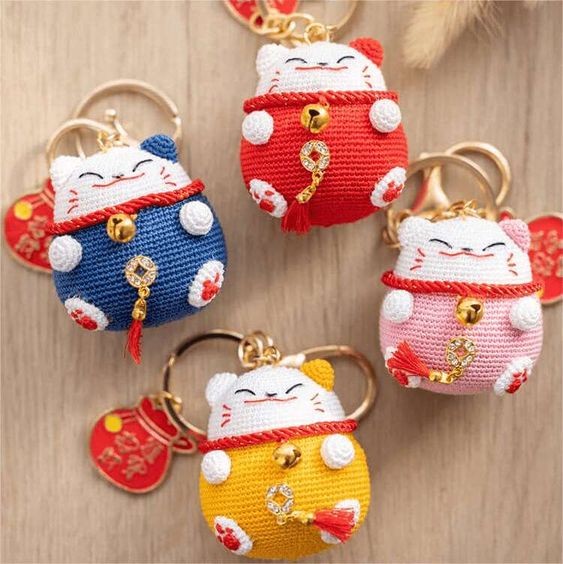
Are you looking for a fun and creative way to add a touch of luck to your everyday life? Look no further than the magical world of crochet! With just a few simple stitches and some colorful yarn, you can create your very own Lucky Cat Key Chain that will bring good fortune wherever you go. This delightful project allows you to unleash your creativity and create a one-of-a-kind piece that will make you smile every time you see it. Hang it on your keys, backpack, or even use it as a zipper pull on your favorite bag.
Materials Required
- Lace Thread
- Crochet Needle
- Stuffing Cotton
- Bell
- Red Rope
- Key Ring
- Tassel
- Lucky Bag Pendant
Finished Size
Height: 4.5cm
Needle Instructions
- sc = single crochet
- inc = increase
- dec = decrease
Creating the Parts of the Lucky Cat
Ears (x2)
Make one with white and the other one with red color.
Rnd 1: 6 sc in MR
Rnd 2: (1 sc, 1 inc) x 3 (9)
Rnd 3: (1 sc, 1 inc, 1 sc) x 3 (12)
Rnd 4: (3 sc, 1 inc) x 3 (15)
Slip stitch to finish and leave a long end for sewing
Arms (x2)
Make with white color.
Rnd 1: 6 sc in MR
Rnd 2: 6 inc (12)
Rnd 3: (1 sc, 1 inc) x 6 (18)
Rnd 4: 18 sc (18)
Rnd 5: (1 sc, 1 dec) x 6 (12)
Fasten off, cut the yarn leaving a long tail for sewing. Stuff the detail.
Legs (x2)
Make with white color.
Rnd 1: 6 sc in MR
Rnd 2: 6 inc (12)
Rnd 3-7: 12 sc (12)
Rnd 8: 6 dec (6)
Fasten off and weave in end
Paws (x2)
Make with red color.
Rnd 1: 6 sc in MR
Fasten off and weave in end
Head
Make with white color.
Rnd 1: 8 sc in MR
Rnd 2: 8 inc (16)
Rnd 3: (1 sc, 1 inc) x 8 (24)
Rnd 4: (3 sc, 1 inc) x 6 (30)
Rnd 5: (2 sc, 1 inc, 2 sc) x 6 (36)
Rnd 6: (5 sc, 1 inc) x 6 (42)
Rnd 7: (3 sc, 1 inc, 3 sc) x 6 (48)
Rnd 8: (7 sc, 1 inc) x 6 (54)
Rnd 9: (4 sc, 1 inc, 4 sc) x 6 (60)
Rnd 10: (9 sc, 1 inc) x 6 (66)
Rnd 11-12: 66 sc (66)
Rnd 13: (5 sc, 1 inc, 5 sc) x 6 (72)
Rnd 14-16: 72 sc (72)
Rnd 17: (5 sc, 1 dec, 5 sc) x 6 (66)
Body
Make with red color.
Rnd 18: 66 sc (66)
Rnd 19: (5 sc, 1 inc, 5 sc) x 6 (72)
Rnd 20: (11 sc, 1 inc) x 6 (78)
Rnd 21: (6 sc, 1 inc, 6 sc) x 6 (84)
Rnd 22: (13 sc, 1 inc) x 6 (90)
Rnd 23-32: 90 sc (90)
Rnd 33: (13 sc, 1 dec) x 6 (84)
Rnd 34: (6 sc, 1 dec, 6 sc) x 6 (78)
Rnd 35: 78 sc (78)
Rnd 36: (11 sc, 1 dec) x 6 (72)
Rnd 37: (5 sc, 1 dec, 5 sc) x 6 (66)
Rnd 38: (9 sc, 1 dec) x 6 (60)
Rnd 39: (4 sc, 1 dec, 4 sc) x 6 (54)
Rnd 40: (7 sc, 1 dec) x 6 (48)
Rnd 41: (3 sc, 1 dec, 3 sc) x 6 (42)
Rnd 42: (5 sc, 1 dec) x 6 (36)
Rnd 43: (2 sc, 1 dec, 2 sc) x 6 (30)
Stuff the detail.
Rnd 44: (3 sc, 1 dec) x 6 (24)
Rnd 45: (1 sc, 1 dec, 1 sc) x 6 (18)
Rnd 46: (1 sc, 1 dec) x 6 (12)
Rnd 47: 6 dec (6)
Fasten off and weave in end
Creating the Expression
- Eyes and Nose
- Eyes are embroidered with black yarn, the needle is pierced from the side of the body and threaded out between 9-10 circles.
- Count 5 stitches to the left and thread between 10-11 circles.
- Do not pull the line too tightly, leave the line of the eye arc.
- Thread out 2 stitches from the left, and 2 stitches in and sew out the nose thread.
- Thread out at 2 stitches, then thread in between 9-10 stitches at 5 stitches, and then sew out the side of the body and sew out the other eye without pulling the thread too tightly.
- After sewing, pick the glue with the tip of the needle and apply it to the thread. The eyes and nose are shaped and glued.
- Mouth
- Thread the red thread into the head from the side, and pierce it from the middle under the nose between 11-12 circles.
- Count 5 to the right and thread the needle into the head.
- Count 5 stitches to the left from the middle of the mouth and thread it out.
- Insert the needle through the middle of the mouth, and then pass it out from the side.
- Needle-point pick glue is applied to the wire, shaped and glued.
- Finish.
- Beard
- The first beard is pierced 5 stitches from the edge of the mouth between the 11-12 circles.
- Count 2 stitches to the right and thread in from 12-13 circles.
- The second beard comes out between the 13-14 circles, the position to the left of the first one edge alignment.
- Count 2 stitches to the right and thread in the same circle.
- The third beard is pierced between 15-16 circles, and the position is the left side of the previous one align the edges, and then count to the right and insert 2 stitches between 14-15 circles.
- Left beard done.
- Symmetrical position of the right beard embroidered.
- The end of the thread is knotted and tucked into the body.
Assembling the Lucky Cat
- The ears are sewn on both sides of the head by rolling needles, between 5-6 circles to 11-12 circles.
- Use the method of rolling needles to sew between 21-22 circles to 24-25 circles of the main body, in a straight line with the beard, one on the left and one on the right.
- The feet are glued between 30-31 and 36-37, slightly inclined in line with the hand.
- For the collar, take the length of the red rope around the junction of the head and the body.
- Connect the ends of the wires together with a wire to make a coil.
- The loop is sewn at the junction of the head and the body with a plain stitch.
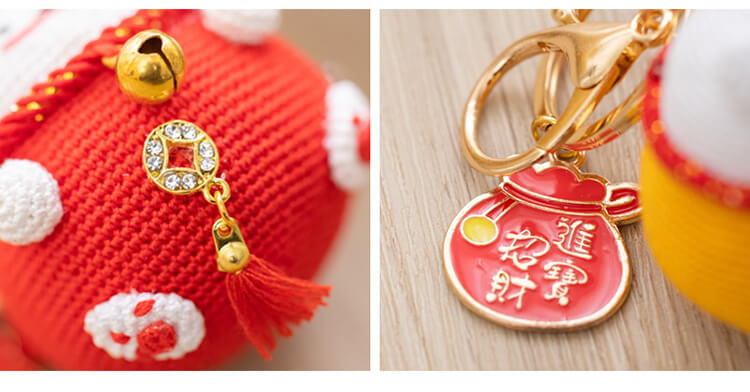
- Sew the bell on the collar when it is sewn to the middle of the mouth.
- Continue to sew the loop and body to completion.
- The copper coins are decorated and glued to the center of the body.
Final Steps
- Press the key ring to install the key ring, and use the needle to repeatedly pierce the needle several times at the position of the needle ring to make the needle hole of the knitting piece larger.
- Install the connecting ring on the needle ring.
- Put the connecting ring on the keychain, and merge the opening of the connecting ring.
- Take another connecting ring to connect the lucky bag pendant and key ring.