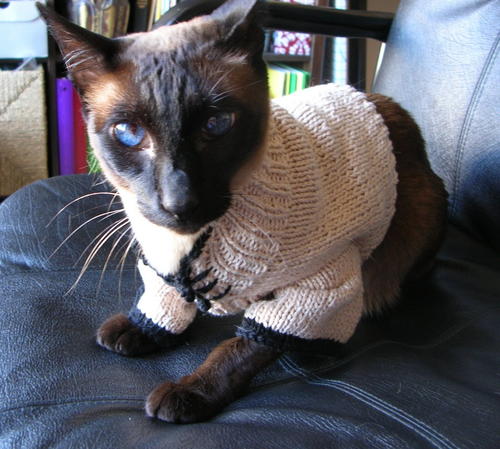
How to Knit a Stylish Cat Sweater

Susan
Dec 29, 2019 12:40 AM
Yarn
Louisa Harding Nautical Cotton, 2 skeins of Sand (MC) and 1 skein of black (CC)
Needles
US 5 (for ribbing) and US 6 straight needles, US 5 dpns, size G crochet hook
Gauge
~5.5 sts per inch on #6 needles
Sizing
I sized this sweater based on the following measurements of my cat. I suggest taking the same measurements and keeping them handy. I will point out where in the pattern you should make adjustments based on the size of your cat.
- A (neck circumference): 8.5"
- B (chest span): 4.5"
- C (body length): ~12"
Instructions
Back
- CO 47 sts in MC on #5 needles (Adjust for measurement A HERE)
- Work 1x1 rib for two rows
- On the next row, CO 1 st at the beginning of the row using the cable cast-on method and continue in 1x1 rib to the end of the row
- Repeat last row 3 times
- Work in 1x1 rib until the piece measures 2.25"
- Switching to #6 needles, continue in St st for 1.5" (from the end of ribbing)
- On RS, k1, ssk, knit to last 3 sts, k2tog, k1
- On WS, continue in St st
- Repeat the last 2 rows once
- Work 4 rows of St st
- On RS, k1, M1R, knit until last 2 sts, M1L, k1
- On WS, continue in St st
- Repeat the last 2 rows once (the armscyes should measure 2")
- Continue in St st until the piece measures 8" from the cast-on edge (Adjust for measurement C HERE)
- Switching to #5 needles, work 1x1 rib for 4 rows
- Bind off in pattern
Front
- With #5 needles, CO 3 sts of MC
- Work 1 row in 1x1 rib (knit, purl, knit)
- On the next row, increase in the following manner: k1, M1R, *p1,* M1L, k1
- Continue increasing in this manner (working the increases one stitch in from the left and right edges and continuing in 1x1 rib for the rest of the row, between the two *) on EVERY row until the piece is 4.5" wide (it should measure 1.5" long) -- Adjust for measurement B HERE, working in more or fewer increases.
- Continue in 1x1 rib until the piece is 5.5" from the CO edge (or length of Back between neck ribbing and bottom edge ribbing)
- Switch the "direction" of the ribbing (knit the purl sts and purl the knit sts) and work 4 rows of this reversed 1x1 rib
- Bind off in pattern
Seaming
- Seam together the neck edges (the 2.5" of ribbing at the top of the back), starting at the 6th row, i.e. after the shaping)
- Seam front and back edges together to the top of armscyes (1.5")
- Seam front and back edges together below the armscyes to the bottom
Sleeves
- Using #5 dpns, pick up and knit 25 sts around the armscye in MC, starting at the bottom join
- Knit one round, placing a marker to signify beginning of the round
- On the next round, k to last 2 sts, M1R, k1, slip marker, M1L
- Repeat last 2 rounds 8 times
- Knit 3 rounds of MC
- Knit 3 rounds of CC
- Bind off
- Repeat for second sleeve
Embellishment
- Using size G crochet hook and with RS facing, work one row of single crochet in CC around bottom and top edges, being careful on the top to maintain the shaping of the neck
- For the "clasps", you may have a better idea, but this is what I did: I cut a piece of yarn ~5" long and tied a bunch of knots in it until it was the right size. I then placed the big knot on the neck seam where I wanted it and threaded the yarn ends through the neck, about 1/2" out from the seam on either side. I then tied the ends in the back of the work and repeated twice more.
4 comments
Write a comment

Annabelle
Dec 29, 2019 09:17 AM
My favourite cat's breeding
Reply

Annabelle
Dec 29, 2019 09:25 AM
I want this sweater for my cat
Reply

Annie
Dec 29, 2019 09:49 AM
Oh, what a cute sweater, but my cat won't allow me to put it on
Reply
Susan
Jan 01, 2020 10:54 AM
I hope, that you manage to do it! 
Reply