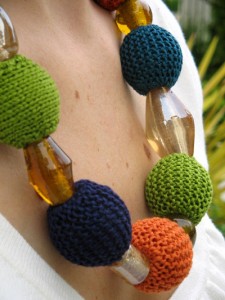
Detailed Instructions for Creating a Beaded Necklace


Finished Measurements
Necklace Length: 21 inches
Each Large Bead: 1 inch diameter
Materials
DMC Embroidery Floss [100% cotton; 8.7 yd/8m per skein]
- [A] 470; 2 skeins
- [B] 823; 1 skein
- [C] 921; 2 skeins
- [D] 3808; 2 skeins
Note: Each bead uses one skein of embroidery floss.
- 1 set US #0/2 mm straight needles
- 4 floss bobbins
- 7 x 1-inch round wooden beads
- Sewing needle
- 1 yd .375 inch wide ribbon (buy more ribbon if you would like a longer necklace)
- 6 large glass beads
- Toggle clasp
- 2 large jump rings
- Sewing thread in same color as ribbon
- Needle-nose pliers
Gauge
44 sts/50 rows = 4 inches in stockinette stitch
Pattern Notes
Garter stitch is more elastic than stockinette stitch. For this reason, more stitches are cast on and more rows are worked for the stockinette stitch bead than for the garter stitch bead.
Before working each bead, wind the skein of floss you will use onto a bobbin. This will help prevent your floss from becoming twisted.
Directions
Garter Stitch Bead [Make one each in A, B, C and D]:
CO 12 sts.
K 1 row.
Next Row: BO 1, k to last st, kfb.
Repeat this row until work measures 2.75 inches.
BO all sts. Break floss, leaving a long (10-12 inch) tail for seaming.
Stockinette Stitch Bead [Make one each in A, C and D]:
CO 13 sts.
K 1 row.
Row 1: BO 1, p to last st, kfb.
Row 2: BO 1, k to last st, kfb.
Repeat these 2 rows until work measures 3 inches.
BO all sts. Break floss, leaving a long (10-12 inch) tail for seaming.
Finishing
With wrong sides together, sew CO and BO edges together. Turn work right side out.
Thread floss through the ridges created by binding off and increasing. Pull tight so that the size of the hole created is the same as the size of the hole in the bead. Sew to secure. Place bead inside work, so that the hole of the bead lines up with the hole at the bottom of the knitted piece. Finish the remaining opening of the knitted piece in the same manner, and sew in ends.
Use pliers to attach a jump ring to each end of the toggle clasp. Determine the arrangement of beads and string onto the ribbon.
Center beads on ribbon so that the tails at each end are of equal length. Tie a knot at each end, close to the end beads. Cut the ribbon to 1 inch longer than desired finished length.
Thread each ribbon end through a jump ring. Fold each over twice, so that no raw edge. Sew ribbon ends in place.
