Ultimate Crochet Doll Pattern and Instructions
Finish Size
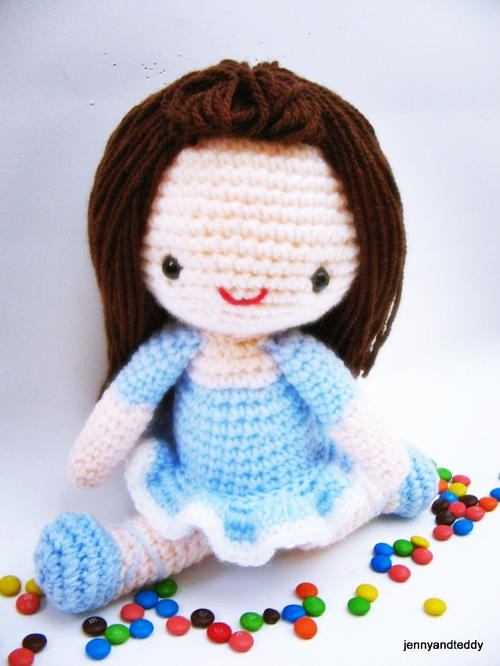
Approximately 7.5-8 inch tall
Size varies depending on the size of yarn and crochet hook.
Materials
To make you will need:
- Acrylic yarn, for this pattern, I normally used 8 ply
- Plastic eyes with safety backing 7.5mm (you can find it at any craft shop)
- Polyester fiberfill for stuffing
- Sewing yarn needle and embroidery
- Ribbon or button
- Crochet hook size 1.25mm and craft glue
Note
For the size of the crochet hook, it really does not matter. The doll design will work just fine with different sizes of crochet hooks; only the end size of the creation will differ slightly.
In this pattern, you will be working in the round continuously; you may use a contrasting colour short piece of yarn to mark the beginning of each round. When you end a round, do not join at the end of each round; you will begin the second round in the next stitch.
At the end of each round, I have given the number of stitches you should have. If you are off by 1 or 2 stitches, do not worry about it.
Skills and Abbreviations
You will need to know how to make a magic ring or adjustable ring.
- Single crochet (sc)
- Crochet increase (inc) - make 2 single crochet in the same stitch
- Crochet decrease (dec) - crochet 2 stitches together
- Stitch (st)
- * = Repeat stitches from * to the end of *
- Chain (ch)
- Slip stitch (sl st)
- Change colour
- blo - back loop only
- flo - front loop only
Working the Doll
You will work from top to bottom.
Round Instructions
- Round 1: Make magic ring and 8 sc in ring (8)
- Round 2: 2 sc in each st around (16)
- Round 3: *sc in next st, 2 sc in next st* and repeat from * around (24)
- Round 4: *sc in next 2 st, 2 sc in next st* and repeat from * around (32)
- Round 5: *sc in next 3 st, 2 sc in next st* and repeat from * around (40)
- Round 6: *sc in next 4 st, 2 sc in next st* and repeat from * around (48)
- Round 7-16: sc in each st around (48)
- Round 17: *sc in each of next 6 st, dec 1* and repeat from * around (42)
- Round 18: *sc in each of next 5 st, dec 1* and repeat from * around (36)
- Round 19: *sc in each of next 4 st, dec 1* and repeat from * around (30)
- Round 20: *sc in each of next 3 st, dec 1* and repeat from * around (24)
- Round 21: *sc in each of next 2 st, dec 1* and repeat from * around (18)
- Round 22: *sc in next st, dec 1* and repeat from * around (12), then finish off and leave a long tail for sewing and stuffing polyester firmly.
Creating the Hair
When making hair for the doll, my technique usually involves using a small book or a piece of cardboard to hold the yarn together, depending on how long you want the doll's hair. For me, my doll's hair is approximately 4 inches on each side.
Then cut it one side. Fold the yarn in half and insert the crochet hook under the head's skin and pull through to make a loop. Put the end pieces through the loop and pull to tighten. Repeat to form a horizontal line around the head.
Then, wrap the yarn around your finger and use another piece of yarn to tie it up. Attach this piece in front of the face of the doll. Sew the hair in place.
Next, use a small book or a piece of cardboard again to hold the yarn together depending on the desired hair length. Divide the yarn into many groups and tie them up. Sew these pieces onto the top of the doll's head.
Body Colour of Your Choice
You will work from bottom to top.
Body Round Instructions
- Round 1: Make magic ring and 8 sc in ring (8) blue
- Round 2: 2 sc in each st around (16) blue
- Round 3: *sc in next st, 2 sc in next st* and repeat from * around (24) blue
- Round 4: *sc in next 2 st, 2 sc in next st* and repeat from * around (32) blue
- Round 5: *sc in next 3 st, 2 sc in next st* and repeat from * around (40) blue
- Round 6-8: sc in each st around (40) blue
- Round 9: *sc in each of next 6 st, dec 1* and repeat from * around (35) blue
- Round 10: *sc in each of next 5 st, dec 1* and repeat from * around (30) blue
- Round 11-14: sc in each st around (30) blue
- Round 15: *sc in each of next 4 st, dec 1* and repeat from * around (25) blue
- Round 16-17: sc in each st around (25) blue
- Round 18: *sc in each of next 3 st, dec 1* and repeat from * around (20) skin colour
- Round 19: *sc in each of next 2 st, dec 1* and repeat from * around (15) skin colour
- Round 20: sc in each st around (15) skin colour
- Then finish off and leave a long tail for sewing and stuffing polyester firmly.
Skirt
We make the skirt by crocheting outside of the body as demonstrated in the picture.
Insert the crochet hook on round 9 and make single crochet in each st around the body.
Start at round 9 of the body. Count from bottom to top.
Count back from round 9, 8, 7, 6, 5 of the body because the skirt is going down from round 9.
- Sc in each st around (counting st in this round is not important) blue
- Sc in each st around (counting st in this round is not important) blue
- Round 7: 3 sc in each st around (no st count) blue
- Round 6: sc in each st around (counting st in this round is not important) blue
- Sc in each st around (counting st in this round is not important) white
Then finish off and leave a long tail for sewing.
Arms Colour of Your Choice
Make 2 pieces.
Arm Round Instructions
- Round 1: Make magic ring and 9 sc in ring (9) skin colour
- Round 2-9: sc in each st around (9) skin colour
- Round 10-16: sc in each st around (24) blue colour
Then finish off and leave a long tail for sewing. Stuff with polyester.
Legs Colour of Your Choice
Make 2 pieces.
You will work from bottom to top.
Leg Round Instructions
- Round 1: Make magic ring and 8 sc in ring (8) blue
- Round 2: 2 sc in each st around (16) blue
- Round 3: *sc in next st, 2 sc in next st* and repeat from * around (24) blue
- Round 4-5: sc in each st around (24) blue
- Round 6: (sc in each of next 5 st) then (dec 7 times)
- (sc in each of next 5 st) (17) blue
- Round 7: (sc in each of next 5 st) then (dec 4 times)
- (sc in each of next 4 st) (13) skin colour
- Round 8-17: sc in each st around (13) skin colour
Then finish off and leave a long tail for sewing. Stuff with polyester firmly.
Shoe Strips
Make 2 pieces following the pictures.
Finishing Touches
Sew the body to the head, then attach the arms and legs.


