Adorable Crochet Pincushion Dolls: A Step-by-Step Guide

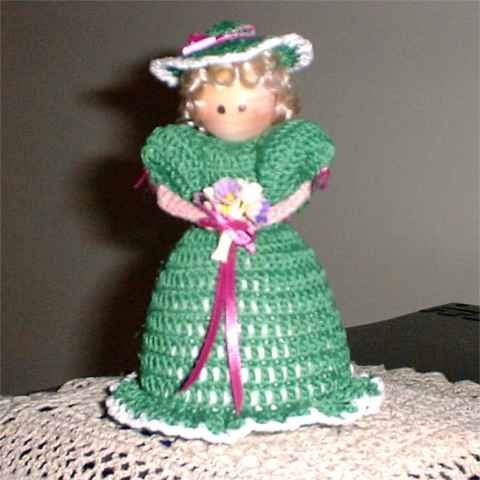
Crochet Pincushion Dolls are not only practical but also adorable additions to your crafting supplies. These charming little dolls serve as a useful tool to keep your pins and needles organized while adding a touch of personality to your sewing space. With their small size, they are perfect for holding onto stray needles or pins during your crafting projects. Additionally, the handmade quality of these pincushion dolls makes them a unique and thoughtful gift for friends who enjoy crafting or sewing. Whether you're an experienced crocheter looking for a new project or a beginner eager to try something fun and creative, making a crochet pincushion doll can be a delightful and rewarding experience.
Materials
No. 10 thread (white, pink, and color of your choice)
#5 crochet hook
One 1" wooden bead
Ribbon, hair, flowers, and polyfil
Black marker to make eyes
The Body
With white, Ch 5 and join to form a ring.
Rnd 1: Ch 3 (for 1st dc), 11 dc in ring. Join (12 dc)
Rnd 2: Ch 3, dc in the same place and 2 dc in each dc around. Join (24 dc)
Rnd 3: Ch 3, dc in the same place, (dc in next dc, 2 dc in next dc) around. Join (36 dc)
Rnd 4: Ch 3, dc in the same place, (dc in next 2 dc, 2 dc in next dc) around. Join (48 dc)
At this point, trace the circle you just made on a piece of cardboard. This will be used later for the base so the doll will stand up.
Rnd 5: Ch 3, dc in back loop of each dc around. Join (48 dc)
Rnd 6: Ch 3, dc through both loops of each dc around. Join (48 dc)
Rnds 7 through 10: Repeat Rnd 6. Join (48 dc)
At this point, insert the cardboard circle as you will be decreasing and it's easier to put the circle in now.
Rnd 11: Ch 3, dc in next dc, (dec over next 2 dc, dc in next 2 dc) around. Join (36 dc)
Rnd 12: Ch 3, dc in each dc around. (36 dc)
Rnd 13: Ch 3, (dec over next 2 dc, dc in next dc) around. Join (24 dc)
Rnd 14: Ch 3, dc in each dc around. Join (24 dc)
At this point, stuff the body firmly.
Rnd 15: Ch 1, sc in the same space and each dc round, decreasing 6 stitches evenly spaced around. Do not join but mark the beginning of each round. (18 sc)
Rnd 16 through 18: Sc in each sc around. (18 sc)
Rnd 19: Sc in each sc around increasing 4 sc evenly spaced around. (22 sc)
Rnd 20: Sc in each sc around. (22 sc)
Rnd 21: Sc in each sc around increasing 4 sc evenly spaced around. (26 sc)
Rnd 22: Sc in each sc around. (26 sc)
Rnd 23: (sc in next sc, dec over next 2 sc) around. Finish stuffing then gather loosely to close.
Weave thread through the last dc row and pull tightly to form a small waist.
Arms (Make 2)
With pink, Ch 16
Row 1: Sc in each st across, ch 1, turn. (15 sc)
Row 2 through 4: Sc in each sc across. Finish off.
Fold in half lengthwise and sew edges together. Attach to body.
Dress
With color of your choice, ch 10 and join to form a ring.
Rnd 1: Ch 3, dc in the same space and 2 dc in each dc around. Join (20 dc)
Rnd 2: Repeat round 1. (20 dc)
Rnd 3: Ch 3, dc in next 9 dc, ch 2, skip next 10 dc, dc in next 10 dc, ch 2, skip the next 10 dc, join to the 3rd st of first dc. (24 stitches)
Rnd 4 and 5: Ch 3 and dc in each dc around. Join (24 dc)
Rnd 6: Ch 3, dc in the same space and 2 dc in each dc around. Join (48 dc)
Rnd 7: Ch 3, dc in each dc around. Join (48 dc)
Rnds 8 through 13: Repeat rnd 7.
Rnd 14: Repeat row 7 working in back loops around. Finish off.
Rnd 15: Holding dress upside down, attach white to any free loop of rnd 14. Chain 4, dc in same space (ch 1, dc in next dc, ch 1, dc in same dc) around. Finish off
Rnd 16: Attach white in any ch 1 sp, ch 1, sc in same space (ch 3, skip 1 space, sc in next space) around. Join.
Sleeves
Rnd 1: Attach thread in first dc at the bottom of sleeve opening, ch 3, dc in next dc, 2 dc over the bar of next dc, 2 dc in next 10 dc, 2 dc over the bar of the next dc, join in the 3rd st of beg ch 3. (26 dc)
Rnd 2 and 3: Ch 3, dc in each dc around (26 dc). Finish off at the end of rnd 3 leaving a length of thread for gathering opening later.
Repeat for the other sleeve.
Slip dress over body form and arms. Stuff sleeves lightly and gather around arm tightly and finish off. Sew the bottom of the dress to the bottom of the body. Glue wooden head to top and add some hair and eyes and mouth. (I just did eyes and used a little blush for cheeks.)
Hat
Rnd 1: With color of your choice, Ch 4 and 19 dc in the first st. Join (20 dc)
Rnd 2: Ch 3, dc in each dc around. Join. (20 dc)
Rnd 3: Ch 4, trc in the same space twice, 3 trc in each dc around. Fasten off.
Rnd 4: Attach white in any trc, ch 1, sc in the same sp, (ch 3, skip 1 trc, sc in next trc) around. Join.
Glue hat to top of head. Glue tiny bow to hat. Tie a ribbon around her waist with a bow in the back. Fasten hands together and give her a tiny bouquet of flowers.