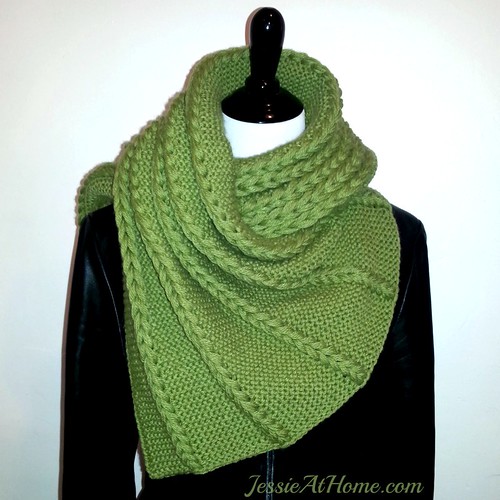
Drop Stitch Knitting Project Instructions
Project Size
Size: 19″ x 52″ (or as long as you want)
Materials Needed
Yarn
Berroco Vintage Chunky ~ 6 to 7 skeins in the color of your choice (6.3 skeins were used to make the sample seen in the photos)
Needles
Size 10 / 6 mm
Gauge
16 sts x 32 rows in garter stitch in a 4″ square
Stitches and Skills Used
- CO ~ Cast on
- K ~ Knit
Knitting Pattern Instructions
Using the Long Tail Cast on method, CO 81. Most other cast ons will not unravel properly for the dropped stitches, so be sure to use this method.
Row Instructions
Row 1: Slip 1 purlwise with yarn in front, K to end.
Repeat Row 1 to desired length.
Finishing Steps
Rows for Finishing
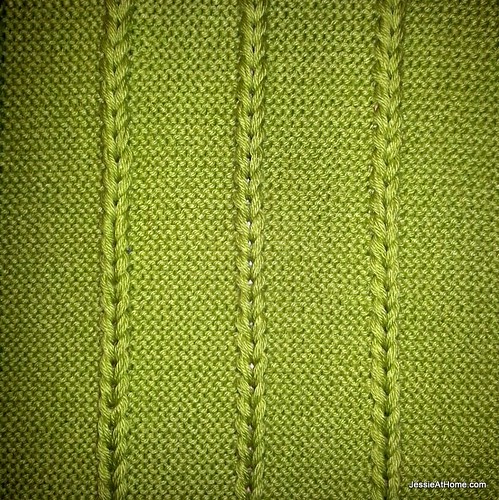
Row 1: Slip 1 purlwise with yarn in front, K8, drop 3 sts, yo [K12, drop 3 sts, yo] 4 times, K9.
Row 2: Slip 1 purlwise with yarn in front, K to end, ignoring dropped sts.
Chains Creation
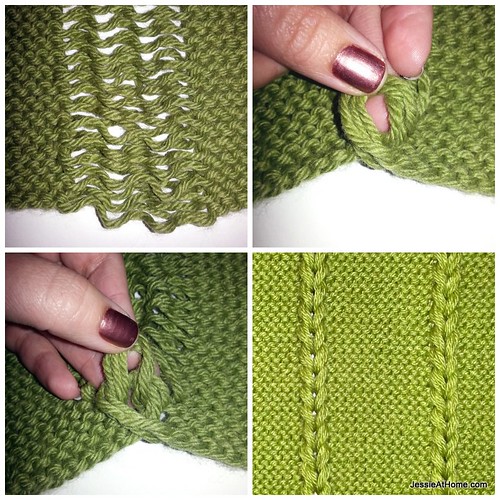
Step 1: Pull the dropped stitches all the way to the bottom. Count the dropped strands in groups of 4. You do not need to know how many groups of 4 you have, you just need to know if you have a multiple of 4, or if you have a multiple of 4 with 1, 2, or 3 left over.
If you have:
- A multiple of 4 with no strands left over, you will use 4 strands for all the loops in step 2.
- A multiple of 4 with 1 strand left over, you will use 5 strands for the first loop in step 2 and 4 strands for the rest of the loops in step 2.
- A multiple of 4 with 2 strands left over, you will use 5 strands for the first and last loop in step 2, and 4 strands for the rest of the loops in step 2.
- A multiple of 4 with 3 strands left over, you will use 3 strands for the last loop in step 2, and 4 strands for the rest of the loops in step 2.
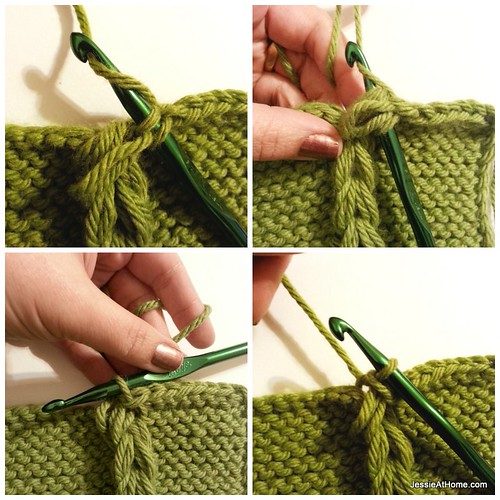
Step 2: Creating the Chain
Take the bottom 4 (or 5) strands from the dropped stitches, hold them together, and twist them half a turn to make a loop. * Grab the next 4 strands together and pull them through the loop (do not twist), repeat from * until all the dropped strands have been turned into a chain. This can be done with your fingers or with a large crochet hook. Leave the last loop free; it will be worked into the bind-off. Repeat for each set of dropped stitches.
Bind Off Instructions
Bind off 8, slip the set of loops from the looped section onto the right needle, K1, pass all remaining stitches on the right needle over the stitch just made (1 stitch left on right needle) [bind off 12, slip the set of loops from the looped section onto the right needle, K1, pass all remaining stitches on the right needle over the stitch just made (1 stitch left on right needle)] 4 times, bind off remaining stitches.
Final Touches
If the looseness on the bottom bothers you, then you can make a crochet slip stitch along the bottom edge, placing one slip stitch in each stitch and one in the bottom of each loop.
Clip yarn, fasten off, and weave in all ends.


