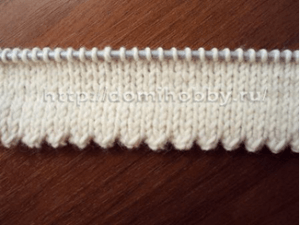
Creating a Decorative Rippled Edge in Knitting


Introduction to Rippled Edging
This nice decorative edge is formed by means of work folding, which comes to forming double and thick edge of your work.
Starting the Rippled Edge
When you start to form rippled edging, make a cast on the needed quantity of stitches with knitting needles.
Then, knit some rows in order to get the needed length of bent end.
Creating the Base for Ripples
After that, start to make base for ripples in the right side row. To make this, knit *2 knit stitches together and yarn over. Then, repeat this combination of stitches to the end of the row.
Next, continue knitting the bent end by means of stockinette stitch.
Connecting the Needles
Put on the stitches on the knitting needle at the same time.
Then, it's necessary to connect two knitting needles, folding the knitted work wrong side inwards.
Finishing the Rippled Edge
To finish the rippled edge, you should knit 1 row, catching 2 stitches at the same time with the knitting needle—one stitch from the first knitting needle and the second stitch from another knitting needle.
This row is called the connecting row, and after it, continue knitting with the chosen pattern.
No comments
Write a comment
