

How to Crochet an Adorable Totoro Plush — Easy Amigurumi Pattern

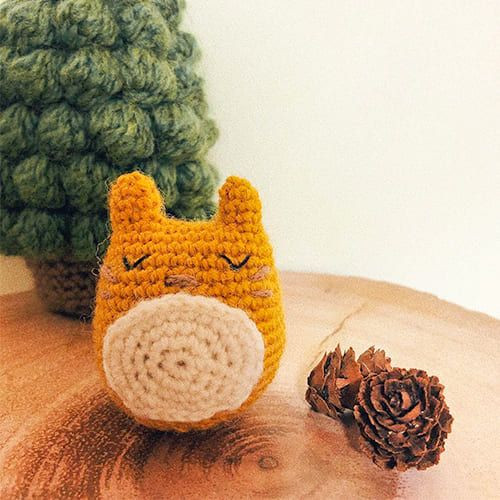
Create a cuddly Totoro plush with this easy amigurumi pattern. This guide walks you through materials, abbreviations and step-by-step rounds to make ears, the body and the belly, plus finishing touches to personalize your Totoro. Suitable for crocheters familiar with basic single crochet, increases and decreases.
Crocheting an Adorable Totoro
Crocheting an adorable Totoro can be such a delightful and heartwarming project! Choosing the perfect shades of grey to capture Totoro's iconic look and creating those cute little details like his pointy ears and big belly can truly bring a smile to your face. It's a wonderful way to showcase your creativity and share your love for this beloved character. Whether you're making it for yourself or as a thoughtful gift for a friend, the process of crocheting your very own Totoro is sure to be filled with joy and satisfaction. Get ready to cuddle up with your handmade creation and feel the warmth of your creativity shining through!
Materials
Yarn: With your favorite yarn.
Hook: 2.5 mm.
Abbreviations
Rnd: Round
St/sts: Stitch(es)
MR: Magic ring
Ch: Chain
Sc: Single crochet
Dc: Double crochet
Dec: Decrease
Inc: Increase
Slst: Slip stitch
Ear 1
Creating the First Ear
First, make one ear.
Rnd 1: 4 sc into MR (4)
Rnd 2: (sc, inc)*2 (6)
Rnd 3: 6 sc (6)
Cut yarn.
Next, make another ear.
Ear 2 and Body
Crochet the second ear the same as the first, from Rnd 1 to Rnd 3 but don’t cut the yarn.
Connect the two ears (Rnd 4).
Rnd 4: 6 ch, sc on the 1st stitch of Rnd 3 of Ear 1, (6 sc, 6 sc on the ch)*2 (24)
Rnd 5: 24 sc (24)
Rnd 6: (3 sc, inc)*6 (30)
Rnd 7-8: 30 sc
Rnd 9: 2 sc, inc, (4 sc, inc)*5, 2 sc (36)
Rnd 10-12: 36 sc (36)
Rnd 13: (5 sc, inc)*6 (42)
Rnd 14-16: 42 sc (42)
Rnd 17: (5 sc, dec)*6 (36)
Rnd 18: 36 sc
Rnd 19: (4 sc, dec)*6 (30)
Rnd 20: (3 sc, dec)*6 (24)
Rnd 21: sc, dec, (2 sc, dec)*5, sc (18)
Rnd 22: (sc, dec)*6 (12)
Rnd 23: dec*6 (6)
Cut yarn, fasten off.
Belly
Rnd 1: 6 sc into MR (6)
Rnd 2: inc*6 (12)
Rnd 3: inc*2, 3 sc, inc*3, 3 sc, inc (18)
Rnd 4: inc*3, 5 sc, inc*5, 3 sc, inc*2 (28)
Rnd 5: inc*3, skip st, sc, 8 sl, sc, skip st, inc*4, sc, 6 sl, sc, inc (34)
Cut the yarn, leaving a tail for sewing to the body.
Final Touches
Embroider the nose and whiskers.
Make a pattern on the belly as you like.
Finishing Tips
- Stuff the body firmly but evenly with polyester fiberfill to keep the amigurumi shape.
- For safety (if gifting to small children), use embroidered eyes or securely attach safety eyes according to the manufacturer's instructions.
- Use a yarn needle and matching yarn tail to sew the belly to the body with small, neat stitches.
- Personalize your Totoro with different shades of grey, add a small leaf or scarf, or embroider the belly markings for extra character.
- We recommend weaving in all ends securely and checking seams before gifting or handling frequently.
- Funny Pictures
-
 Relatable Pics You’ll Definitely Send to Your Friend
-
 Memes That You Might Like if You Don’t Really Like People
-
 Some Real Life Memes You’ll Find Relatable
- Recipes
-
 Kale Guacamole
-
 Maple Walnut Goji Berry Granola (Vegan, Gluten-Free)
-
 Roasted Brussels Sprouts with Bacon, Toasted Pecans, and Dried Cranberries
- Lifehacks
-
 How to Crochet Aran Bobble Stitch
-
 Crochet Circle Stitch
-
 Crochet Ripple Shell Stitch
- Crochet Ideas
-
 Crochet Alpine Socks
-
 Crochet Bear Keychain
-
 Crochet Meandering Paw Prints Market Tote
- DIY
-
 Crochet Aura Blanket — Color-Shifting Circle-to-Square Crochet Pattern
-
 Crochet a Beautiful Labrador Amigurumi — Step-by-Step Pattern
-
 Easy DIY Crochet Market Bag: Stretchy Mesh Pattern for Groceries & Beach Trips
- Knitting Ideas
-
 Adorable Knitted Lil Kitty Hat Pattern — Sizes from Preemie to Child
-
 Cozy Knitted I-Cord Brim Bonnet — Easy Baby Bonnet Pattern (Newborn to 3 Years)
-
 Chic Chunky Knitted Vest Top Pattern — Step‑by‑Step Guide for Women