Crochet Adult Romper Pattern Instructions

Crochet adult rompers are a fun and stylish addition to any wardrobe! With their cozy texture and versatile design, these rompers are perfect for a casual day out or a relaxed day at home. Whether you're heading to the beach or lounging around on a lazy Sunday, a crochet romper adds a charming touch to your outfit. The intricate crochet patterns and unique colors make each romper a one-of-a-kind piece that is sure to turn heads and spark conversations. So, why not embrace your inner fashionista and rock a crochet adult romper for a comfy yet chic look that you'll love!
Materials
Yarn – Any DK weight yarns in colors of your choice.
The prototype was made using 2 strands of #2 to get DK equivalent.
The prototype was made using a combination of various brands like Hobbi Twister and Lionbrand Coboo.
Estimated Total Yardage
2800 (3000, 3200, 3400, 3600, 3800, 4000, 4200, 4400) Yards
Hook – 5 mm Crochet Hook
Gauge – 18 sts over 12 Rows = 4 x 4” made using the stitch pattern, before blocking.
Gauge Pattern
Chain 21 and follow the pattern for 12 rows. The pattern uses the crochet blanket stitch.
Pattern Notes
Please kindly read through the pattern before starting.
The stitch count is written after each row/round, with the smallest XS written first and the others in the ().
Stitch count written in black is for all sizes, but at some points, the stitch counts are color-coded for clarity, i.e. XS (S, M, L, XL, 2XL, 3XL, 4XL, 5XL).
Difficulty Level
Intermediate
Terms
US Terminology
Stitches Abbreviations
- Chain/chains – ch/chs
- Chain space – ch sp
- Stitch(es) – st(s)
- Slip Stitch – sl st
- Single Crochet – sc
- Double Crochet – dc
Adult Crochet Romper Finished Measurements
Size(s) and color codes – XS (S, M, L, XL, 2XL, 3XL, 4XL, 5XL)
Bust Measurement: 30 (34, 38, 42, 46, 50, 54, 58, 62)”
Armhole Circumference: 14 (14, 16, 16, 16, 16, 18, 18, 18)”
Length of Top: 18 (19, 19, 20, 21, 21, 22, 23, 24)”
Length of Pant: 11 (14, 15, 15, 16, 16, 18, 20, 20)”
Waist Measurement: 27 (28, 30, 32, 34, 36, 38, 40, 42)”
Short Band Size: 3.5”
Hip Measurement: 32 (36, 40, 44, 48, 52, 56, 60, 64)”
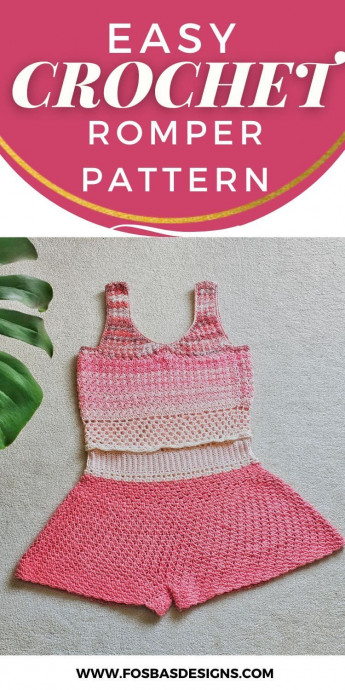
The modeled romper is shown with the top in size Medium, with about 1” of Positive Ease.
And the shorts made in size Small.
Construction Notes
This project is made in sections.
The top is made without sewing, starting from the shoulder downwards. You will make two parts, which are then joined together.
You then continue in rounds until your piece gets to your belly button.
The shorts are then made and joined to the top.
Picking a Size
For the top:
Make the top following your bust measurement.
Use your hip measurements for the shorts; it’s okay if the size differs from your tops.
How To Crochet Adult Romper
Romper Top
Section 1: Make 2
Front Panel
Row 1: Chain 12, 2 dc in 3rd ch from hook, *skip 2 chs, sc in next ch, 2 dc in same ch, repeat from * until the last 3 chs, sc in last ch, turn. 6 dc, 3 sc
Row 2: Ch 2 (does not count as a stitch, here and throughout), 2 dc in first sc below, *skip next 2 dc, (sc, 2 dc) in next sc, repeat from * across row, sc in last st, turn. 6 dc, 3 sc
Rows 3 – 10 (10, 12, 12, 8, 6, 6, 6, 4): Rep row 2
Plus size row numbering is not off, it’s to create a fitting neckline that is not too wide.
Shaping for the Neckline
Row 1: Ch 2, (2 dc, sc, 2 dc) in first sc, *skip next 2 dc, (sc, 2 dc) in next sc. Repeat from * across the row, sc in last st, turn. 8 dc, 4 sc
Row 2: Ch 2, 2 dc in first sc below, *skip next 2 dc, (sc, 2 dc) in next sc, repeat from * across row, sc in last st, turn. 8 dc, 4 sc
Rows 3 – 8 (10, 12, 14, 16, 18, 20, 22, 24): Rep Rows 1 – 2.
Row 9 (11, 13, 15, 17, 19, 21, 23, 25): Rep Row 1
Counts after the last row:
14 (16, 18, 20, 22, 24, 26, 28, 30) dc,
7 (8, 9, 10, 11, 12, 13, 14, 15) sc
Fasten off.
Back Panel
Check fit: Neckline depth.
Check the neckline length of your piece.
If you prefer it extends more, add more rows before shaping the neckline below.
For a shorter neckline, reduce the number of rows before neckline shaping.
Join yarn with a sl st to the starting chain in row 1.
The skipped chs from the foundation chs while making the front panel will be used for the next row.
Row 1: Ch 2, 2 dc in same st, *skip next 2 sts, sc in next ch-sp, 2 dc in same ch-sp, repeat from * to end of row, sc in final ch st of row, turn.
Row 2: Ch 2, 2 dc in first sc below, *skip next 2 dc, (sc, 2 dc) in next sc, repeat from * across row, sc in turning ch 2 at end of row, turn. 6 dc, 3 sc
Rows 3 – 9 (11, 11, 11, 7, 7, 5, 5, 5): Rep Row 2
If you made adjustments to the strap of front, add the same number of rows on the back panel.
Make sure you have an odd number of rows for the back panel.
Shaping for the Neckline
Ensure the next row (shaping for the neckline) is on the same side as the front panel.
Repeat the neckline shaping as with the front panel.
Do not fasten off.
Connecting the Front and Back Panels
Connect the back panel to the front.
Chain 12 (12, 18, 18, 18, 18, 24, 24, 24) sl st to the last st on the front panel.
Fasten off for the first piece.
Joining the Two Pieces Together
Continue in rounds, starting with the front panel.
Pick up the front panel of panel A, continue until the chain sps, and then proceed to the back panel (panel A completed), proceed to the back panel of panel B, and then to the chain space of panel B.
Join with a sl st to the top of chain 2 sp.
Round 1: Ch 2, 2 dc in first sc below, *skip next 2 dc, (sc, 2 dc) in next sc, repeat from * until the last sc in this panel, (sc, 2 dc) in last sc of this panel,** pick up next front panel (panel A), (sc, 2 dc) in ch 2 sp, rep from * until **. Continue to the chain spaces, {skip 2 chs, sc in next ch, 2 dc in same ch}, repeat from { } to the last 2 chains, skip the last 2 chains, continue to the back panel.
Rep from * to ** end of back panel, rep { } to the last 2 chains, skip the last 2 chains, join with a sl st to the top of chain 2 sp. { } to the last 2 chains, skip the last 2 chains, join with a sl st to the top of the beginning ch 2. 62 (70, 82, 90, 98, 106, 118, 126, 134) dc, 31 (36, 41, 45, 49, 53, 59, 64, 67) sc. Turn your work to work the next round from the wrong side.
This step is vital to continue the “raised sts”.
Round 2: Ch 2, 2 dc in first sc below, *skip next 2 dc, (sc, 2 dc) in next sc, repeat from * around, sc in last st, join with a sl stitch to the beginning ch 2.
Round 3: Ch 2, 2 dc in first sc below, *skip next 2 dc, (sc, 2 dc) in next sc, repeat from * around, sc in last st, join with a sl stitch to the beginning ch 2.
Rounds 4 – 16 (16, 18, 20, 20, 22, 22, 24, 24): Repeat rounds 2 and 3.
For the plus sizes, you can add more rounds for better coverage around your bust.
Mini Granny Mesh Section
Round 1: Ch 5 (counts as the first dc + ch 2 sp, here and throughout), *skip next 2 dc, dc in next sc below, ch 2, rep from * around, join with a sl stitch to the beginning ch 2.
Round 2: Ch 5, *2 dc in ch sp, ch 1, rep from * around, join with a sl stitch to the beginning ch 2.
Rounds 3 – 6 (6, 8, 8, 8, 8, 8, 8, 8): Repeat round 2
The length should be around your belly button.
Round 7 (7, 9, 9, 9, 9, 9, 9, 9): Ch 3, 4 dc in first ch sp, *sc in next ch sp, 5 dc in next ch sp, rep from * to the end, join with a sl st to the beginning ch.
Fasten off and set aside.
Section 2: Shorts
Materials
Finished Measurements:
Size(s) and color codes – XS (S, M, L, XL, 2XL, 3XL, 4XL, 5XL)
Length of Pant: 11 (14, 15, 15, 16, 16, 18, 20, 20)”
Waist Measurement – 27 (28, 30, 32, 34, 36, 38, 40, 42)”
Band Size – 3.5”
Hip Measurement: 32 (36, 40, 44, 48, 52, 56, 60, 64)”
The modeled garment is shown in Small.
Picking a size: Use your hip measurement.
Adjustments/Fittings
Length of pants: increase or decrease the repeats for the body. You can also add more rounds to each of the legs.
Adult Crochet Romper Pants Pattern Instruction
Section 1 – Band
Row 1: Chain 11, sc in 2nd ch from hook and in each ch across, turn. 10 sc
Row 2: Ch 1, sc in first st, sc in BLO across until the last st, sc in both loops, turn. 10 sc
Rows 3 – 54 (60, 70, 80, 90, 100, 110, 120, 130): Repeat Row 2.
Or until you have a length loose enough to wrap around your waist: Rep Row 2.
Increase or decrease the number of repeats for a comfortable fit around your waist.
Your piece should measure about Waist: 27 (28, 30, 32, 34, 36, 38, 40, 42)”
Fold lengthwise to have the short ends next to each other.
Join the sides with a sl st.
Do not fasten off.
Edging
Note:
The numbers might be different from mine.
Make sure to check the fit of your shorts as you proceed.
Round 1: Ch 1, sc in each st around the panel, join with a sl st to the beginning ch. 54 (60, 70, 80, 90, 100, 110, 120, 130) sc
Adjust the numbers so you have a multiple of 2.
Round 2: Ch 4 (counts as hdc + ch 1 sp), *skip next st, hdc in next st, ch 1, rep from * until the end, join with a sl stitch to the 3rd ch from the beginning. 27 (30, 35, 40, 45, 50, 55, 60, 65) hdc/ch sps
Fasten off, join yarn with a sl st to the other open end.
Repeat the edging (rounds 1 – 2) on the other end, do not fasten off.
Shorts Construction
No need to turn after each round; the shorts look beautiful when made in rounds instead of turning as we did with the top.
Round 1: Ch 2, 2 dc in same ch sp, *sc in next ch sp, 2 dc in next ch sp, rep from * until the end, join with a sl st to the beginning ch. 14 (15, 18, 20, 23, 25, 28, 30, 33) sc/ dc groups
For the prototype, I started a new color from the next round.
Round 2: Ch 2, 2 dc in first sc below, *skip next 2 dc, (sc, 2 dc) in next sc, repeat from * around, sc in last st, join with a sl stitch to the beginning ch 2. 14 (15, 18, 20, 23, 25, 28, 30, 33) sc/ dc groups
Rounds 3 – 5: Repeat round 2.
(Increase Round) Round 6: Ch 2, *[(sc, 2 dc, sc, 2 dc) in first sc below, skip next 2 dc, (sc, 2 dc) in next sc], rep [ ] one more time, (2 dc, sc, 2 dc) in next sc repeat from * until the end, join with a sl stitch to the beginning ch 2. 21 (20, 24, 30, 32, 38, 42, 45, 50) sc/ dc groups
Round 7: Ch 2, 2 dc in first sc below, *skip next 2 dc, (sc, 2 dc) in next sc, repeat from * around, sc in last st, join with a sl stitch to the beginning ch 2. 21 (20, 24, 30, 32, 38, 42, 45, 50) sc/ dc groups
Round 8: Repeat round 6. 30 (31, 32, 40, 42, 50, 56, 60, 66) sc/ dc groups
Fit Check
Check the width of the project by measuring the circumference.
If it is too tight, repeat rounds 6 – 7 one or two more times.
Leg Openings
Rounds 9 – 22: Repeat round 7. 30 (31, 32, 40, 42, 50, 56, 60, 66) sc/ dc groups
Repeating until your piece measures 10 (10, 12, 12, 13, 13, 13, 14, 14)”
Split for Leg Openings
Place a stitch marker on the 15 (16, 16, 20, 21, 25, 27, 30, 33) sc.
If your count is different from the above, count the number of sc, divide by 2.
Place a stitch marker at the middle (center).
Section 3 – Leg Right
Round 1: Ch 2, 2 dc in first sc below, *skip next 2 dc, (sc, 2 dc) in next sc, repeat from * around the sts left unworked, connect with a sl st to the beginning chain. Leave the remaining stitches unworked.
Rounds 2 – 9: Ch 2, 2 dc in first sc below, *skip next 2 dc, (sc, 2 dc) in next sc, repeat from * around, sc in last st, join with a sl stitch to the beginning ch 2.
Fasten off.
Section 3 – Left Leg
Pass your hook through the right leg’s starting chain and last stitch, and join yarn with a sl st through the two sts. This closes up the gap.
Make a slip stitch to secure the two sts.
Crochet around the sts left unworked while making the right leg.
Round 1: Ch 2, 2 dc in first stitch to your left, skip next st, *(sc, 2 dc) in next sc, skip next 2 dc, repeat from * until the stitch marker, make a slip stitch through the middle of the beginning chain and then join a sl st to the top of the beginning chain.
This last step covers the gap.
Repeat rounds 2 – 9 as with the right leg.
Fasten off.
Joining the Top to the Shorts
Pick up the shorts and the top.
Turn both to the wrong side.
Place the lower end of the top next to the shorts.
The joining is through the mesh row of the top and the last row of the shorts. The shells from the last round of the top cover the joining. This creates a beautiful cover over the joining.
Using either a darning needle or a crochet hook, and either the mattress stitch or the slip stitch, join the upper part of the shorts to the last round of the mesh on the lower end of the top.
Tip for a Perfect Joining
Count the number of stitches on the lower end of the top and the stitches on the last round of the shorts.
If the stitches are more on one side, you can join using 2 stitches on one side and one stitch on the other side to give an even joining. Make sure to even these around.
Fasten off.
Weave in ends.
Block your romper.
- Funny Pictures
-
 Hilarious Memes for Those Bored to Tears
-
 Weekly Treat of Funniest Parenting Memes for Good Laugh out Loud Right Now
-
 Really Funny Pics to End These Weekend Perfectly
- Recipes
-
 Crispy Baked Avocado Fries
-
 Scrambled Chickpea and Spinach Pitas
-
 Cinnamon Pancakes
- Lifehacks
-
 Crochet Basics: Aligned Cobble Stitch
-
 Brick Stitch Crochet Tutorial
-
 Crochet Basics: Wattle Stitch
- Crochet Ideas
-
 Crochet Snorlax Plushie Doll
-
 Crochet Beautiful Penguin Toy
-
 Crochet Tiny Snowman
- DIY
-
 DIY Santa Craft For Kids
-
 Paper Plate Angel Craft
-
 Upcycled Mason Jar Chicken Vase
- Knitting Ideas
-
 Knitted Bridger Cowl
-
 Knitted Keepsake Bag
-
 Knitted Cutie Cupcake Dolls