Crochet Flared Cardigan

Introduction
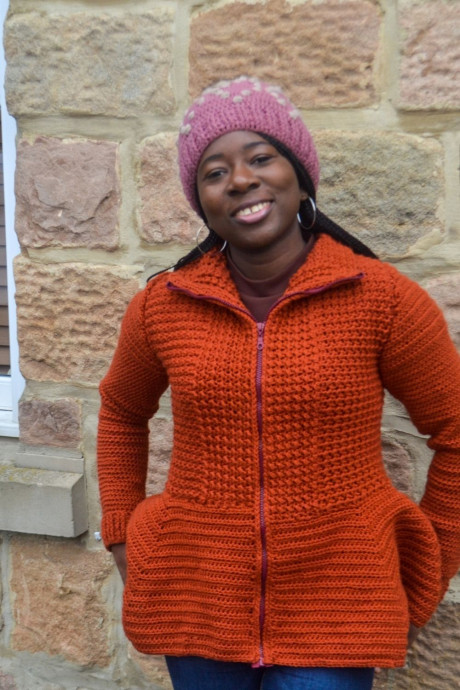
Crochet Flared Cardigans are the perfect blend of cozy and stylish! These versatile pieces add a touch of bohemian flair to any outfit and are great for layering during the cooler months. With their flattering flared silhouette and intricate crochet details, they are sure to make you stand out in a crowd. Whether you pair it with jeans and a tee for a casual look or dress it up with a flowy dress, this cardigan is a wardrobe essential. The beauty of crochet is that each piece is handmade and unique, giving you that special touch of artisan charm. Embrace your inner boho-chic style with a Crochet Flared Cardigan and make a fashion statement wherever you go!
Materials Required
The materials needed to make your own version of this crochet flared cardigan pattern include the following:
- US size J (6 mm) crochet hook
- Buttons (6 – 10) or Zipper (the length of which would be determined by how long your flare is)
- Stitch markers – 4 pcs
Gauge
15 sts over 21 rows, see pattern below = 4”/10cm. Adjust hook size if necessary to obtain gauge.
Pattern Instructions
Gauge Rows
Row 1: Chain 16, sc in 2nd ch from hook, *hdc in next, sl st in next, repeat from * to last st, sc, turn. 7 hdc, 6 sl st, 2 sc
Row 2: Ch 1, sc in first st, *sl st in next, hdc in next, repeat from * to last st, sc in last, turn – 6 hdc, 7 sl st, 2 sc
Row 3: Ch 1, sc in first st, *hdc in next, sl st in next, repeat from * to last st, sc, turn – 7 hdc, 6 sl st, 2 sc
Rows 4 – 21: Repeat Row 2 and 3
Pattern Notes
This pattern has 1” of positive ease. The stitch count in parenthesis is interpreted as follows – XS (S, M, L, XL, 2XL, 3XL, 4XL, 5XL). Chains at the beginning of the rows do not count as a stitch unless stated.
Section 1 is worked by alternating hdc and sl st; the texture is obtained over 2 rows, with hdc made on sl st from the preceding row and vice versa.
Difficulty Level – Intermediate
Terms – US Terminology
Stitch Abbreviations
- Chain – ch
- Slip stitch – sl st
- Single Crochet – sc
- Single crochet 2 together – sc2tog
- Half double crochet – hdc
- Half double crochet 2 together – hdc2tog
Finished Measurements
- Sizes/Color – XS(S, M, L, XL, 2XL, 3XL, 4XL, 5XL)
- Bust: 30(34, 38, 42, 46, 50, 54, 58, 62)”
- Sleeve Length – 21(21, 22, 22, 23, 23, 24, 24, 24)”
- Armhole Depth – 15(16, 16.5, 17, 17.5, 18, 18, 18.5, 18.5)”
- Length (Shoulder to waist): 21(21, 27, 27, 33, 33, 39, 39, 41)”
Construction Notes
This sweater is worked in 3 sections:
- Section 1 – Both panels (front and back) are made in one piece in rows with a split for sleeves made halfway, and the rest of the body is completed.
- Section 2 – Sleeve is then made in rounds and joined to the body.
- Section 3 – Flare made in rows.
Adjustments/Fittings
1. Length: Increase or decrease the repeat rows on the front panel before splitting for the armpit and also adjust the number of repeats for the armhole to your preference.
2. For a shorter sleeve – Decrease the number of rounds.
Instructions for This Crochet Cardigan Free Pattern
Section 1: Waist Upwards
Row 1: Chain 114(130, 146, 160, 174, 190, 204, 220, 234), sc in 2nd ch from hook, *hdc in next, sl st in next, repeat from * to last st, sc, turn. 56(64, 72, 79, 86, 95, 101, 109, 116) hdc 55(63, 71, 78, 85, 94, 100, 108, 115) sl st, 2 sc
Row 2: Ch 1, sc in the first st, *sl st in next, hdc in next, repeat from * to last st, sc in last, turn – 56(64, 72, 79, 86, 95, 101, 109, 116) sl st 55(63, 71, 78, 85, 94, 100, 108, 115) hdc, 2 sc
Row 3: Ch 1, sc in first st, *hdc in next, sl st in next, repeat from * to last st, sc, turn – 56(64, 72, 79, 86, 95, 101, 109, 116) hdc 55(63, 71, 78, 85, 94, 100, 108, 115) sl st, 2 sc
Rows 4 – 33 (33, 33, 33, 33, 37, 37, 37, 37): Repeat Row 2 and 3
Row 34 (34, 34, 34, 34, 38, 38, 38, 38): Repeat Row 2.
Do not fasten off.
Split for Sleeve Opening
Place stitch markers on the 28th and 85th (32nd and 97th, 36th and 109th, 40th and 119th, 44th and 129th, 46th and 143rd, 50th and 153rd, 54th and 165th, 58th and 175th) stitches respectively.
Front Panels
Right Side: Arm-Pit Shaping
Row 1: Working toward the 1st stitch marker, ch 1, sc in first st, *hdc in next, sl st in next, repeat from * to last 2 sts before stitch marker, hdc in next st, sc2tog, turn – 27(31, 35, 39, 43, 45, 49, 53, 57) sts
Row 2: Ch 1, sc2tog, *hdc in next, sl st in next, repeat from * to last st, sc, turn – 26(30, 34, 38, 42, 44, 48, 52, 56) sts
Row 3: Ch 1, sc in first st, *hdc in next, sl st in next, repeat from * to last 3 sts, hdc in next st, sc2tog, turn – 25(29, 33, 37, 41, 43, 47, 51, 55) sts
Row 4: Ch 1, sc2tog, *hdc in next, sl st in next, repeat from * to last st, sc, turn – 24(28, 32, 36, 40, 42, 46, 50, 54) sts
Row 5: Ch 1, sc in first st, *hdc in next, sl st in next, repeat from * to last 3 sts, hdc in next st, sc2tog, turn – 23(27, 31, 35, 39, 41, 45, 49, 53) sts
Stop Reducing
Row 6: Ch 1, sc in first st, *sl st in next, hdc in next, repeat from * to last st, sc in last, turn – 23(27, 31, 35, 39, 41, 45, 49, 53) sts
Row 7: Ch 1, sc in first st, *hdc in next, sl st in next, repeat from * to last st, sc, turn – 23(27, 31, 35, 39, 41, 45, 49, 53) sts
Row 8 – 27 (29, 31, 31, 33, 33, 35, 37, 37): Repeat Rows 6 – 7
Do not fasten off.
Shape Neckline
Row 1: Ch 1, sc in first st, *sl st in next, hdc in next, repeat from * to last st, sc in last, turn – 23(27, 31, 35, 39, 41, 45, 49, 53) sts
Row 2: Ch 1, sc in first 5 sts, (place stitch marker on the 4th st) *hdc in next, sl st in next, repeat from * to last st, sc, turn – 23(27, 31, 35, 39, 41, 45, 49, 53) sts
Row 3: Ch 1, sc in first st, *sl st in next, hdc in next, repeat from * to last 5 sts, sc in next st, leave last 4 sts unworked, turn. 19(23, 27, 31, 35, 37, 41, 45, 49) sts
Row 4: Ch 1, sc2tog, *sl st in next, hdc in next, repeat from * to last st, sc in last st, turn. 18(22, 26, 30, 34, 36, 40, 44, 48) sts
Continue with Neckline
Row 5: Ch 1, sc in first st, *sl st in next, hdc in next, repeat from * to last 2 sts, sc2tog, turn. 17(21, 25, 29, 33, 35, 39, 43, 47) sts
Row 6: Repeat Row 4. 16(20, 24, 28, 32, 34, 38, 42, 46) sts
Fasten off.
Left Panel – Arm-Pit Shaping
Working from the 2nd stitch marker towards the edge. Join yarn with a slip stitch.
Row 1: Ch 1, sc2tog, *hdc in next, sl st in next, repeat from * to last st, sc, turn – 27(31, 35, 39, 43, 45, 49, 53, 57) sts
Row 2: Ch 1, sc in first stitch, *sl st in next, hdc in next, repeat from * to last 2 sts, sc2tog, turn – 26(30, 34, 38, 42, 44, 48, 52, 56) sts
Pattern for Left Panel
Row 3: Ch 1, sc2tog, *hdc in next, sl st in next, repeat from * to last st, sc, turn – 25(29, 33, 37, 41, 43, 47, 51, 55) sts
Row 4: Ch 1, sc in first st, *sl st in next, hdc in next, repeat from * to last 2 sts, sc2tog, turn – 24(28, 32, 36, 40, 42, 46, 50, 54) sts
Row 5: Ch 1, sc2tog, *hdc in next, sl st in next, repeat from * to last st, sc, turn – 23(27, 31, 35, 39, 41, 45, 49, 53) sts
Stop reducing.
Shaping the Left Panel
Row 6: Ch 1, sc in first st, *sl st in next, hdc in next, repeat from * to last st, sc in last, turn – 23(27, 31, 35, 39, 41, 45, 49, 53) sts
Row 7: Ch 1, sc in first st, *hdc in next, sl st in next, repeat from * to last st, sc, turn – 23(27, 31, 35, 39, 41, 45, 49, 53) sts
Row 8 – 27 (29, 31, 31, 33, 33, 35, 37, 37): Repeat Rows 6 – 7
Shape Neckline for Left Panel
Row 1: Ch 1, sc in first st, *sl st in next, hdc in next, repeat from * to last st, sc in last, turn – 23(27, 31, 35, 39, 41, 45, 49, 53) sts
Row 2: Ch 1, sc in first st, *hdc in next, sl st in next, repeat from * to last 5 sts, sc in next st, leave last 4 sts unworked, turn – 19(23, 27, 31, 35, 37, 41, 45, 49) sts
Row 3: Ch 1, sc2tog, *hdc in next, sl st in next, repeat from * to last st, sc in last st, turn. 18(22, 26, 30, 34, 36, 40, 44, 48) sts
Back Panel
Working between the 1st and 2nd stitch markers, join yarn with a slip stitch to the stitch with the 1st stitch marker, and work the following stitches –
Row 1: Ch 1, sc2tog, *hdc in next, sl st in next, repeat from * to last 1st before 2nd stitch marker, sc2tog, turn. 55(63, 71, 77, 83, 95, 101, 109, 115) sts
Row 2: Ch 1, sc2tog, *hdc in next, sl st in next, repeat from * to last 2 sts, sc2tog, turn. 53(61, 69, 75, 81, 93, 99, 107, 113) sts
Continue Back Panel
Row 3: Ch 1, sc2tog, *hdc in next, sl st in next, repeat from * to last 2 sts, sc2tog, turn. 51(59, 67, 73, 79, 91, 97, 105, 111) sts
Row 4: Repeat Row 2. 49(57, 65, 71, 77, 89, 95, 103, 109) sts
Row 5: Repeat Row 3 – 47(55, 63, 69, 75, 87, 93, 101, 107) sts
Stopping Reduction in the Back Panel
Row 6: Ch 1, sc in first st, *sl st in next, hdc in next, repeat from * to last st, sc in last st, turn – 47(55, 63, 69, 75, 87, 93, 101, 107) sts
Row 7: Ch 1, sc in first st, *hdc in next, sl st in next, repeat from * to last st, sc in last, turn – 47(55, 63, 69, 75, 87, 93, 101, 107) sts
Rows 8 – 33 (35, 37, 37, 39, 39, 41, 43, 43): Repeat Rows 6 and 7
Shoulder Seam
On both sides – sew/join from the shoulder tip towards the neck, stopping 2” from the front panels and the neck opening (adjust appropriately if the neck is too wide, increase the length joined).
Collar
Working in Row, across the 2” left un-joined from both panels and the back.
With right side – Join yarn with a slip stitch to the first st of skipped sts from the front panel in Row 3 of the front panel.
Row 1: Ch 1, sc in each across, turn.
Row 2: Ch 1, sc in first st, *hdc in next, sl st in next, repeat from * to last st, sc, turn.
Row 3: Ch 1, sc in first st, *sl st in next, hdc in next, repeat from * to last st, sc, turn.
Rows 4 – 11: Repeat Row 2 – 3.
Section 2: Sleeves
Round 1: Ch 26(30, 30, 30, 34, 34, 36, 36, 36), join to form a ring, ch 2, dc in each ch around. 26(30, 30, 30, 33, 33, 36, 36, 36) dc
Round 2: Ch 2, *fpdc in next 2, bpdc in next, repeat from * to the end of the round, join with a sl st to the beginning chain. 18(20, 20, 20, 22, 22, 24, 24, 24) FPdc, 8(10, 10, 10, 11, 11, 12, 12, 12) BPdc
Rounds 3 – 7: Repeat Round 2
Continuing Sleeve Rounds
Round 8: Ch 2, hdc in each st across, join to beginning ch. 26(30, 30, 30, 33, 33, 36, 36, 36) hdc
Round 9: Ch 2, *hdc in next 2 sts, 2 hdc, repeat from * to end, join with a sl st to the beginning ch – 36(40, 40, 40, 44, 44, 48, 48, 48) hdc
Round 10: Ch 2, hdc in each st, join with beginning ch – 36(40, 40, 40, 44, 44, 48, 48, 48) hdc
Rounds 11 – 24 (26, 28, 30, 32, 32, 34, 34, 34): Repeat Row 10; 36(40, 40, 40, 44, 44, 48, 48, 48) hdc
Finalizing Sleeve Length
At this point, the sleeve should be at your elbow; if not, repeat round 10 till you have the length of your elbow.
Do not fasten off.
Round 1: Ch 2, hdc in next, 2 hdc in next st, hdc in next st, 2 hdc in next st, hdc in each of the remaining sts till last 4 sts, 2 hdc in next, hdc in next st, 2 hdc in next, hdc in last st, join with ch – 40(44, 44, 44, 48, 48, 52, 52, 52) hdc
Round 2: Ch 2, hdc in each st, join with slip stitch – 40(44, 44, 44, 48, 48, 52, 52, 52) hdc
Rounds 3 – 7: Repeat Round 1 – 2.
Note for Sleeve Width
If too tight, increase (repeat round 1 -2) till a convenient width, i.e., repeat Round 2 till the start of your armpit.
Kindly remember that the stitch counts would be different; thus, you would need more rows when reducing.
Working in Rows
Row 1: Ch 2, hdc2tog, hdc in each st to last 2 sts, hdc2tog, turn – 50(54, 54, 54, 58, 58, 62, 62, 66) hdc
Rows 2 – 18 (20, 20, 20, 22, 22, 24, 24, 26): Repeat Row 1. 16(16, 16, 16, 16, 16, 16, 16, 16) hdc
Row 19 (21, 21, 21, 23, 23, 25, 25, 27): Ch 2, hdc2tog in each stitch across. 8(8, 8, 8, 8, 8, 8, 8, 8) hdc
Note – If you increased the number of stitches earlier, you would need to increase the number of repeats also.
Fasten off.
Joining the Sleeves to the Body of Your Cardigan
Turn both sleeves and the body of the cardigan to the wrong side, with the tip of the sleeve placed on the shoulder tip, work sc around both shoulder and body of the cardigan.
Section 3: Flare Part of This Free Crochet Pattern
Turn the bodice to the waist (foundation Row 1).
Join yarn with a sl st to the edge of Row 1.
XS, S and M size alone –
Row 1: Ch 1, sc in first 5 sts, sc2tog, sc in each st across, turn. 112(128, 144)
Large size alone –
Row 1: Ch 1, 2 sc in first st, sc in remaining sts across, turn. 160 sc.
XL, 2XL, 3XL, 4XL and 5XL alone –
Row 1: Ch 1, *sc in next 5 sts, sc2tog, repeat from * (5, 5, 3, 3, 1) more time(s), sc in remaining sts across, turn. (168, 184, 200, 216, 232) sc.
For All Sizes
Row 2: Ch 2, hdc in next 14(16, 18, 20, 21, 23, 25, 27, 29) sts, *3 hdc in next, hdc in next 13(15, 17, 19, 20, 22, 24, 26, 28) sts, repeat from * 5 more times, 3 hdc in next st, hdc in remaining sts, turn. 126(142, 158, 174, 182, 198, 214, 230, 246) hdc.
Continue with Flare Rows
Row 3: Ch 2, hdc in next 14(16, 18, 20, 21, 23, 25, 27, 29) sts, *3 hdc in next, hdc in next 15(17, 19, 21, 22, 24, 26, 28, 30) sts, repeat from * 5 more times, 3 hdc in next st, hdc in remaining sts, turn. 140(156, 172, 188, 196, 212, 228, 244, 260) hdc.
Flare Rows Continuing
Row 4: Ch 2, hdc in next 16(18, 20, 22, 23, 25, 27, 29, 31) sts, *2 hdc in next, hdc in next 17(19, 21, 23, 24, 26, 28, 30, 32) sts, repeat from * 5 more times, 2 hdc in next st, hdc in remaining sts, turn. 147(163, 179, 195, 203, 219, 235, 251, 274) hdc.
Final Flare Rows
Row 5: Ch 2, hdc 16(18, 20, 22, 23, 25, 27, 29, 31) sts, *2 hdc in next, hdc in next 18(20, 22, 24, 25, 27, 29, 31, 33) sts, repeat from * 5 more times, 2 hdc in next st, hdc in remaining sts, turn. 154(170, 186, 202, 210, 226, 242, 258, 281) hdc.
Row 6: Ch 2, hdc in next 17(19, 21, 23, 24, 26, 28, 30, 32) sts, *2 hdc in next, hdc in next 19 (21, 23, 25, 26, 28, 30, 32, 34) sts, repeat from * 5 more times, 2 hdc in next st, hdc in remaining sts, turn. 161(177, 193, 209, 217, 233, 249, 265, 288) hdc.
Final Flare Row Sequence
Row 7: Ch 2, hdc in next 17(19, 21, 23, 24, 26, 28, 30, 32) sts, *2 hdc in next, hdc in next 20(22, 24, 26, 27, 29, 31, 33, 35) sts, repeat from * 5 more times, hdc in last 19(20, 21, 22, 23, 24, 25, 26, 27) sts, turn. 168(184, 200, 216, 224, 240, 256, 272, 295) hdc.
Row 8: Ch 2, hdc in next 18(21, 23, 25, 26, 28, 30, 32, 34) sts, *2 hdc in next, hdc in next 21(23, 25, 27, 28, 30, 32, 34, 36) sts, repeat from * 5 more times, 2 hdc in next st, hdc in remaining sts, turn. 175(191, 207, 223, 231, 247, 263, 279, 302) hdc.
Final Length of Flare
Continue in this sequence until you have the desired length; Prototype made to Row 28 measuring 10”!
Finishing for This Flared Crochet Cardigan Pattern
Please note that you can either use buttons or zippers.
Kindly follow the instructions for either.
Option 1: Zippers
Note: Make sure you don’t sew too close to the zipper tooth. The slip stitch gives a clean edge.
On the right side of the body – working on the sides/edges from the last row of the collar towards the flare:
Join yarn with a slip stitch to the edge of the collar, ch 1, sc in the first st, *hdc in next, sl st in next, repeat from * to last stitch, sc, end, turn.
Ch 1, sc in the first stitch, *sl st, hdc, repeat from * to last st, sc.
Ch 1, sc in each st across, turn.
Ch 1, slip stitch in each stitch across.
Fasten off, repeat on the left side.
To Add Zipper
Measure from the tip of your flare to the edge of collar to get the required length for a zip.
Place your zipper on your cardigan, secure both ends with needles.
On each side, with a sewing needle, sew the zipper and cardigan together, starting from the collar towards the flare.
Repeat on the other side.
- Funny Pictures
-
 Pics to Get the Excitement Today
-
 Funny Christmas Meme Dump
-
 Funniest Relatable Felines in the Form of Memes
- Recipes
-
 Cinnamon Sugar Swirl Cupcakes
-
 Cheesy Bacon Ranch Roasted Potatoes
-
 Blooming Onion Bites with Dipping Sauce
- Lifehacks
-
 7 Toilet and Bathroom Cleaning Hacks
-
 Tips & Hacks for Clean Carpets
-
 7 Kitchen Hacks & Simple Solutions
- Crochet Ideas
-
 Crochet Watermelon Amigurumi
-
 Crochet Shark Applique
-
 Crochet Pineapple Amigurumi
- DIY
-
 Yarn Wrapped Christmas Wreath Ornaments
-
 Egg Carton Snowman Ornament
-
 Stick Peppermint Candy Ornament
- Knitting Ideas
-
 Knitted Star Square Dishcloth
-
 Knitted Free 2025 Year Dishcloth
-
 Knitted Belle Finger Puppet