Crochet Spring Cardigan

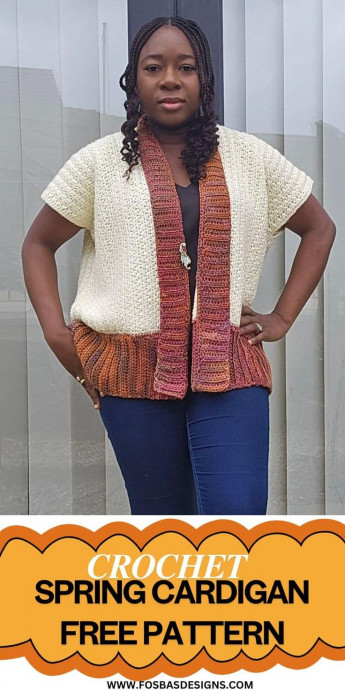
Looking for a cozy and stylish addition to your spring wardrobe? The Crochet Spring Cardigan is just what you need! This charming and versatile piece is perfect for adding a touch of warmth without sacrificing style. Whether you're heading out for a casual stroll or cozying up at home, this cardigan will be your go-to companion. Its soft fabric and lovely crochet design make it a must-have for the season. Stay comfy and chic with the Crochet Spring Cardigan!
Materials Needed for the Crochet Spring Cardigan
Yarn – Any worsted-weight yarns in colors of your choice.
The prototype was made using:
- Hobbii Mega Ball, Aran weight, #4 (100% Acrylic, 1200 m (1312 yds) per 14.1oz/400g Ball)
- Hoobii Happy Sheep Wool Print
Estimated Total Yardage
Main Color (Cream)
- 1000 (1100, 1200, 1300, 1400, 1500, 1600, 1700, 1800) Yards
Contrasting Color (Variegated)
- 200 (250, 300, 350, 400, 450, 500, 550, 600) Yards
Hook – 6 mm Crochet Hook
Tapestry needle
Gauge
14 sts over 9 Rows = 4 x 4” made in xhdc, before blocking.
Crochet Spring Cardigan Pattern Notes
- Please kindly read through the pattern before starting.
- Beginning chains count as a stitch except when stated otherwise throughout the pattern.
- Stitch count is written after each row/round with the smallest size, XS, written first and the others in parentheses.
- Stitch count written in black is for all sizes but at some points, the stitch counts are color-coded for clarity, i.e., XS (S, M, L, XL, 2XL, 3XL, 4XL, 5XL)
Difficulty Level
Intermediate
Terms
US Terminology
Stitches Abbreviations
- Chain/chains – ch/chs
- Stitch(es) – st(s)
- Slip Stitch – sl st
- Single Crochet – sc
- Half Double Crochet – hdc
- Crossed Half Double Crochet – xhdc
Special Stitches
Crossed Half Double Crochet – skip next st, hdc in next st, crocheting over the hdc just made, work hdc into the skipped st
Crochet Spring Cardigan Finished Measurements
Size(s) and color codes – XS (S, M, L, XL, 2XL, 3XL, 4XL, 5XL)
- Bust Measurement: 30 (34, 38, 42, 46, 50, 54, 58, 62)”
- Finished Bust Measurement: 34 (38, 42, 46, 50, 54, 58, 62, 64)”
- Armhole Measurement: 7.5 (8, 8, 8.5, 8.5, 9, 9, 9.5, 10)”
- Length of Poncho: 30 (30, 25, 28, 28, 28, 30, 30, 30)”
The modeled garment is shown in M, with about 8” of Positive Ease.
How to Crochet a Spring Cardigan
Construction Notes
- This vest is worked in one section with 2 separate pieces made.
- The panels are then joined together to create an armhole opening and an open front part.
- The band is then made in rows around the lower end and the front opening.
Crochet Spring Cardigan Pattern
Section 1: Front and Back Panels
Make 2
With A, Chain 148 (148, 148, 162, 162, 162, 178, 178, 178)
Row 1: Hdc in 3rd Ch from hook and in each Ch across, turn. 146 (146, 146, 160, 160, 160, 176, 176, 176) hdc
Row 2: Ch 2, hdc in first st, xhdc across until the last st, hdc in last st, turn. 72 (72, 72, 79, 79, 79, 87, 87, 87) xhdc, 2 hdc.
Rows 3 – 10 (12, 14, 16, 18, 20, 22, 24, 26): Repeat rows 2
Continue the repeats until your piece’s width measures = 10 (10, 12, 14, 14, 16, 16, 16, 16)”
Each panel should measure approximately 10 (10, 12, 14, 14, 16, 16, 16, 16)” by 45 (45, 45, 48, 48, 48, 50, 50, 50)”

Edging
You can use color specific to each edge or use the same color when working on the edges.
Crocheting around the whole panel.
Round 1: Ch 1, sc evenly around, aim for 2 sc in each dc/ch sp and (sc, ch 2, sc) at each corner, join with a sl st to the beginning ch.
Round 2: Ch 1, sc in each st around, (sc, ch 2, sc) at each corner, join with a sl st to the beginning ch.
Fasten off.
To Join
Place both panels beside each other.
Join color A with a sl st to the edge of any of the panels.
Using either a darning needle or a crochet hook with mattress st or sl st, join the sides together until halfway through, leave the remaining unjoined. These will be the front opening.
Fasten off.
Side Seam and Armhole
Fold the panel in two, as shown in the photo below, and turn to the wrong side.
Measure 7.5 (8, 8, 8.5, 8.5, 9, 9, 9.5, 10)” from the shoulder tip downwards.
Using either darning needle or a crochet hook with mattress st or sl st, join the sides together.
Fasten off.

Finishing: Adding Band
There are two options:
Poncho Lower Band
With Color B
You can adjust the length of the band by increasing or decreasing the number of chains made.
Option 1
Row 1: Chain 20, hdc in 3rd ch from hook and in each chain across, skip corresponding st on the body of the poncho, sl st into the next 2 sts on the poncho, turn. 18 hdc
Note:
You can go down a hook size for the ribbing.
Skip 3 sts instead of 2 sts for a neater joining on the body of the poncho.
Row 2: In BLO, hdc in each st across, turn
Row 3: Ch 2, in BLO, hdc in each st across, skip corresponding st on the body of the poncho, sl st into the next 2 sts on the sweater, turn. 18 hdc
Rows 4 – end: Repeat Rows 2 and 3 until you have crocheted into all the stitches on the lower end of the poncho.
Crocheting across the band just made, join yarn with a sl st to any of the sts on the edge.
Row 1: Ch 1, sc evenly across.
Fasten off.
Option 2: Band Made Separately and Then Joined to the Poncho
Row 1: Ch 22, hdc in 3rd ch from the hook and in each ch across, turn. 20 Hdc
Row 2: Ch 2, in BLO, hdc in each st across
Rows 3 – until you have a length long enough around the poncho lower end: Repeat Row 2
Joining the Band to the Poncho
Place the band next to the lower edge of the poncho.
Using color B, sl st or sc to join the band to the poncho.
Poncho Band: Front Opening
With Color B
You can adjust the length of the band by increasing or decreasing the number of chains made.
Option 1
Row 1: Chain 12, hdc in 3rd ch from hook and in each chain across, skip corresponding st on the front of the poncho, sl st into the next 2 sts on the poncho, turn. 10 hdc
Note:
You can go down a hook size for the ribbing.
Skip 3 sts instead of 2 sts for a neater joining on the cardigan.
Row 2: In BLO, hdc in each st across, turn
Row 3: Ch 2, in BLO, hdc in each st across, skip corresponding st on the cardigan, sl st into the next 2 sts on the sweater, turn. 18 hdc
Rows 4 – end: Repeat Rows 2 and 3 until you have crocheted into all the stitches on both fronts of the cardigan.
Crocheting across the band just made, join yarn with a sl st to any of the sts on the edge.
Row 1: Ch 1, sc evenly across.
Fasten off.
Option 2: The Band Is Made Separately and Then Joined to the Cardigan
Row 1: Ch 22, hdc in 3rd ch from the hook and in each ch across, turn. 20 Hdc
Row 2: Ch 2, in BLO, hdc in each st across
Rows 3 – until you have a length long enough around the poncho’s lower end: Repeat Row 2
Joining the Band to the Cardigan
Place the band next to the front opening.
Using color B, sl st or sc to join the band to the poncho.
Weave in all ends.
Block your vest to measurement.
- Funny Pictures
-
 These are the Pics That Simply Describe Your Life
-
 Hilariously Accurate Parenting Memes That Show the Other Side of Parenthood
-
 Great Pics That Just Depict Our Lives
- Recipes
-
 Crispy Baked Avocado Fries
-
 Baked Beans and Hot Dogs with Biscuit Topping
-
 Roasted Rosemary Lemon Chicken Breasts
- Lifehacks
-
 Crochet Basics: Twisted Fringe
-
 7 Crochet Tips And Tricks
-
 How To Work Crochet Into Denim
- Crochet Ideas
-
 Crochet Snorlax Plushie Doll
-
 Crochet Cat in 1 Row
-
 Crochet Beautiful Penguin Toy
- DIY
-
 Popsicle Stick and Jingle Bell Christmas Tree Ornament
-
 Upcycled Mason Jar Chicken Vase
-
 Crochet Namaste Stephanie Doll
- Knitting Ideas
-
 Knitted Keepsake Bag
-
 Knitted Textured Heart Dishcloth
-
 Knitted Snowfall Dishcloth