Crochet Turkey Bread Basket

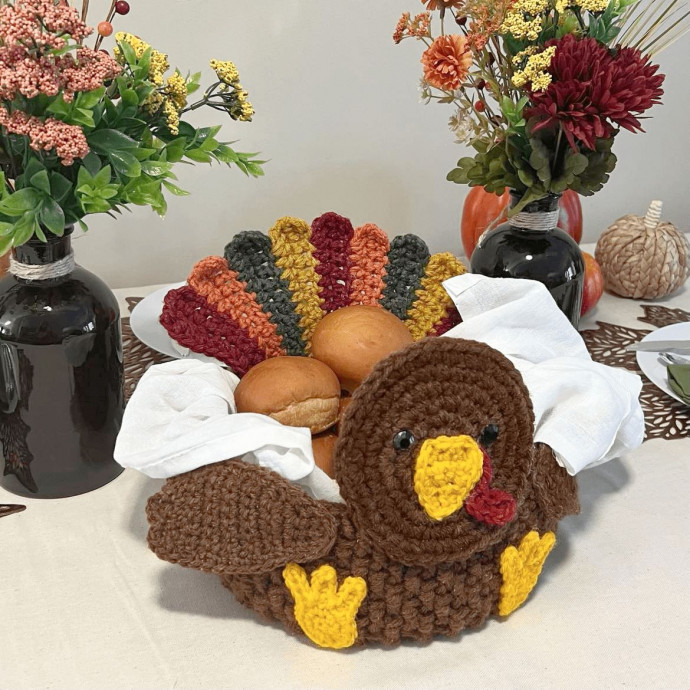
The Crochet Turkey Bread Basket is a charming and whimsical addition to any Thanksgiving table. Crafted with love and creativity, this delightful piece combines functionality with style, making it a perfect centerpiece for displaying your bread rolls or dinner rolls. The intricate crochet work captures the essence of fall and the spirit of the holiday season, adding a unique touch to your dining experience. With its warm colors and intricate details, this turkey-shaped bread basket is sure to draw compliments from your guests and make your Thanksgiving feast even more festive and memorable. So, why not treat yourself and your loved ones to a touch of handmade charm this Thanksgiving with the Crochet Turkey Bread Basket?
Materials
- Brown [5.5oz/350yds]
- Red [1oz/65yds]
- Yellow [.75ozs/48yds]
- Orange [.5oz/32yds]
- Green [.5oz/32yds]
- K/10.5/6.50mm Hook
- H/8/5.50mm Hook
- 12mm Black Gems
- Yarn Needle
- Scissors
Gauge
10 sts x 8 rows = 4”
Gauge is not critical for this project
Finished Measurements
- 9”D (across bottom)
- 4”H (basket sides)
Stitch Guide
- Adc = See Special Stitches
- arnd = around
- BPdc = See Special Stitches
- ch = chain
- dc = double crochet
- FPdc = See Special Stitches
- hdc = half double crochet
- sc = single crochet
- sl st(s) = slip stitch(es)
- st(s) = stitch(es)
Skill Level
Easy
Pattern Notes
- Beginning chains do not count as stitches.
- Where asterisks appear, repeat the instructions between them.
- Where parenthesis appear, work those stitches all into the same space.
- Pro tip: If you’re wanting the tail feathers to be stiffer, you can crochet over craft wire or fishing line!
Special Stitches
- Front Post Double Crochet (FPdc): Front-post double crochet—Yarn over, insert hook from front to back and then to front again around post of stitch, yarn over and draw up loop, [yarn over and draw through 2 loops on hook] twice.
- Back Post Double Crochet (BPdc): Back-post double crochet—Yarn over, insert hook from back to front and then to back again around post of stitch, yarn over and draw up loop, [yarn over and draw through 2 loops on hook] twice.
- Alternate Double Crochet (Adc): Without chaining, work sc in first stitch, insert hook in middle of sc, yo, draw up a loop, yo, draw through both loops.
Instructions
BASKET (Double Strand + K Hook)
With Brown,
- R1. Magic Ring, ch 2 (counts as 1st stitch), 10 dc in ring, sl st to join (11)
- R2. Ch 2 (counts), dc in same space as ch, 2 dc in each st arnd, sl st to join (22)
- R3. Ch 2, *2 dc, dc* in each st arnd, sl st to join (33)
- R4. Ch 2, *2 dc, dc x 2* in each st arnd, sl st to join (44)
- R5. Ch 2, *2 dc, dc x 3* in each st arnd, sl st to join (55)
- R6. Ch 2, *2 dc, dc x 4* in each st arnd, sl st to join (66)
- R7. Ch 2, *2 dc, dc x 5* in each st arnd, placing 2 dc in last st, sl st to join (78)
- R8. Ch 1, FPdc arnd 1st st, BPdc arnd next st, *FPdc, BPdc* arnd, sl st to join (78)
- R9. Ch 1, BPdc arnd 1st st, FPdc arnd next st , *BPdc, FPdc* arnd, sl st to join (78)
- R10-15. Repeat R8&9; Fasten at end of R15.
HEAD (Double Strand + K Hook)
With Brown,
- R1. Make magic ring, ch 1, 6 sc in ring (6)
- R2. 2 sc arnd (12)
- R3. *2 sc, sc* arnd (18)
- R4. *2 sc, sc x 2* arnd (24)
- R5. *2 sc, sc x 3* arnd (30)
- R6. *2 sc, sc x 4* arnd (36)
- R7. sc x 3, *2 sc, sc x 5* 5X, 2 sc, sc x 2, sl st x 2; Fasten. (42)
TAILFEATHER (Double Strand + K Hook)
With Red,
- R1. Ch 16, sc x 5, hdc x 5, dc x 5, turn
- R2. Ch 1, Adc in 1st st, dc x 4, hdc x 5, sc x 5, turn
- With Orange,
- R3. Ch 1, sc x 5, hdc x 5, dc x 2, 3 dc in next st, leave last 2 sts unworked, turn
- R4. Ch 1, Adc in 1st st, dc x 4, hdc x 5, sc x 5, turn
- With Green,
- R5-6. Repeat R3&4
- With Yellow,
- R7-8. Repeat R3&4
- With Red,
- R9-10. Repeat R3&4
- With Orange,
- R11-12. Repeat R3&4
- With Green,
- R13-14. Repeat R3&4
- With Yellow,
- R15-16. Repeat R3&4
- With Red,
- R17-18. Repeat R3&4; Fasten at the end of R18.
WINGS (Make 2) (Single Strand + H Hook)
With Brown,
- R1. Ch 4, sc in 2nd ch from hook and across, turn (3)
- R2. Ch 1, sc across, turn (3)
- R3. Ch 1, 2 sc, sc, 2 sc, turn (5)
- R4. Ch 1, sc across, turn (5)
- R5. Ch 1, 2 sc, sc x 3, 2 sc, turn (7)
- R6-13. Ch 1, sc across, turn (7)
- R14. Ch 1, sc, skip 1, sc x 3, skip 1, sc, turn (5)
- R15. Ch 3, 2 trc in same space as ch, sl st x 2, (ch 2, 2 dc) in same space as last sl st, sl st x 2, (ch 1, 2 sc) in same space as last sl st; turn project slightly and sc in the end of each row and in each st arnd the wing (do not work back across top); Fasten.
FEET (Make 2) (Single Crochet + H Hook)
With Yellow,
- R1. Magic Ring, ch 1, 6 sc in ring (6)
- R2. 2 sc arnd (12)
- R3. 2 dc x 2, sc x 3, *[ch 4, hdc in 2nd ch from hook and across], sl st in next sc* 3X; Fasten.
BEAK (Single Strand + H Hook)
With Yellow,
- R1. Ch 5, sc in 2nd ch from hook and across, turn (4)
- R2. Ch 1, sc across, turn (4)
- R3. Ch 1, dec x 2, turn (2)
- R4. Ch 1, sc across, turn (2)
- R5. Ch 1, dec (1); turn slightly and sc in the end of each row and in each st arnd; Fasten.
SNOOD (Single Strand + H Hook)
With Red,
- Ch 9, sc in 2nd ch from hook and in next 2 chs, skip 1 ch, sl st in next, 2 sc x 2, 4 sc in last; Fasten.
Finishing
Attach beak to head, so R1 of beak is across R1 of head.
Attach snood to head, so the 1st stitch of the snood is attached to the corner of R1 of beak. I tucked mine under the beak.
Attach black gems to head slightly above and to the side of the beak corners.
Attach head to the outside front center of basket, so R5-7 of head are attached to the basket.
Attach feet to front outside of basket, so the heel of the foot is across R8 of the basket. Leave approx. 10 sts between them, so they are just outside alignment with head.
Attach wings to the front top of basket, leaving one stitch between them and the head. Make sure R1 of wing is closest to the head and the trc stitches are the top of the wing. Angle them slightly upward, so there is about 2-3 stitches peeking above the top of the basket. I only attached R1-6 of the wing, so they would “flap out”.
Attach tail feather to the inside back center of the basket, so half of the tail feather is attached and the other half comes out above the basket.
- Funny Pictures
-
 Hilarious Memes for Those Bored to Tears
-
 Weekly Treat of Funniest Parenting Memes for Good Laugh out Loud Right Now
-
 Really Funny Pics to End These Weekend Perfectly
- Recipes
-
 Crispy Baked Avocado Fries
-
 Baked Beans and Hot Dogs with Biscuit Topping
-
 Roasted Rosemary Lemon Chicken Breasts
- Lifehacks
-
 Crochet Basics: Twisted Fringe
-
 7 Crochet Tips And Tricks
-
 How To Work Crochet Into Denim
- Crochet Ideas
-
 Crochet Snorlax Plushie Doll
-
 Crochet Cat in 1 Row
-
 Crochet Beautiful Penguin Toy
- DIY
-
 Popsicle Stick and Jingle Bell Christmas Tree Ornament
-
 DIY Santa Craft For Kids
-
 Paper Plate Angel Craft
- Knitting Ideas
-
 Knitted Bridger Cowl
-
 Knitted Keepsake Bag
-
 Knitted Cutie Cupcake Dolls