Crochet Isobel's Little Blanket

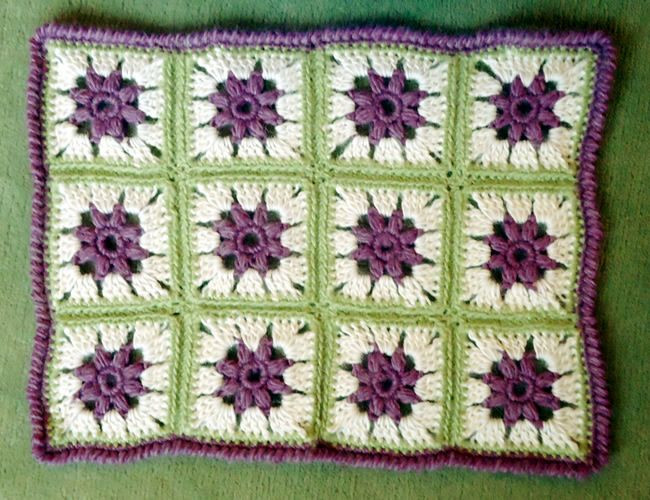
Crochet Isobel's Little Blanket is a delightful project that combines creativity with love. This charming pattern is perfect for both experienced crafters and beginners looking to try something new. The intricate design and cozy texture make it an ideal gift for a little one or a lovely addition to your home decor. Whether you're crocheting this blanket for a newborn or just to unwind after a long day, the process of creating something so beautiful with your own hands is truly rewarding. So grab your yarn, hook, and a cup of tea, and let's get crocheting with Isobel's Little Blanket!
Materials
- 2 x 50g balls of chunky in each of first and second contrast and 1 ball in third contrast.
- One No 2 (7mm) and one No 4 (6mm) crochet hook.
Tension
Each square is intended to measure 4¾ inches.
Size Matters
To fit cot, pram, or Moses basket.
Abbreviations
- yoh: yarn over hook.
- ch: chain.
- cl: cluster.
- dc: double crochet.
- tr: treble crochet.
A Word on the Wool
The original yarn produces a tension of 13sts x 19 rows to 4 ins over stocking stitch. You can substitute an Aran weight yarn worked double throughout, though this is less easy to work with for crochet patterns.
I used Patons Pompero, a chunky yarn knitting to a tension of 16sts x 22 rows to 4 ins, which is thinner, though I used a 7mm hook with it.
The result of my yarn choice is a smaller blanket, requiring only one ball in each colour.
Instructions
There are a couple of new stitches used in this pattern, as well as basic chain, dc, and treble. There is a "cluster" used in making the central flower, and crab stitch for the edging.
Make Cluster:
Working all into the same stitch, yoh, draw through loop; repeat from ** to ** 4 times (9 loops on hook); yoh, draw loop through all loops on hook; yoh, draw loop through stitch on hook.
[Editor's note: This last stitch is just "1 chain".]
Crab Stitch
Crab stitch is worked exactly as you do double crochet - but from right to left instead of left to right. It seems very awkward but just force yourself to do it; push the hook through the stitch to the right of your needle, pull through a loop, then yoh and pull through both loops on hook.
It creates a very attractive twisted ribbed edge.
Motif (Make 12)
Starting at the centre of the square: using 7mm hook and first contrast (plum), make 6ch and join in a ring using a slip stitch.
1st Round:
8dc into the ring and join with a slip stitch to top of first dc.
2nd Round:
1 cluster in first dc, 3ch; 1 cluster in next dc, 1ch; repeat from ** to ** 3 times more, and join with a slip stitch to top of first st.
Change to second contrast (cream).
3rd Round:
Insert hook in first 3-chain space and make 2 chain for first treble; 2tr in same space, 3ch; 3tr in same space, 1ch; 3tr in next 1-chain space, 1ch; 1tr in next 3-chain space, repeat from ** to ** 3 times more, omitting the very last tr in the repeated sequence, and join with a slip stitch to top of first chains.
Change to third contrast (lime).
4th Round:
1 dc, 1dc over each of next 3tr, 3dc into next 3-chain space; 1dc over each of next 3tr, 1dc into next 1-chain space; 1dc over each of next 3tr, 1dc into next 1-chain space; repeat from ** to ** 3 times more, and join with a slip stitch to top of first dc.
Fasten off. This completes the motif.

To Make Up
Make 12 squares altogether.
With 7mm hook and 3rd contrast (lime), join 2 squares together; hold right sides together and slip stitch through the back loop of each dc, leaving the front loops exposed as a decorative ridge on the right side (see photos).
[Editor's note: If you can't immediately see what is meant here, try experimenting. There is a loop on each side of a crochet stitch; usually when placing a stitch on top of the next row, you push your hook through both loops, but for some decorative sts, you are asked to use either only the back or only the front loops in order to create a ridge. Whatever you end up doing, just make sure you are consistent, so that you get a nice consistent pattern emerging.]
Join 3 squares in a row, then join the 4 rows together.
Finally, using first contrast (plum) and with right side facing, work a row of dc all around the blanket and work 2 or 3 sts into the 4 corner sts, to make it curve properly. Then, keeping the right side facing you, change to a 6mm hook and go back the way you came, working one row of crab stitch right to left.
Sew in all ends.
Block the blanket by pinning it out and dampening; leave to dry. You can press very lightly with a damp cloth - just hold the iron above the cloth so it heats it but do not press down. You want to leave the texture of the stitches in place, so do not press heavily.
- Funny Pictures
-
 Pics to Get the Excitement Today
-
 Funny Christmas Meme Dump
-
 Funniest Relatable Felines in the Form of Memes
- Recipes
-
 Cappuccino Brownies
-
 Chicken Mushroom Tortellini Bake
-
 Spinach Pie
- Lifehacks
-
 8 Necessary Tips for Baking Bread
-
 Tips & Hacks for Clean Carpets
-
 10 Uses For Old TV Armoires
- Crochet Ideas
-
 Crochet Watermelon Amigurumi
-
 Crochet Shark Applique
-
 Crochet Pineapple Amigurumi
- DIY
-
 Yarn Wrapped Christmas Wreath Ornaments
-
 Egg Carton Snowman Ornament
-
 Stick Peppermint Candy Ornament
- Knitting Ideas
-
 Knitted Star Square Dishcloth
-
 Knitted Free 2025 Year Dishcloth
-
 Knitted Belle Finger Puppet