Crochet Drawstring Pouch

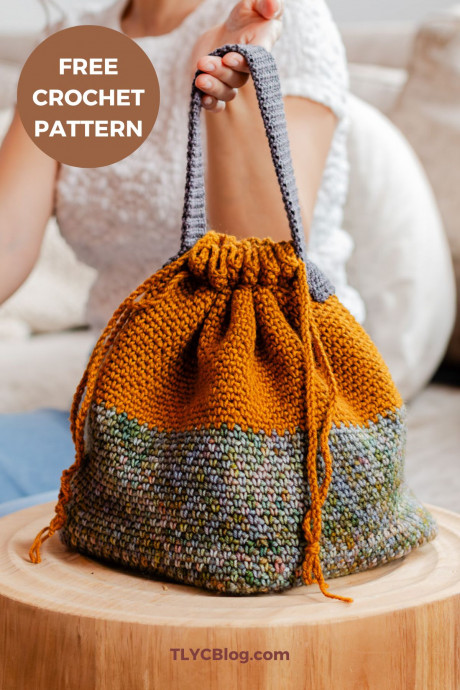
Crochet Drawstring Pouch Overview
Crochet drawstring pouches are the perfect addition to any crafter's repertoire! These cute and practical little bags are versatile and can be used for storing all kinds of goodies like jewelry, small toys, or even makeup. The best part is that you can customize them to match your style by choosing your favorite yarn colors and adding unique embellishments like buttons or beads. They also make wonderful handmade gifts that are sure to put a smile on someone's face. So, grab your crochet hook and get ready to create a one-of-a-kind drawstring pouch that's as charming as it is functional!
Materials Needed
- 545 yards DK-weight yarn (Sample uses Hue Loco DK, category #3, 100% superwash merino – 3 skeins needed)
- 4mm crochet hook
- Scissors
- Tape measure
- Tapestry needle
- Locking stitch markers
- One (1) Clear 7 Mesh plastic canvas – 10.5″ x 13.5″ sheet
- Nail file
Finished Size
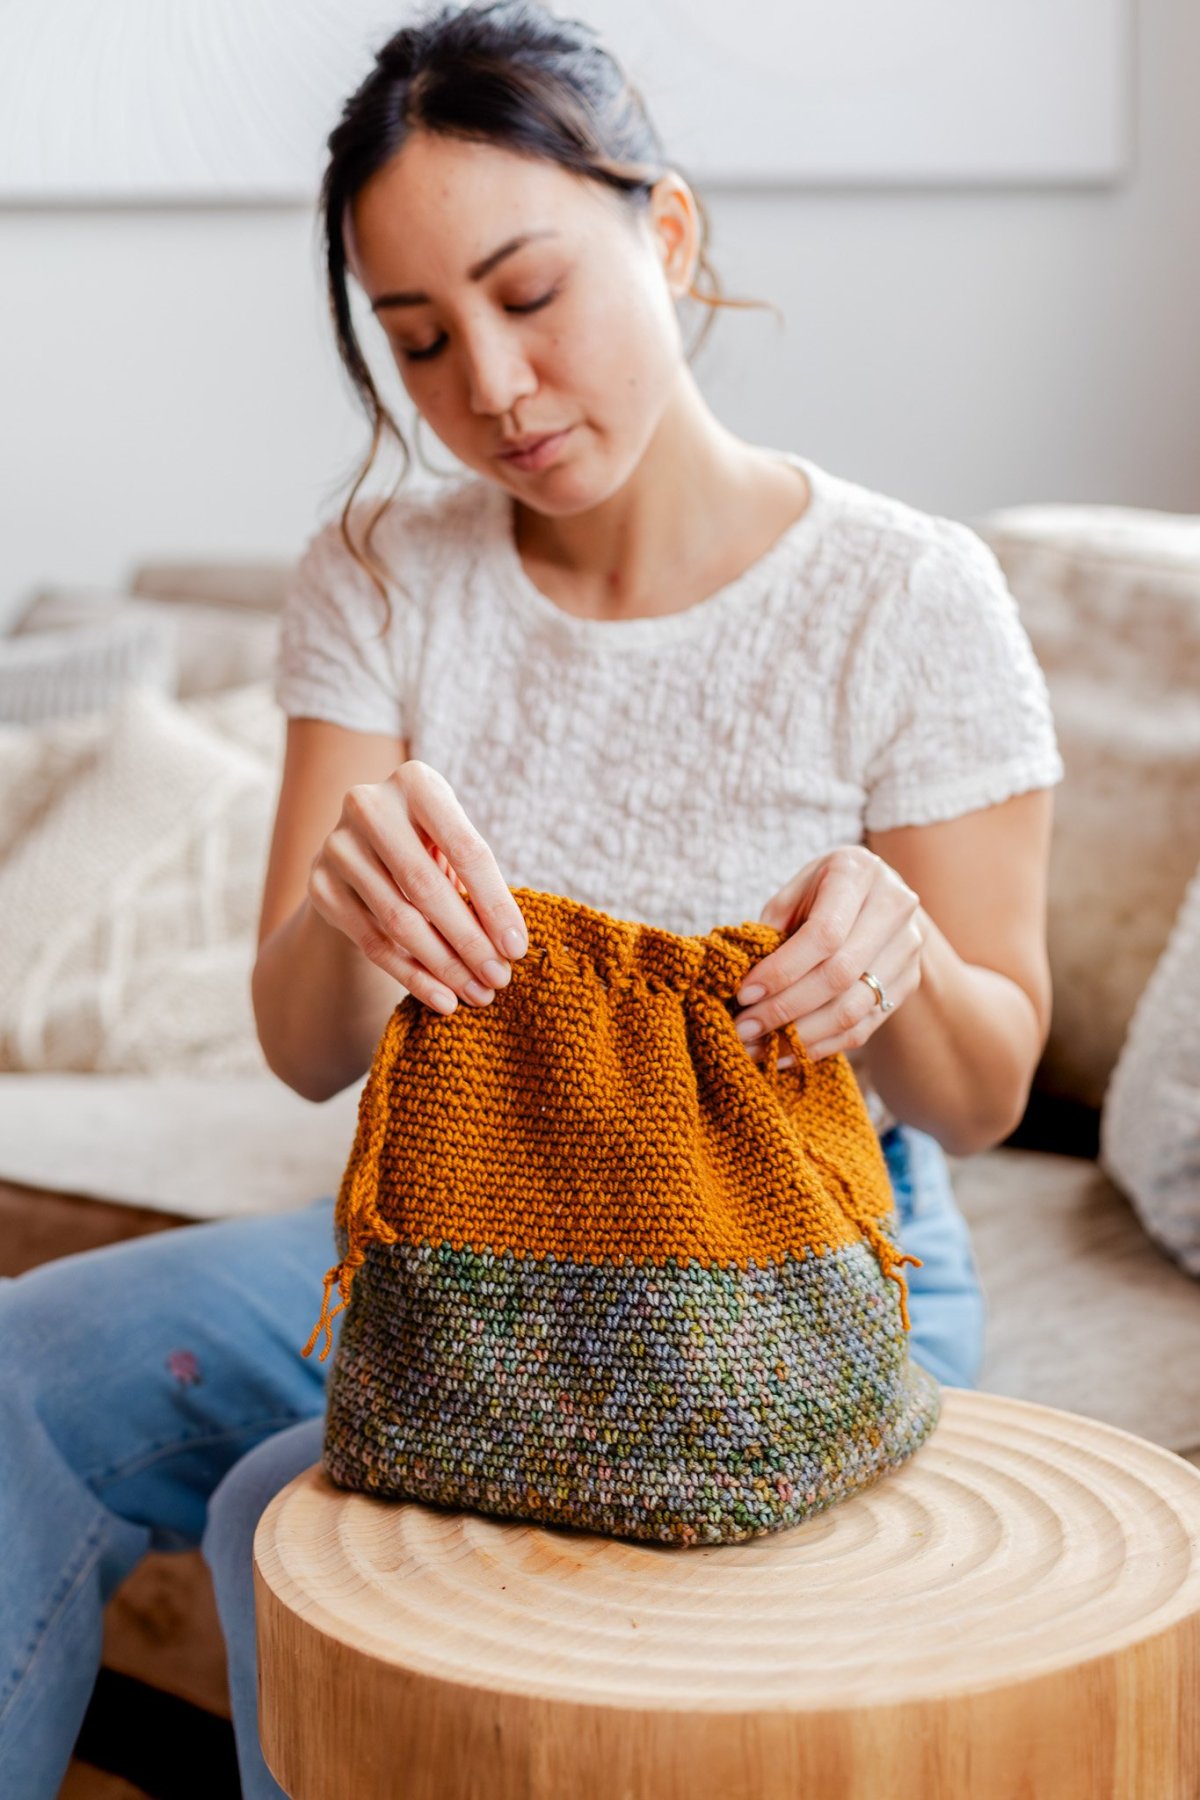
8″ square base, 10″ tall, 6″ handle drop
Gauge
4” = 20 rows x 24 stitches (ch-1 counted as a stitch)
Abbreviations
- BLO = back loop only
- Ch = chain
- Dc = double crochet
- MR = magic ring
- Rep = repeat
- Sc = single crochet
- Sl St = slip stitch
- Sp = Space
- Tch = turning chain
Pattern Notes
Stash Busting Options: This pattern is made to be a stash buster. The bag is made with two full skeins, and the handle is made with an additional 30g of DK weight yarn. Mix and match DK-weight yarns to complete your bag. Full skeins, leftovers, and mini skeins are recommended.
Row Counts: Numbers at the end of some rows indicate the total number of stitches in that row.
Adjusting the Size: Instead of row-by-row counts, this pattern is completed by dimensions. Adjust the dimensions of the bag to suit your personal style. Note that adjusting these dimensions will alter the amount of yarn used.
To make your bag bigger/smaller: Add or remove rounds to the Base.
To make your bag taller/shorter: Add or remove rounds to the Sides.
To make your strap longer or shorter: Add or remove rows to the Handle.
Square One Project Bag Pattern
Base
ROUND 1: In MR, ch 1, (sc, ch 1, sc, ch 2) 4 times, close ring, sl st in first sc to join, turn.
ROUND 2: Sl st into the ch-2 sp, ch 1, sc in same ch-sp, ch 1, sc in next ch-1 sp, ch 1, [(sc, ch 2, sc) in next ch-2 sp, ch 1, sc in next ch-1 sp, ch 1] 3 times, sc in starting ch-2 sp, ch 2, sl st in first sc to join, turn.
ROUND 3: Sl st into the ch-2 sp, ch 1, sc in same ch-sp, ch 1, (sc in next ch-1 sp, ch 1) 2 times, [(sc, ch 2, sc) in next ch-2 sp, ch 1, (sc in next ch-1 sp, ch 1) 2 times] 3 times, sc in starting ch-2 sp, ch 2, sl st in first sc to join, turn.
ROUND 4: Sl st into the ch-2 sp, ch 1, sc in same ch-sp, ch 1, (sc in next ch-1 sp, ch 1) to next ch-2 sp, [(sc, ch 2, sc) in next ch-2 sp, ch 1, (sc in next ch-1 sp, ch 1) to next corner] 3 times, sc in starting ch-2 sp, ch 2, sl st in first sc to join, turn.
Rep Row 4 until the square measures 8” wide, measuring from one flat side across the center to the other flat side. This took me 20 rounds.
When you reach the end of the last round, do not join. Proceed to Side.
Side
Do not join at the end of the round, and do not turn. Instead, we will begin working in continuous rounds.
ROUND 1: After last sc, ch 1, sc in the ch-sp after the first sc (mark this sc), ch 1, (sc in next ch-sp, ch 1) around.
Continue in pattern to work in a spiral until the Side measures 9” from the Base, using the marked stitch as the start. This took me 45 rounds.
When you reach 9”, work until you come to the end of the round (trace up from the marked stitch to determine the approximate end of the round). Continuing in pattern, place a sl st in the next ch-sp instead of a sc.
NEXT ROUND: Ch 4 (counts as dc + ch 1), (dc in next ch-1 sp, ch 1) around, sl st in 3rd ch of tch. Ensure you have an EVEN number of dc in your round. I had 78.
NEXT ROUND: Sl st into next ch-sp, ch 1, sc in same sp, (ch 1, sc in next ch-sp) around, sl st in first sc to join.
Rep last round 3 more times. Fasten off.
Do not remove the placed marker!
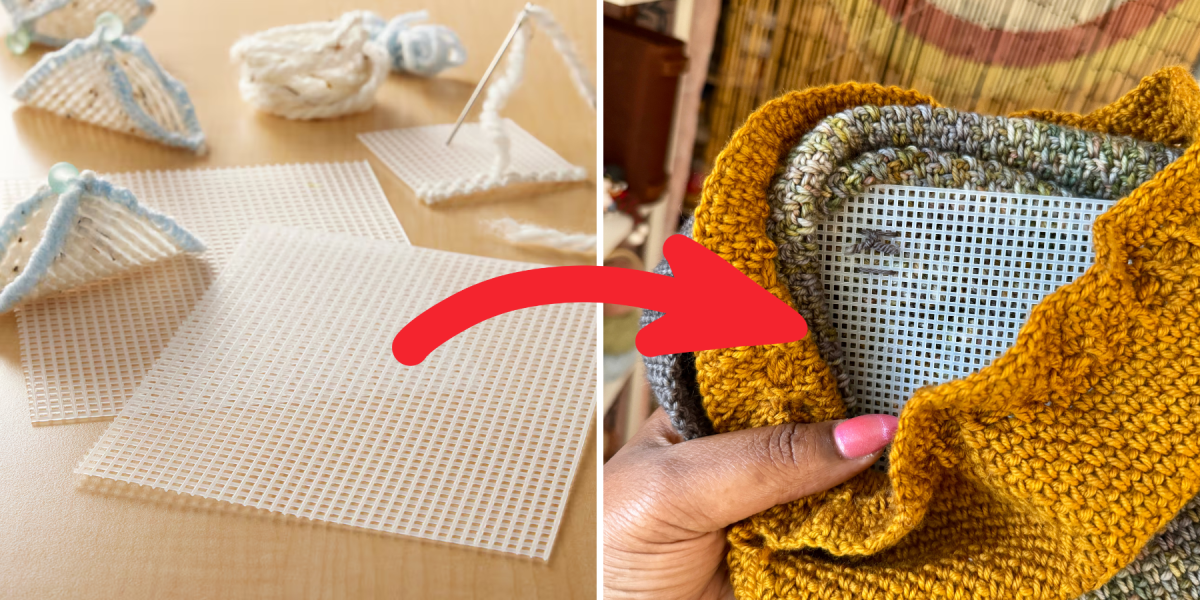
Strengthen the Base
Cut #7 mesh to an 8×8 square. Use scissors to round out the corners. Use a nail file to smooth out the sides.
Insert mesh into the bottom of the bag. Use leftover yarn and a tapestry needle to sew the mesh to the bottom of the bag in a cross pattern – one in each corner. Knot the length of yarn on the inside of the bag.
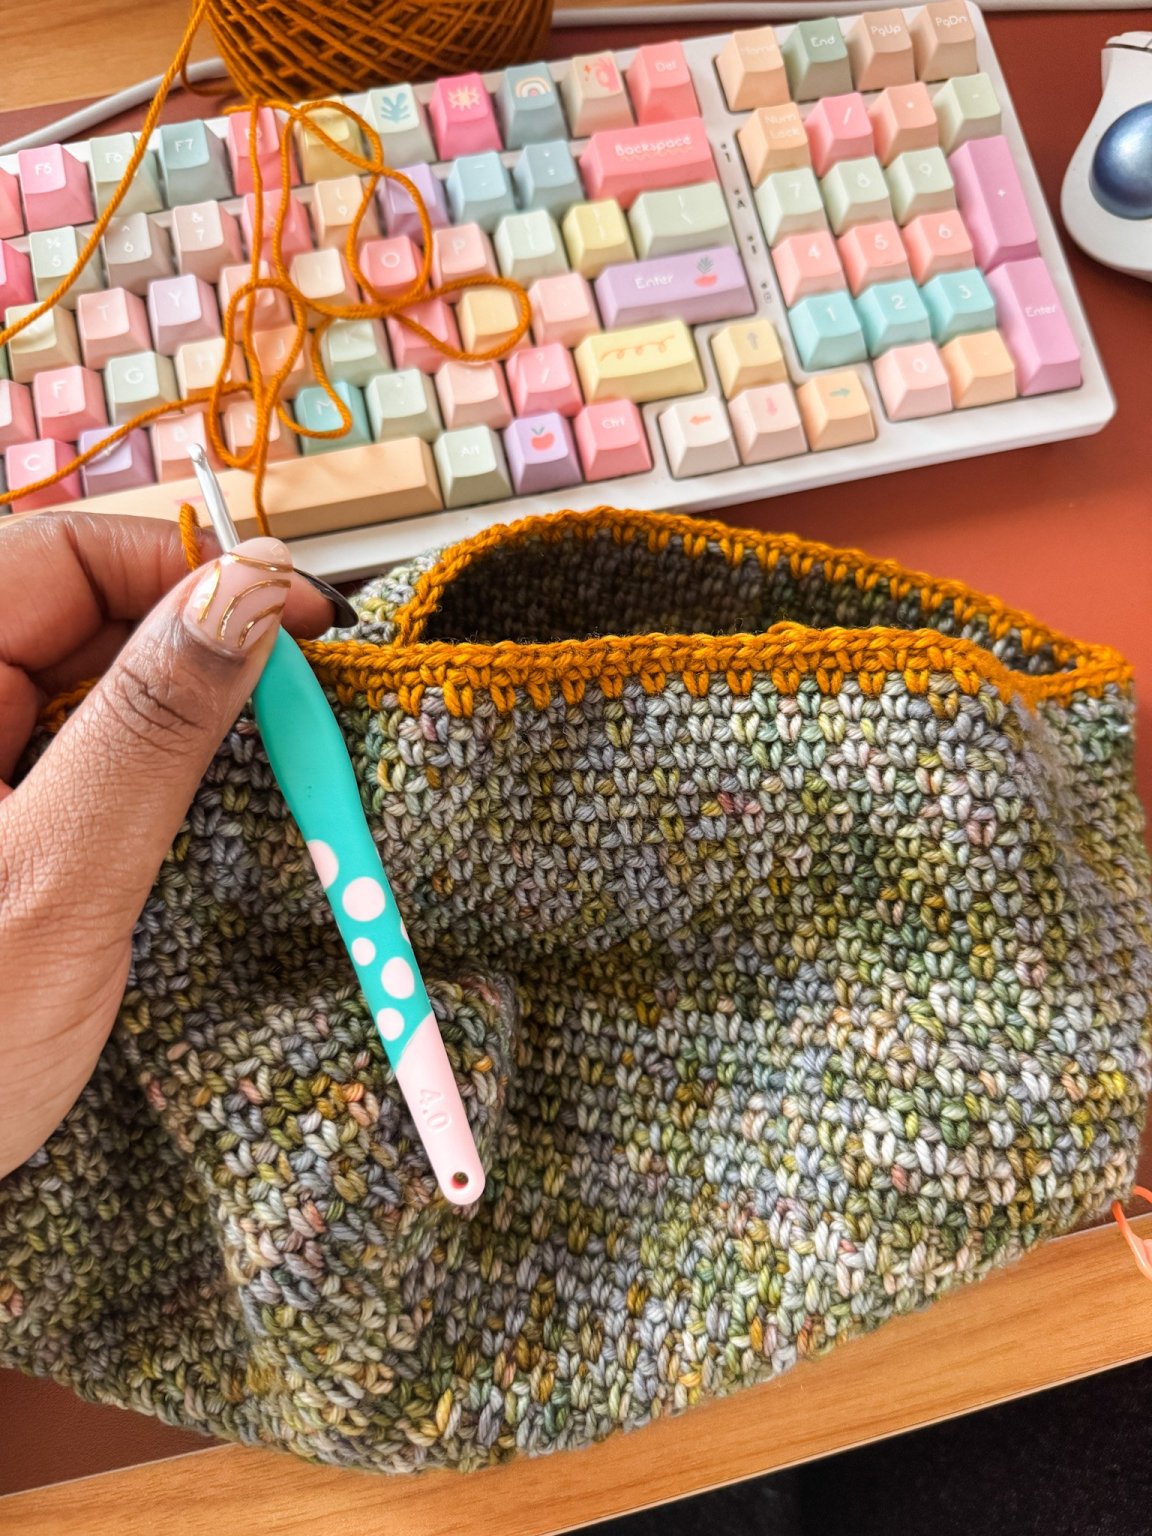
Drawstring
Locate the marked stitch. Trace up from this marker to the dc row. Mark the corresponding dc. Lay bag flat with marked dc at one end. Find the dc on the opposite side of the row. Mark this dc also.
Make two lengths of chain that are 28” when lightly stretched. Ensure they are not tight. Lightly steam block the chains to 28”. Set aside.
Handle
ROW 1: Leaving an 8” tail for seaming, ch 10, starting in the 2nd ch from the hook, sc BLO across row, turn. (9 sc)
ROW 2: Ch 1, sc across row, catching the back loop + the free loop of the stitch one row below, turn.
Rep Row 2 until Handle measures 18” long. Fasten off, leaving an 8” tail for seaming.
Assembly
Starting at the first marked dc, weave a length of 28” chain through the dc stitches around the bag until the ends of the chain are coming out of the same space. Secure the ends together with an overhand knot. Remove the marker.
Starting at the opposite marked dc, weave the remaining 28” chain through the dc stitches around the bag until the ends are coming out of the same space. This second chain should follow the same path as the first chain. Secure the ends together with an overhand knot. Remove the marker.
Remove the marker from the marked sc.
Using locking stitch markers, position the ends of the Handle vertically 2.5” below the opening of the bag, centering them below the drawstring. Use the tapestry needle and the 8” tails to secure both sides of the Handle to the bag.
Finishing
Weave in all remaining ends.
Insert soft clothing or balls of yarn to give the bag some shape. Lightly steam block the entire bag to soften the stitches.
- Funny Pictures
-
 Hilarious Memes for Those Bored to Tears
-
 Weekly Treat of Funniest Parenting Memes for Good Laugh out Loud Right Now
-
 Really Funny Pics to End These Weekend Perfectly
- Recipes
-
 Crispy Baked Avocado Fries
-
 Scrambled Chickpea and Spinach Pitas
-
 Cinnamon Pancakes
- Lifehacks
-
 Crochet Basics: Aligned Cobble Stitch
-
 Brick Stitch Crochet Tutorial
-
 Crochet Basics: Wattle Stitch
- Crochet Ideas
-
 Crochet Snorlax Plushie Doll
-
 Crochet Beautiful Penguin Toy
-
 Crochet Tiny Snowman
- DIY
-
 DIY Santa Craft For Kids
-
 Paper Plate Angel Craft
-
 Upcycled Mason Jar Chicken Vase
- Knitting Ideas
-
 Knitted Bridger Cowl
-
 Knitted Keepsake Bag
-
 Knitted Cutie Cupcake Dolls