Adorable Crochet Bunny Pouch Tutorial

Penelope
Mar 08, 2025 03:03 AM
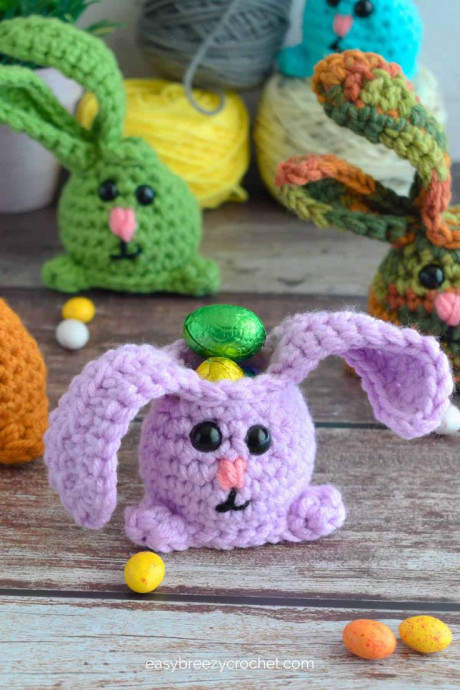
The Crochet Bunny Pouch is an adorable and fun accessory that adds a touch of whimsy to your everyday life. This charming little pouch is perfect for storing small items like coins, lip balm, or even a special trinket. The cute bunny design will bring a smile to your face every time you use it. Whether you're a crochet enthusiast looking for a new project or just want to add a playful element to your day, the Crochet Bunny Pouch is sure to delight you and those around you.
Materials Needed
Yarn
- We used two strands of #4 medium yarn (worsted, Afghan, Aran, or 10-ply) with 11 wraps per inch.
- Color A, green (body) - 56.8 yards (52 meters) - total needed to work in two strands.
- Color B, pink (nose) - 27 inches (70 cm) - total needed to work in two strands.
- Color C, black (mouth) - 11 inches (30cm) - embroider mouth using a single strand.
Hook
- 6.5mm
Notions
- Scissors
- Yarn Needle
- 2 stitch markers
- Eyes - 12mm safety eyes (or glue-on eyes + glue)
Gauge
- Not important for this pattern.
Finished Size
- The finished size of the crochet bunny pouch is about 3 inches (7.6 cm) wide, 3.25 inches (8.3 cm) to the top of the pouch opening, and about 7 inches (18cm) tall to the tip of the ear when fully extended up.
Stitches and Abbreviations Used (US Terms)
- ch - chain stitch
- sc – single crochet
- hdc - half double crochet
- dc - double crochet
- BO - bobble stitch
- col - color
- invdec - invisible decrease
- rnd/rnds – round/rounds
- rpt – repeat
- sk - skip
- sp - space
- sl st – slip stitch
- st/sts – stitch/stitches
- FLO - front of the loop
- BLO - back of the loop
- YO - yarn over
- hk – hook
- lp/lps - loop/loops
- [ ] - at the end of a round, indicates the number of stitches in that round
Special Stitches
- invdec – Insert hook in FLO of next stitch, then in FLO of next stitch, yarn over (YO), pull through 2 loops, YO, pull through 2 loops.
- BO - YO, insert hook into specified stitch, YO pull up loop (3 loops on hook), YO pull through 2 loops (2 loops on hook), YO pull up loop (4 loops on hook), repeat until you pull through all loops (1 loop on hook).
Pattern Notes
- This pattern is worked with two strands of yarn throughout.
- Use a stitch marker to mark the first stitch of each round, and where indicated in the pattern.
Instructions
- Foundation, color A - ch3, sl st into 1st ch to form a ring.
- Rnd 1 – ch1 (not counted as a stitch), 8sc into ring, sl st into 1st stitch to join. [8sc]
- Rnd 2 – ch1 (not counted as a stitch), 2sc in same space as ch-1, 2sc in next 7 stitches, sl st into 1st stitch to join. [16sc]
- Rnd 3 – ch1 (not counted as a stitch), 2sc in same space as ch-1, * 2sc in next, 1sc in next, repeat from * 7 times, sl st into FLO of 1st stitch to join (mark the back loop of this stitch for the next round). [24sc]
- Rnd 4 - sl st in FLO of next 7 stitches, foot 1: in FLO of next stitch (1sc, 1hdc, 1dc, 1hdc, 1sc), sl st in FLO of next 7 stitches, foot 2: in FLO of next stitch (1sc, 1hdc, 1dc, 1hdc, 1sc), sl st in FLO next 8 stitches, sl st into the marked stitch on round 3 to join. [26sc, 4hdc, 2dc]
- Rnd 5 – ch-1 (not counted as a stitch), 1sc in same space as ch-1, 1sc in BLO of next 23 stitches. [24sc]
- Rnd 6 – sl st into next 2 stitches, ch1 (not counted as a stitch), 1sc in same space as ch-1, 1sc in next 22 stitches, BO in next. [23sc, 1BO]
- Rnd 7 - 1sc in each stitch. [24sc]
- Rnd 8 - 1sc in next 11 stitches, drop color A (keep loop on hook), nose: pick up color B (work with two strands), insert hook into next stitch and pull up a loop, YO, insert hook back into same stitch, YO and pull up a loop, drop color B and pick up color A, YO and pull through all loops on hook, 1sc in each of the next 12 stitches. [23sc, nose]
- Finish nose and mouth- Before moving onto the next round, knot the yarn ends of color B to secure in place and trim away the excess.- Then with a single strand of color C (black) worsted yarn embroider on an upside-down “T” for the mouth.
- Rnd 9 – *1sc in next 4 stitches, invdec, repeat from * 4 times. [20sc]
- Rnd 10 – *1sc in next 3 stitches, invdec, repeat from * 4 times. [16sc]
- Rnd 11 – 1sc in next 4 stitches, ear 1: ch13, 1dc in 3rd ch from hook, 1dc in next 2 stitches, 1hdc in next 8 stitches, 1sc in next stitch on pouch edge, invdec, 1sc in next 4 stitches, ear 2: ch13, 1dc in 3rd ch from hook, 1dc in next 2 stitches, 1hdc in next 8 stitches, sk 2 stitches on pouch edge (buttonhole), 1sc in next 3 stitches.
- Rnd 12 – sl st into next 4 stitches, sl st into the 1st stitch on the ear, 1sc in next 10 stitches of the ear, (1sc, ch3, 1sc) in the turning ch (top of ear), 1sc in next 10 stitches down the ear, sl st into last stitch on ear, sl st into next 5 stitches along the edge of the pouch, sl st into 1st stitch of next ear, 1sc in next 10 stitches of the ear, (1sc, ch3, 1sc) in the turning ch (top of ear), 1sc in next 10 stitches down the ear, sl st into last stitch on ear, sl st into next 2 stitches on the pouch, cut yarn fasten off and weave in ends.
- Finishing- Position the eyes about 1 row above the nose evenly spacing them apart.- Fill the pouch with small treats or gifts.- To close the pouch, slip the right ear into the buttonhole created in round 11 and pull tight.
Additional Notes
Tips
- When creating the bobble stitch tail, pull the loops up higher making them slightly looser which will make it easier to pull all the loops through the stitch, and it will also make it easier for you to pull your hook through all the loops to complete the stitch.
- Don't add a chain stitch after making the bobble stitch tail. This will increase the stitch count making the pattern incorrect.
No comments
Write a comment
- Funny Pictures
-
 Pics to Get the Excitement Today
-
 Funny Christmas Meme Dump
-
 Funniest Relatable Felines in the Form of Memes
- Recipes
-
 Cappuccino Brownies
-
 Chicken Mushroom Tortellini Bake
-
 Spinach Pie
- Lifehacks
-
 8 Necessary Tips for Baking Bread
-
 Tips & Hacks for Clean Carpets
-
 10 Uses For Old TV Armoires
- Crochet Ideas
-
 Crochet Watermelon Amigurumi
-
 Crochet Shark Applique
-
 Crochet Pineapple Amigurumi
- DIY
-
 Yarn Wrapped Christmas Wreath Ornaments
-
 Egg Carton Snowman Ornament
-
 Stick Peppermint Candy Ornament
- Knitting Ideas
-
 Knitted Star Square Dishcloth
-
 Knitted Free 2025 Year Dishcloth
-
 Knitted Ribbed Adult Hat