How to Create a Crochet Drawstring Bag

Discover the art of creating your very own crochet drawstring bag! This delightful project allows you to showcase your creativity and create a practical accessory that is both stylish and functional. With just a few simple crochet stitches, you can transform a ball of yarn into a beautiful bag that is perfect for carrying your essentials. Not only will you have a unique and personalized accessory, but you'll also have a functional bag that can be used for a variety of purposes. Whether you use it as a stylish purse, a handy storage bag, or a thoughtful gift for a loved one, your crochet drawstring bag is sure to be a cherished item that showcases your creativity and craftsmanship. So grab your crochet hook and yarn, and let your imagination run wild as you embark on this exciting crochet project!
Materials
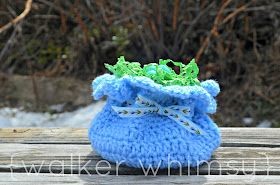
I used a G hook, Red Heart Super Saver yarn in what I believe is Light Blue, and approximately 2.5 feet of ribbon.
Abbreviations
- ch = chain
- sl st = slip stitch
- sc = single crochet
- dc = double crochet
Instructions
Rounds for the Base
ROUND 1: Start with a magic adjustable ring. Ch 3. 15 dc. Join.
ROUND 2: Ch 3, *2 dc in next stitch, dc in next stitch*. Repeat from * to * to end. Join.
ROUND 3: Ch 3, *2 dc in next stitch, dc in next 2 stitches*. Repeat from * to * to end. Join.
That's the bottom of the bag. Now,
Rounds for Body of Bag
ROUND 4: (In back loops only for this round), dc in each dc around. Join.
ROUND 5: Ch 3. Dc in each dc around. Join.
ROUND 6: Same as round 5.
ROUND 7: Same as round 5.
Halfway there!
Rounds for the Top Edge
ROUND 8: Ch 1. Sc in each dc around. Join.
ROUND 9: Ch 1. Sc in each sc around. Join.
ROUND 10: Same as round 9.
Now for the ribbon row (you'll thread it in afterward):
ROUND 11: Ch 3. Dc in next two stitches. *Skip 1 stitch, ch 1. Dc in next three stitches*. Repeat from * to * to end. Join.
Almost done!
Finalizing the Bag
ROUND 12: Ch 1. Sc in each stitch around. Join.
ROUND 13: Same as round 12.
ROUND 14: Same as round 12.
For the last row, I added scallops. I know, I know. But, hey! There's nary a pom pom in sight. That's gotta count for something, right?
ROUND 15 (optional scallops): Skip 1 stitch, 6 dc in next stitch, skip 1 stitch, sl st in next st. Repeat from * to * to end. Join.
Finish off and weave in ends.
Weave ribbon through round 11.
- Funny Pictures
-
 Hilarious Memes for Those Bored to Tears
-
 Weekly Treat of Funniest Parenting Memes for Good Laugh out Loud Right Now
-
 Really Funny Pics to End These Weekend Perfectly
- Recipes
-
 Crispy Baked Avocado Fries
-
 Scrambled Chickpea and Spinach Pitas
-
 Cinnamon Pancakes
- Lifehacks
-
 Crochet Basics: Aligned Cobble Stitch
-
 Brick Stitch Crochet Tutorial
-
 Crochet Basics: Wattle Stitch
- Crochet Ideas
-
 Crochet Snorlax Plushie Doll
-
 Crochet Beautiful Penguin Toy
-
 Crochet Tiny Snowman
- DIY
-
 DIY Santa Craft For Kids
-
 Paper Plate Angel Craft
-
 Upcycled Mason Jar Chicken Vase
- Knitting Ideas
-
 Knitted Bridger Cowl
-
 Knitted Keepsake Bag
-
 Knitted Cutie Cupcake Dolls