Crochet Drawstring Bath Bag: Complete Instructions and Materials List

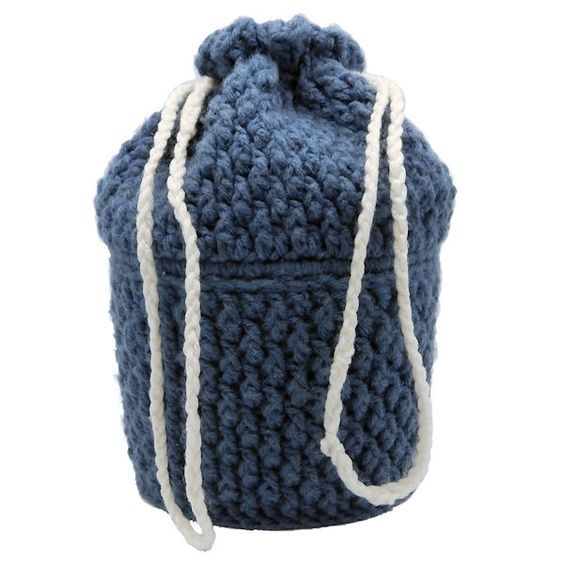
The Crochet Drawstring Bath Bag is an absolute must-have for anyone looking to elevate their bathing experience. Crafted with love and attention to detail, this charming and practical accessory is perfect for keeping all your bath essentials organized and easily accessible. Its drawstring closure ensures your items stay secure while adding a touch of style to your bathroom decor. Whether you're a seasoned crocheter or a newbie to the craft, this project is a fun and rewarding way to create something both beautiful and functional. Pamper yourself or surprise a friend with this delightful bath bag that's sure to bring joy to each bathing ritual.
Materials Needed
- One empty Whipped topping container. Large. 5.5" on the bottom. 6" diameter across the top 4.75" high.
- 1 ball Caron Wintuck4 Worsted Weight yarn.
- Small scrap white worsted weight yarn. I used Red Heart.
- Size H/8 or 5mm aluminum crochet hook.
- Tapestry needle for weaving in ends.
Yarn Specifications
- Yarn Thickness: 3mm
- Gauge: 4dc = 1"
- Finished Size: 10" high
- Skill Level: Intermediate
Note: This is a tight fitting cover so if it seems to be a bit small for the container, well it is supposed to be this way. It will stretch to be a tight fit.
Special Stitches Used
Front post double crochet (fpd) and back post double crochet (bpd). You can read about how to do this stitch in the Featured Stitches Section.
Instructions
Tub Preparation
Using a paper punch, punch 50 holes around the rim just under the lip. You may want to punch four holes first in a crisscross fashion, then punch holes centered between each of these holes, and again punch holes centered between holes until you have 50 holes. You might want to mark the tub first with a permanent marker and then punch your holes. Each hole will be about 3/16 of an inch apart.
Bottom
RND 1: Ch3. Work 10 dc in 3rd ch from hook. Join with slip stitch to the first dc, NOT the top of ch3. (10 dc)
RND 2: Ch3. Dc in the same stitch as the slip stitch. 2dc in each dc around. Join with slip stitch to the top of ch3. (20 dc)
RND 3: Ch3. Dc in same stitch as slip stitch. Dc in next dc. *2dc in next dc. Dc in next dc. Repeat from * around. Join with slip stitch to the top of ch3. (30 dc)
RND 4: Ch3. Dc in same stitch as slip stitch. Dc in each of the next 2 dc. *2dc in next dc. Dc in each of the next 2 dc. Repeat from * around. Join with slip stitch to the top of ch3. (40 dc)
RND 5: Ch3. Dc in same stitch as slip stitch. Dc in each of the next 3 dc. *2dc in next dc. Dc in each of the next 3 dc. Repeat from * around. Join with slip stitch to the top of ch3. (50 dc)
RND 6: Ch3. Work 1bpd in each dc around. This will form a ridge on the bottom of the bag. Join with slip stitch to the top of ch3.
RND 7: Ch3. Fpd in next dc. *Dc in next dc. Fpd in next dc. Repeat from * around. Join with slip stitch to the top of ch3.
This next round is the pattern row. Repeat this row over and over again as instructed. The way this is written, you will be working a fpd in each dc and you will work a dc in each fpd. This creates a woven effect.
RND 8-16: Slip stitch to the first fpd. Ch3. Fpd in next dc. *Dc in next fpd. Fpd in next dc. Repeat from * around. Join with slip stitch to the top of ch3.
Joining to Tub Rim
RND 17: To join bottom to tub, work a surface slip stitch in each hole around catching the stitches of rnd 16 with each stitch. Insert hook in first stitch and hole, draw up a loop, *insert hook into next stitch and hole to the left, draw up a loop and draw this loop through the loop on the hook. Repeat from * all the way around.
RND 18: Work 2 single crochet in each hole around just above stitches to cover the rim. (100 sts) Now, you can stop here and fasten off and use the tub as is for many useful things for the holidays, such as holding treats or using it as decoration. Or you can continue with the instructions below to use this as a drawstring bath bag or storage bag.
In this next round, make sure you end up with an even number of dc around. I ended up with 72. You may need to fudge here. I did. I just had to add one more dc anywhere in this round. See, not all my patterns are perfect every time.
RND 19: Ch3. Dc in next stitch. *Skip next stitch, dc in each of the next 2 stitches. Repeat from * around. Remember to add one more dc if you end up with an odd number. Very Important. You can add it anywhere near the end of the round in one of the stitches that would normally be skipped.
RND 20: Ch3. Fpd in next dc. *Dc in next dc. Fpd in next dc. Repeat from * around. Join with slip stitch to the top of ch3.
RND 21-26: This is worked the same as for round 8. Slip stitch to the first fpd. Ch3. Fpd in next dc. *Dc in next fpd. Fpd in next dc. Repeat from * around. Join with slip stitch to the top of ch3.
Casing
RND 27: Ch4. Skip fpd. *Dc in next dc. Ch1. Skip fpd. Repeat from * around. Join with slip stitch to the 3rd ch of ch4.
RND 28: Ch3. Dc in each dc and in each ch1 space around. Join with slip stitch to the top of ch3. Fasten off and weave ends into work.
Drawstrings
Make two. With White, Ch 100.
Weave each string through the casing, going in opposite directions. Tie the ends together and weave ends into the strings to secure them. Then you should be able to pull on the strings to close the bag.
- Funny Pictures
-
 Hilarious Memes for Those Bored to Tears
-
 Weekly Treat of Funniest Parenting Memes for Good Laugh out Loud Right Now
-
 Really Funny Pics to End These Weekend Perfectly
- Recipes
-
 Crispy Baked Avocado Fries
-
 Scrambled Chickpea and Spinach Pitas
-
 Cinnamon Pancakes
- Lifehacks
-
 Crochet Basics: Aligned Cobble Stitch
-
 Brick Stitch Crochet Tutorial
-
 Crochet Basics: Wattle Stitch
- Crochet Ideas
-
 Crochet Snorlax Plushie Doll
-
 Crochet Beautiful Penguin Toy
-
 Crochet Tiny Snowman
- DIY
-
 DIY Santa Craft For Kids
-
 Paper Plate Angel Craft
-
 Upcycled Mason Jar Chicken Vase
- Knitting Ideas
-
 Knitted Bridger Cowl
-
 Knitted Keepsake Bag
-
 Knitted Cutie Cupcake Dolls