Crochet Apple Necklace Tutorial

Penelope
May 28, 2025 09:13 AM
Introduction
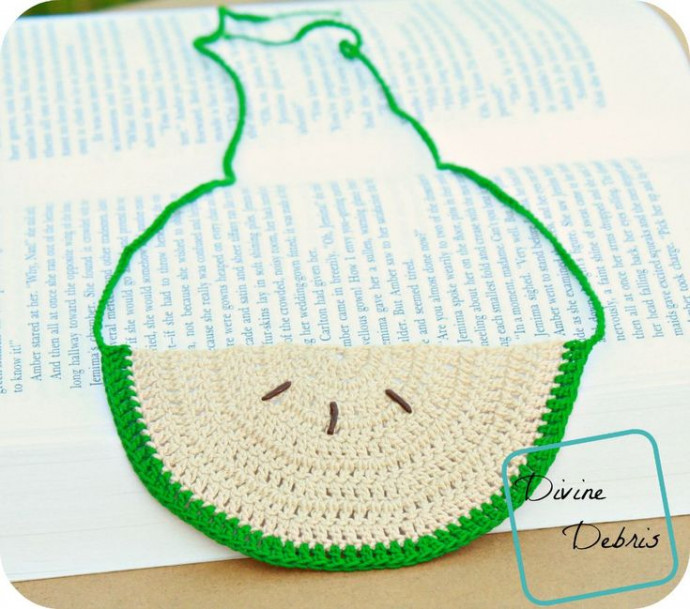
Oh, the crochet apple necklace is absolutely adorable! It's a charming little accessory that adds a touch of whimsy to any outfit. The intricate crochet work makes each apple pendant unique and delightful, perfect for a fun and casual look. Whether you're heading to a picnic or a cozy gathering, this sweet necklace is sure to bring a smile to your face. It's a lovely way to show off your love for all things handmade and cute!
Materials
- 2.25 mm crochet hook
- Less than 1 oz of crochet thread (I used off white and green)
- You can use red or gold in place of the green for a different look
- Needle to weave in ends
- Puffy paint (I used chocolate brown)
- Fabric stiffener
Gauge
*Gauge is not important for this pattern.
Terms and Stitches Used
- Ch: Chain
- St: Stitch
- Dc: Double crochet
Notes
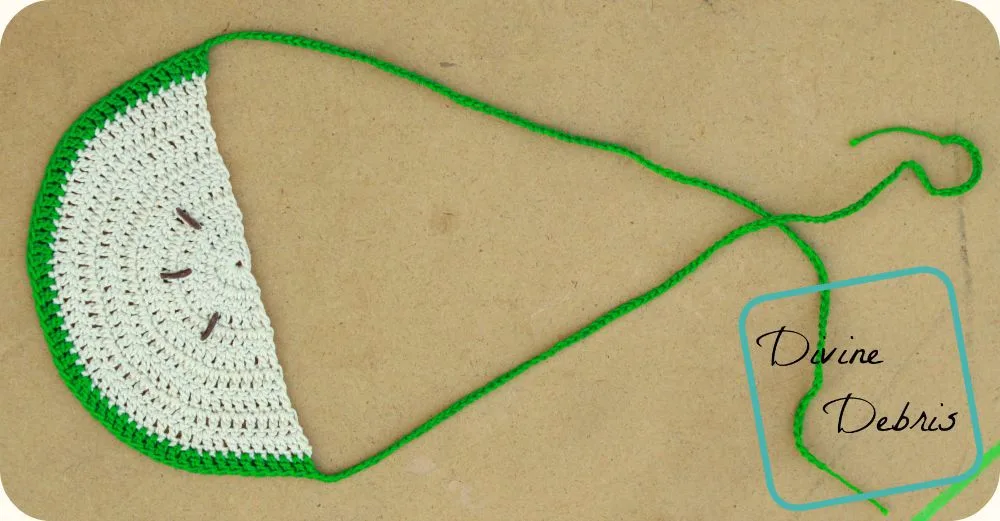
- This necklace is worked back and forth, with a turn at the beginning of each row starting on row 3.
- The ch 3 at the beginning of the rows can also be replaced with a standing dc.
Finished Measurements
- Height: 2.25″, 13″ with straps
- Width: 4.5″
Pattern Instructions
- Row 1: Ch 4 slip st to form a ring. *Note: if you want to replace this with a magic circle, you can.
- Row 2: Ch 3 (counts as a dc), dc 9 times into the ring – 10 dcs.
- Row 3: Turn, ch 3, dc into the first st, dc once into the next st, dc twice into the next st, *dc into the next st, dc twice into the next st,* repeat from * to * 3 more times – 15 dcs.
- Row 4: Turn, ch 3, dc into the first st, dc once into the next 2 sts, *dc twice into the next st, dc once into the next 2 sts,* repeat from * to * 3 more times – 20 dcs.
- Row 5: Turn, ch 3, dc into the first st, dc once into the next 3 sts, *dc twice into the next st, dc once into the next 3 sts,* repeat from * to * 3 more times – 25 dcs.
- Row 6: Turn, ch 3, dc into the first st, dc once into the next 4 sts, *dc twice into the next st, dc once into the next 4 sts,* repeat from * to * 3 more times – 30 dcs.
- Row 7: Turn, ch 3, dc into the first st, dc once into the next 5 sts, *dc twice into the next st, dc once into the next 5 sts,* repeat from * to * 3 more times – 35 dcs.
- Row 8: Turn, ch 3, dc into the first st, dc once into the next 6 sts, *dc twice into the next st, dc once into the next 6 sts,* repeat from * to * 3 more times – 40 dcs.
- Row 9: Turn, ch 3, dc into the first st, dc once into the next 7 sts, *dc twice into the next st, dc once into the next 7 sts,* repeat from * to * 3 more times – 45 dcs.
- Row 10: Turn, ch 3, dc into the first st, dc once into the next 8 sts, *dc twice into the next st, dc once into the next 8 sts,* repeat from * to * 3 more times – 50 dcs.
- Fasten off with this color.
- Row 11: Ch 90 (this will be one of the straps) starting on the first dc/ch 3 from row 10, dc twice into the first st, dc once into the next 9 sts, *dc twice into the next st, dc once into the next 9 sts,* repeat from * to * 3 more times, ch 90 (this is the second strap) – 55 dcs.
- Fasten off with this color.
*Note: If you want to use metal chains for jewelry making, just skip the 90 chs at the beginning of row 11.
Finishing
Stiffen the apple with fabric stiffener.
No comments
Write a comment
- Funny Pictures
-
 Hilarious Memes for Those Bored to Tears
-
 Weekly Treat of Funniest Parenting Memes for Good Laugh out Loud Right Now
-
 Really Funny Pics to End These Weekend Perfectly
- Recipes
-
 Crispy Baked Avocado Fries
-
 Scrambled Chickpea and Spinach Pitas
-
 Cinnamon Pancakes
- Lifehacks
-
 Crochet Basics: Aligned Cobble Stitch
-
 Brick Stitch Crochet Tutorial
-
 Crochet Basics: Wattle Stitch
- Crochet Ideas
-
 Crochet Snorlax Plushie Doll
-
 Crochet Beautiful Penguin Toy
-
 Crochet Tiny Snowman
- DIY
-
 DIY Santa Craft For Kids
-
 Paper Plate Angel Craft
-
 Upcycled Mason Jar Chicken Vase
- Knitting Ideas
-
 Knitted Bridger Cowl
-
 Knitted Keepsake Bag
-
 Knitted Cutie Cupcake Dolls