Crochet Granny Square Baby Bonnets

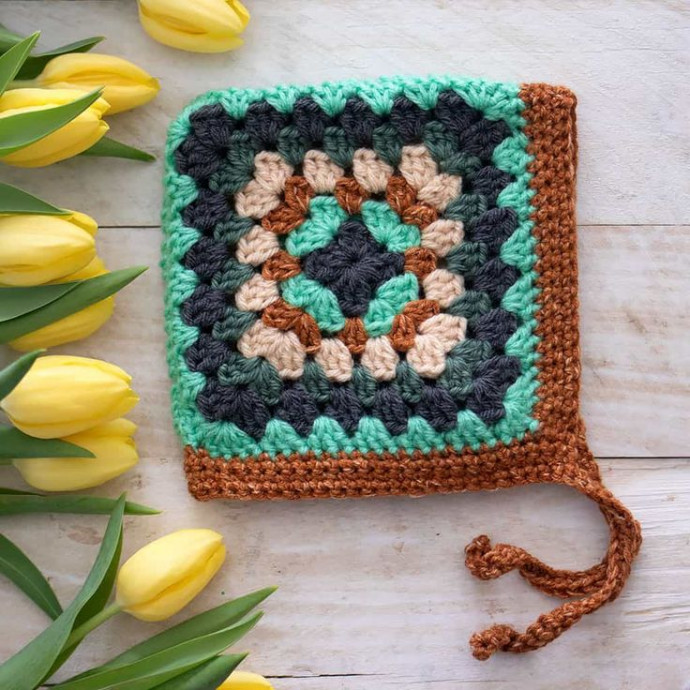
Crochet Granny Square Baby Bonnets are not only adorable but also a wonderful project for crafters of all levels. The intricate design and soft yarn used to create these sweet bonnets make them a perfect gift for any little one. With a variety of colors and embellishments to choose from, you can customize each bonnet to reflect the baby's unique personality. Whether you're a seasoned crocheter or just starting out, making a Granny Square Baby Bonnet is a fun and rewarding way to add a touch of handmade charm to any baby's wardrobe.
Materials Needed
Yarn:
#4 worsted weight yarn
I used: Lion Brand Vanna’s Choice in Charcoal, Loops & Threads Soft Classics in Taupe, Loops & Threads Impeccable Yarn in Jade, Lion Brands Jeans in Topstitch, Lion Brand Wool-Ease in Forest Green.
Crochet Hook:
Size US G (4 mm) crochet hook
Gauge:
13 sc and 14 rows = 4 inches
Sizes:
6/12 months, 18/24 months
Pattern Instructions
Granny Square:
(Make 2)
With A, ch 4. Join with sl st to first ch to form ring.
Round 1:
Ch 4 (counts as dc, ch 1). (3 dc, ch 1) 3 times in ring. 2 dc in ring. Join with sl st to 3rd ch of beg ch 4. Break A.
Round 2:
Join B with sl st in next corner ch-1 sp. Ch 4 (counts as dc, ch 1). 3 dc in same ch-1 sp as sl st. *(3 dc, ch 1, 3 dc) in next corner ch-1 sp. Rep from * twice more. 2 dc in next corner ch-1 sp (same as beg ch 4). Join with sl st to 3rd ch of beg ch 4. Break B.
Round 3:
Join C with sl st in next corner ch-1 sp. Ch 4 (counts as dc, ch 1). 3 dc in same ch-1 corner sp as sl st. *Skip next 3 dc. 3 dc in sp between next 3 dc. Skip next 3 dc. (3 dc, ch 1, 3 dc) in next corner ch-1 sp. Rep from * twice more, then from * to ** once. 2 dc in next ch-1 corner sp. Join with sl st to 3rd ch of beg ch 4. Break C.
Round 4:
Join D with sl st in next ch-1 corner sp. Ch 4 (counts as dc, ch 1). 3 dc in same ch-1 corner sp as sl st. *(Skip next 3 dc. 3 dc in sp between next 3 dc) to next corner ch-1 sp. Skip next 3 dc. (3 dc, ch 1, 3 dc) in next corner ch-1 sp. Rep from * twice more, then from * to ** once. 2 dc in next ch-1 corner sp. Join with sl st to 3rd ch of beg ch 4.
Work a further 3 (4) rnds as established, working 1 more group of 3-dc before each corner ch-1 sp each rnd, in established color sequence, beg next rnd with A. Fasten off, leaving a long tail for seaming.
Finishing Touches
With WS tog and sts aligned, sew across 2 sides of Squares using whipstitch to form top and back seams.
For the Bottom Edging:
Turn Bonnet to work along the bottom edge.
Row 1:
(RS) Join A with sl st in ch-1 sp at right corner. Ch 1. 1 sc in same sp as sl st. 1 sc in each of next 21 (24) dc to next ch-1 sp. Sc2tog over next 2 ch-1 sps. 1 sc in each dc to last ch-1 sp. 1 sc in last ch-1 sp. Turn. 45 (51) sts.
Rows 2 through 4:
Ch 1. 1 sc in each st to end of row. Turn.
Fasten off.
- Funny Pictures
-
 These are the Pics That Simply Describe Your Life
-
 Hilariously Accurate Parenting Memes That Show the Other Side of Parenthood
-
 Great Pics That Just Depict Our Lives
- Recipes
-
 Crispy Baked Avocado Fries
-
 Baked Beans and Hot Dogs with Biscuit Topping
-
 Roasted Rosemary Lemon Chicken Breasts
- Lifehacks
-
 Crochet Basics: Twisted Fringe
-
 7 Crochet Tips And Tricks
-
 How To Work Crochet Into Denim
- Crochet Ideas
-
 Crochet Snorlax Plushie Doll
-
 Crochet Cat in 1 Row
-
 Crochet Beautiful Penguin Toy
- DIY
-
 Popsicle Stick and Jingle Bell Christmas Tree Ornament
-
 Upcycled Mason Jar Chicken Vase
-
 Crochet Namaste Stephanie Doll
- Knitting Ideas
-
 Knitted Keepsake Bag
-
 Knitted Textured Heart Dishcloth
-
 Knitted Snowfall Dishcloth