Crochet Spring Table Runner Pattern


Looking to add a touch of charm to your dining space this spring? A Crochet Spring Table Runner is the perfect way to bring a burst of color and warmth to your table setting. Handcrafted with love and care, this delightful crochet piece merges functionality with style, making it a cheerful addition to any mealtime. Whether you're hosting a brunch with friends or simply enjoying a meal with family, this table runner will surely brighten up your space and set a welcoming tone for the season ahead. Let the intricate patterns and vibrant hues of this handmade creation infuse your dining area with a cozy, inviting atmosphere, perfect for creating lasting memories around the table.
Notes
ch1 at the beginning of rows throughout the pattern does not count as a stitch.
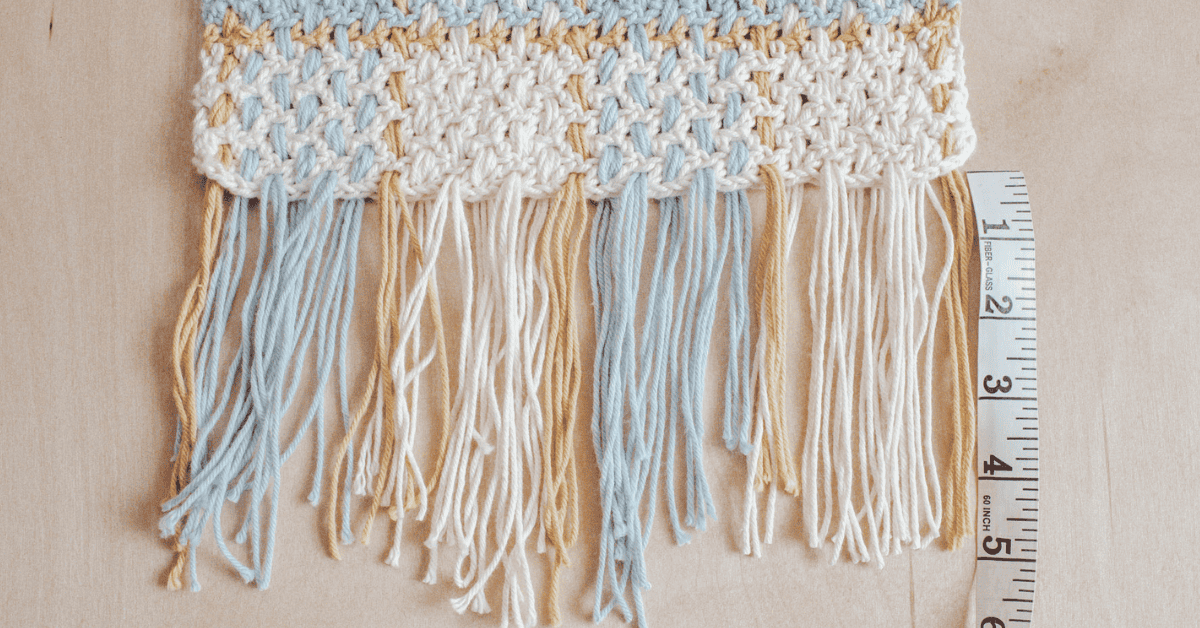
Final Measurement: 40″ x 10″ after weaving.
To adjust the width of your table runner, ch an odd number +1.
Abbreviations
- ch : chain
- hdc : half double crochet
- prev : previous
- rep : repeat
- sk : skip
- st(s) : stitch(es)
Materials
- Crochet.com Dishie
- Color A: Swan, 2 balls, about 380 yds
- Color B: Creme Brulee,1 ball, about 190 yds
- Color C: Dewdrop, 2 balls, about 380 yds
- 4.5mm/ US 7 Crochet hook, I use these
- Darning needle
- Tape Measurer
Gauge
22 sts x 11 rows in pattern= 4″ x 4″.
Pattern
Color A
Ch 52
Row 1 hdc in 2nd ch from hook, *ch1 (sk1), hdc* rep to end of row, ending with a hdc, ch1, turn.
Row 2 hdc in the first st, *ch1 (sk1), hdc* rep to end of row, ending with a hdc, ch1, turn.
Continue to rep row 2 with color changes as follows:
Color Changes:
- Rows 1-6: Color A
- Row 7: Color B
- Rows 8-13: Color C
- Row 14: Color B
- Rows 15-20: Color A
- Row 21: Color B
- Rows 22-27: Color C
- Row 28: Color B
- Rows 29-34: Color A
- Row 35: Color B
- Rows 36-41: Color C
- Row 42: Color B
- Rows 43-48: Color A
- Row 49: Color B
- Rows 50-55: Color C
- Row 56: Color B
- Rows 57-62: Color A
- Row 63: Color B
- Rows 64-69: Color C
- Row 70: Color B
- Rows 71-76: Color A
- Row 77: Color B
- Rows 78-83: Color C
- Row 84: Color B
- Rows 85-90: Color A
- Row 91: Color B
- Rows 92-97: Color C
- Row 98: Color B
- Rows 99-104: Color A
- Row 105: Color B
- Rows 106-111: Color C
- Row 112: Color B
- Rows 113-118: Color A
- Row 119: Color B
- Rows 120-125: Color C
- Row 126: Color B
- Rows 127-132: Color A
Weaving
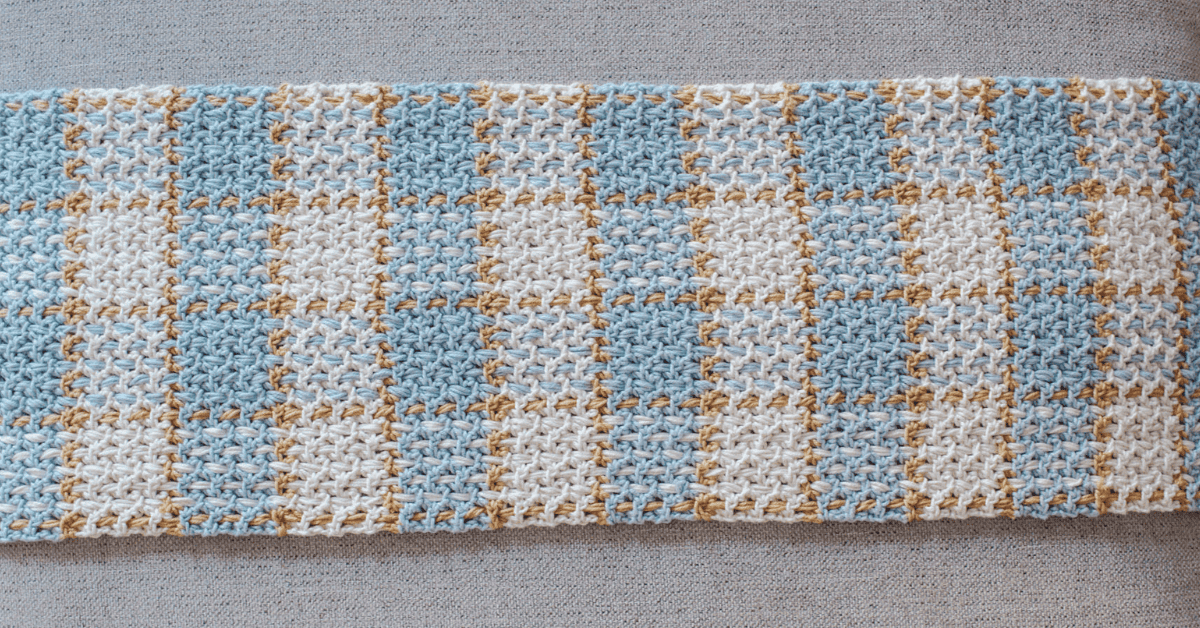
Once you are done with crocheting the runner, you will begin to weave yarn through the ch1 spaces, lengthwise, to create the plaid pattern.
I made each strand 4 pieces of yarn thick and about 62″ inches long for this particular length. Please note that if you choose to make your runner longer or wider than I did, you will need to adjust the length of each piece you are weaving and you will also need to adjust how many sections you are weaving across.
For example, the pattern for the woven pieces I used was:
B, C, C, C, C, C, B, A, A, A, A, A, B, C, C, C, C, C, B, A, A, A, A, A, B.
To begin weaving, cut a length of yarn 4 strands thick about 62 inches long. Start weaving from one end of your runner while it is vertical, leaving about a 4-5″ tail for the fringe, starting at the first ch space. You will be going over the first ch row, under, over under the ch 1s into the ch spaces all the way to end of the runner, also leaving about a 4-5″ tail.
The next row will start under the first ch row, over, under, over until the end, also leaving your tails at each end.
Continue alternating between starting over and starting under your first ch row, alternating colors as stated above.
In the photo below, I am going over the first.
Fringe
Once you are done weaving the runner, you will be left with some uneven tails on either end.
I chose to knot the tails to keep them secure.
I used the first cluster of 4 strands from the first color, 2 strands from the second color and did a knot pulled up to the edge of the runner. For the rest of the colors, I used two strands from each cluster and knotted them together. For the last cluster, you will use two strands from the previous cluster and the four strands from the last cluster.
After you do all your knots, you will measure and trim your fringe evenly. I did about 3″.
- Funny Pictures
-
 Cute Cat Memes That Will Make Your Day Brighter
-
 Spot-on and Funny Memes About Introverts Struggles
-
 Top Wonderful Cat Memes on Their Way to Better Your Day
- Recipes
-
 Creamy Old Fashioned Rice Pudding
-
 Russian Tea Cakes (Snowball Cookies)
-
 Rigatoni with Sausage, Tomatoes, and Zucchini
- Lifehacks
-
 How to Crochet a Harlequin Stitch
-
 Removing The Toughest Stains
-
 Crochet Basics: Crumpled Griddle Stitch
- Crochet Ideas
-
 Crochet Christmas Tree
-
 Crochet Goblet of Fire
-
 Crochet Adorable Ammonite
- DIY
-
 DIY Snowman Wreath
-
 Mini Santa Sleigh Ornament
-
 Crochet Gingerbread House Blanket
- Knitting Ideas
-
 Knitted Easter Bunny
-
 Knitted Mobile Phone/Glasses Case
-
 Knitted Cabled Wallet