Crocheting a Pentagon Granny Square: A Creative Guide

Crocheting a Pentagon Granny Square is a fun and creative way to add a unique touch to your projects! With its five sides, this design adds an interesting twist to traditional granny squares. The versatility of a pentagon shape opens up countless possibilities for creating beautiful blankets, cushions, or even coasters. Whether you're a beginner or a seasoned crocheter, experimenting with different colors and stitches can result in a truly one-of-a-kind masterpiece. So grab your yarn, crochet hook, and let your imagination run wild with this delightful and charming crochet technique!
Materials
- Yarn
- Crochet Hook
Stitches Used & Code (US Term)
ch = chain
st = stitch(es)
sl st = slip stitch
dc = double crochet
sp = space
REP = repeat
Crochet Pentagon Pattern
One Color Pentagon
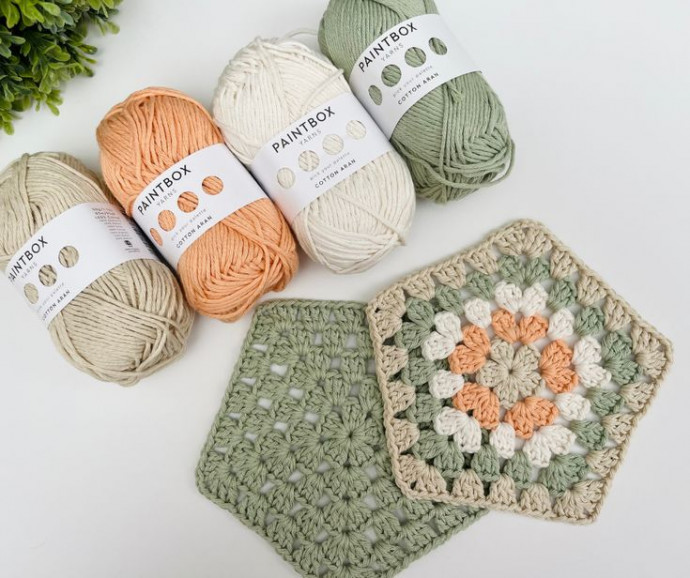
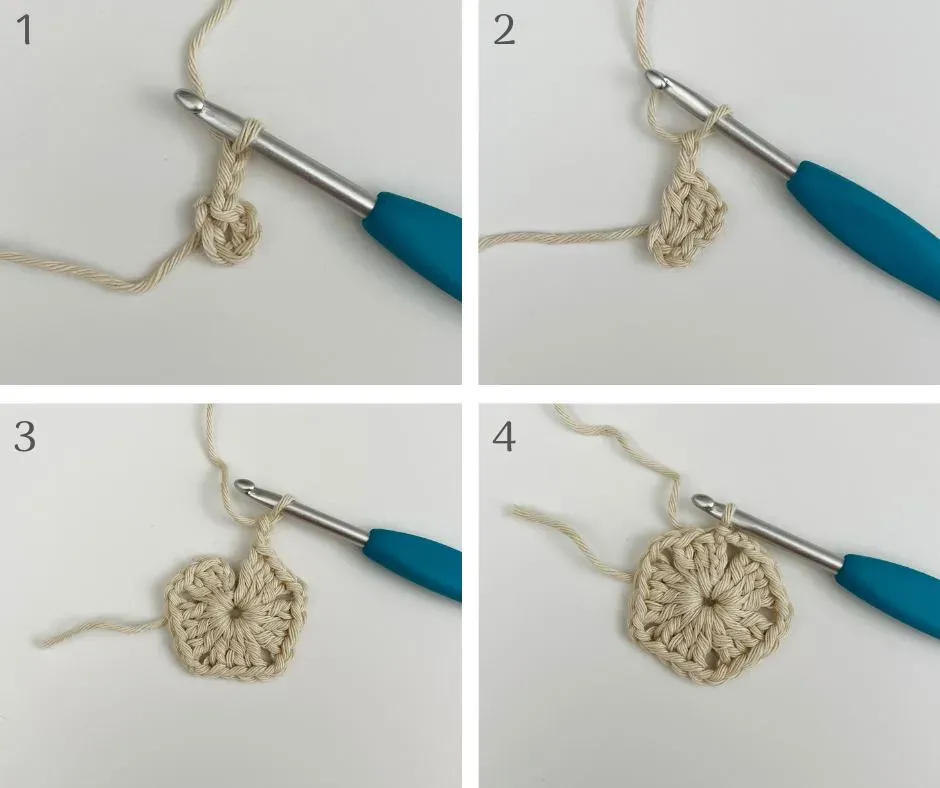
Round 1: ch 5, sl st into the 5th ch from the hook to form a ring, ch 3 (count as 1 dc), 2 dc into the ring sp, *ch 2, 3 dc into the same ring sp* REP from *TO* 3 more times, end with ch 2, sl st into the third ch. Check the picture below:
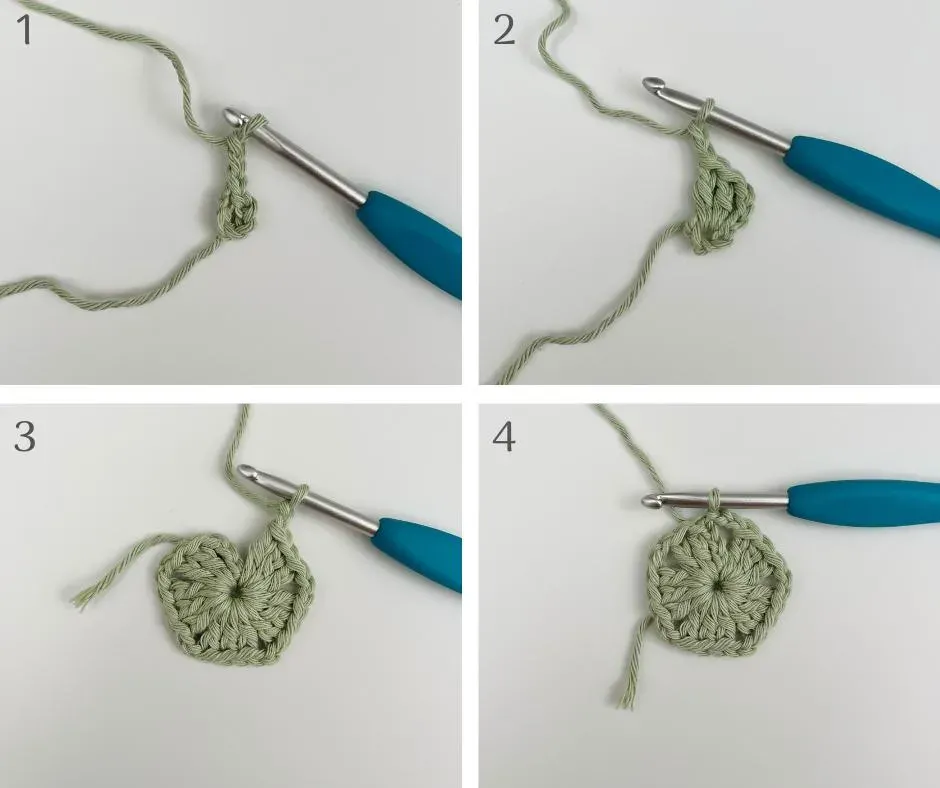
Round 2: ch 3 (count as 1 dc), 2 dc into the previous ch 2 sp, ch 1, *(3 dc, ch 2, 3 dc All into the next ch 2 sp/the corner), ch 1* REP from *TO* around and for the last sp is going to be the same sp that we did the first 3 ch and 2 dc/the corner, 3 dc into that sp, ch 2, sl st into the third ch. Check the picture below:
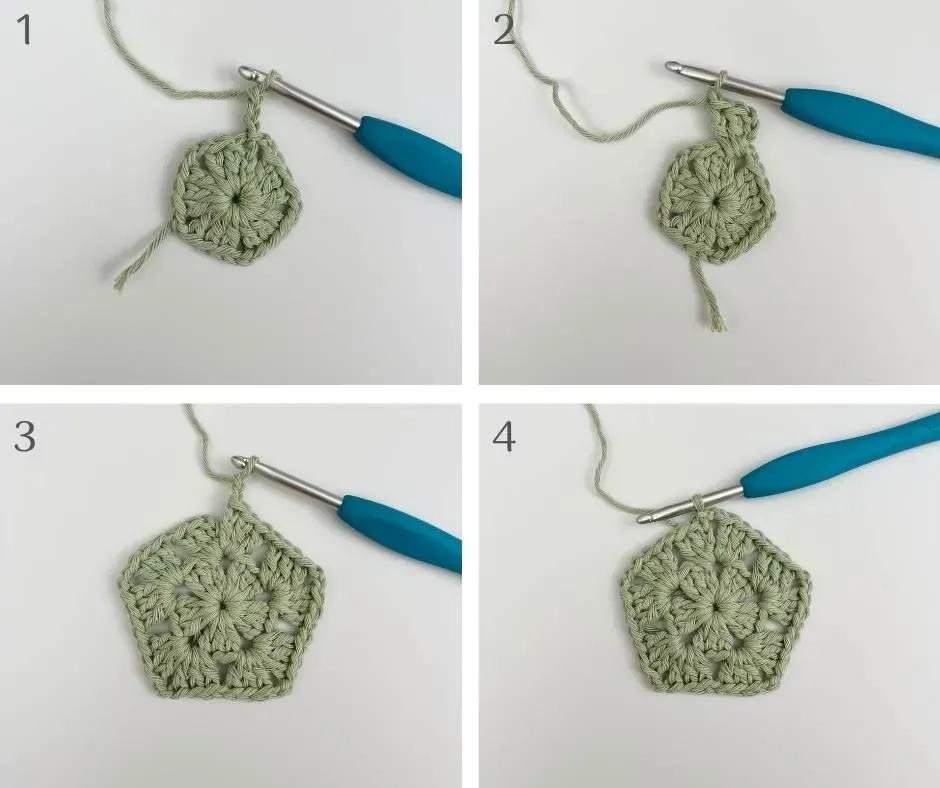
Round 3: ch 3 (count as 1 dc), 2 dc into the previous ch 2 sp, ch 1, 3 dc into the next ch 1 sp, ch 1, *(3 dc, ch 2, 3 dc All into the next ch 2 sp/the corner), ch 1, 3 dc into the next ch 1 sp, ch 1* REP from *TO* around and for the last sp is going to be the same sp that we did the first 3 ch and 2 dc/the corner, 3 dc into that sp, ch 2, sl st into the third ch. Check the picture below:
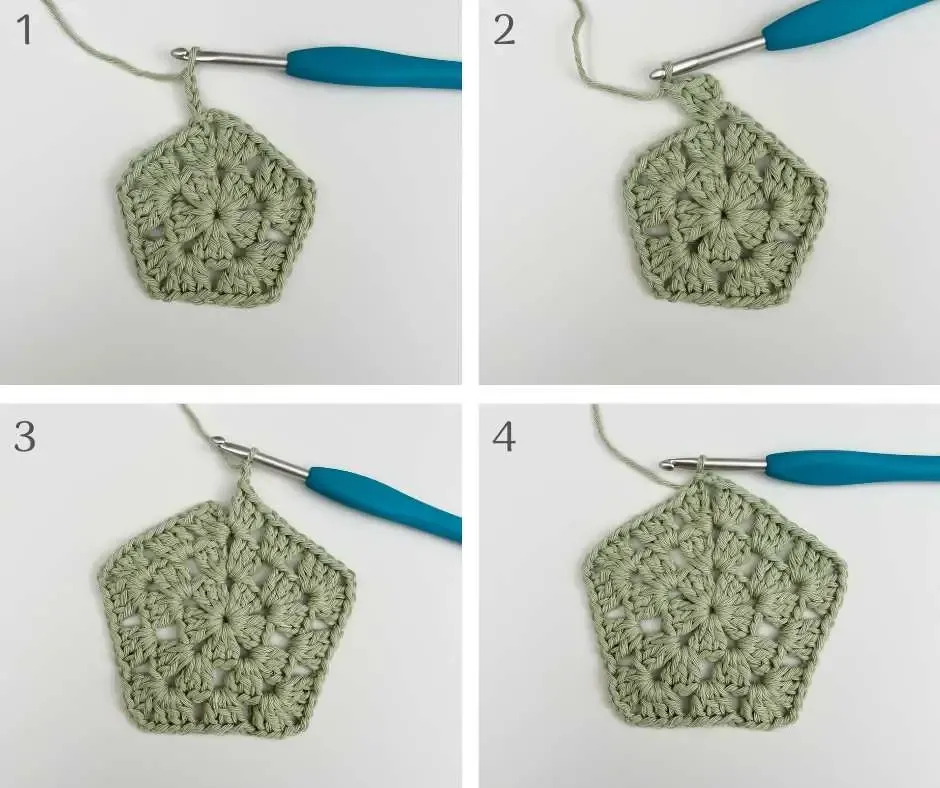
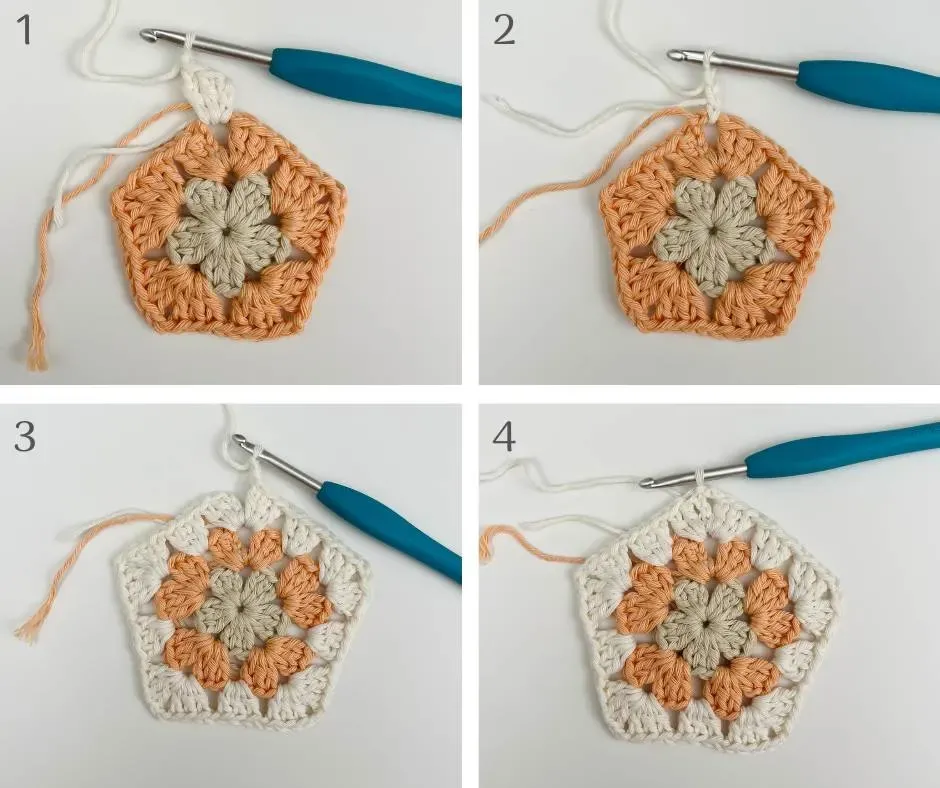
Round 4: ch 3 (count as 1 dc), 2 dc into the previous ch 2 sp, ch 1, 3 dc into the next ch 1 sp, ch 1, 3 dc into the next ch 1 sp, ch 1, *(3 dc, ch 2, 3 dc All into the next ch 2 sp/the corner), ch 1, 3 dc into the next ch 1 sp, ch 1, 3 dc into the next ch 1 sp, ch 1* REP from *TO* around and for the last sp is going to be the same sp that we did the first 3 ch and 2 dc/the corner, 3 dc into that sp, ch 2, sl st into the third ch. Check the picture below:
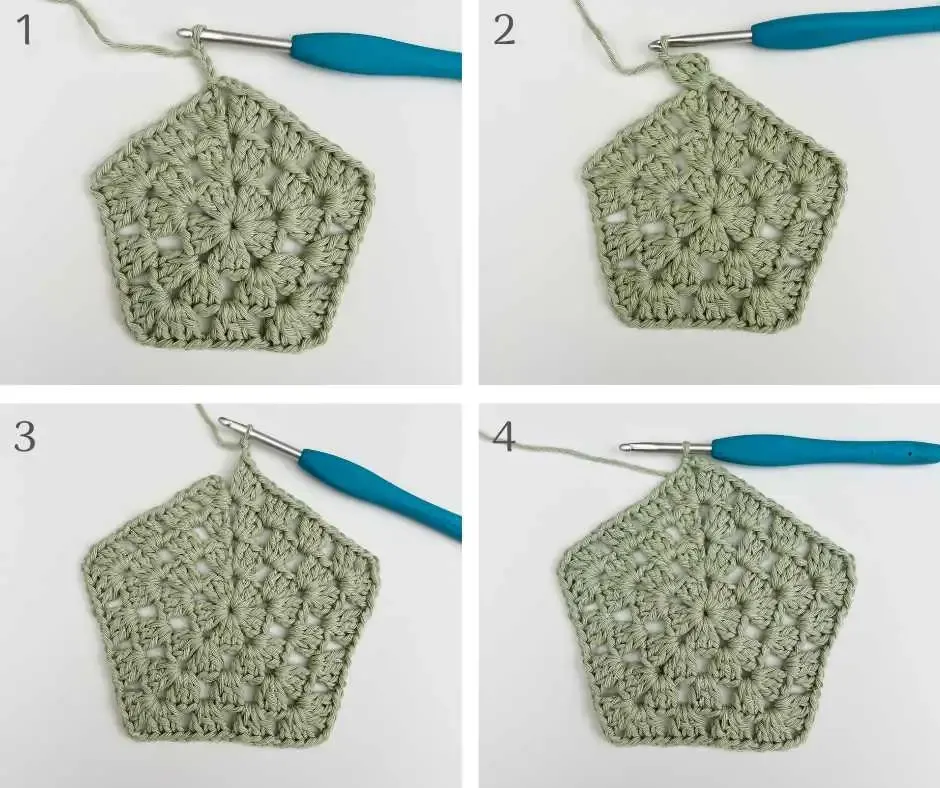
Round 5: ch 3 (count as 1 dc), 2 dc into the previous ch 2 sp, ch 1, 3 dc into the next ch 1 sp, ch 1, 3 dc into the next ch 1 sp, ch 1, 3 dc into the next ch 1 sp, ch 1, *(3 dc, ch 2, 3 dc All into the next ch 2 sp/the corner), ch 1, 3 dc into the next ch 1 sp, ch 1, 3 dc into the next ch 1 sp, ch 1, 3 dc into the next ch 1 sp, ch 1* REP from *TO* around and for the last sp is going to be the same sp that we did the first 3 ch and 2 dc/the corner, 3 dc into that sp, ch 2, sl st into the third ch. Check the picture below:
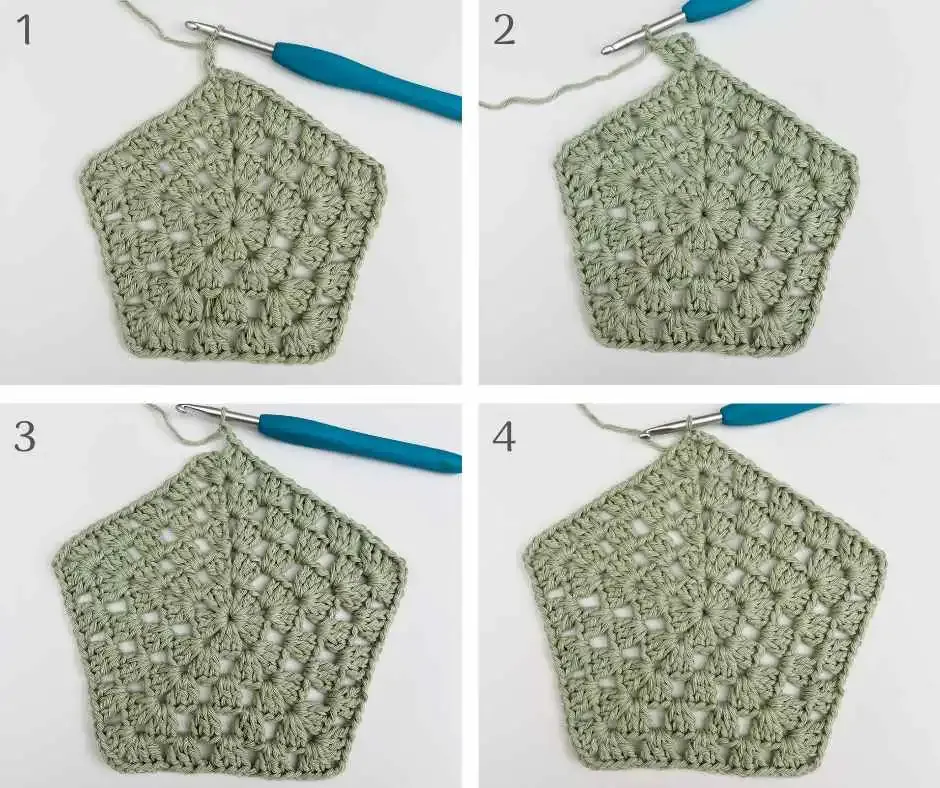
From here on you’re just going to repeat round 5. The only difference will be the stitch count. You will increase by 1 group of the dc and 1 ch1 sp before you crochet into the corner/ch 2 sp. So that means every round you will automatically increase by 5 groups of dc and 5 ch1 sp. Easy!
Multiple Color Pentagons
Round 1 (Color A): ch 5, sl st into the 5th ch from the hook to form a ring, ch 3 (count as 1 dc), 2 dc into the ring sp, *ch 2, 3 dc into the same ring sp* REP from *TO* 3 more times, end with ch 2, sl st into the third ch that we did, cut the yarn. Check the picture below:
Round 2 (Color B): Add new yarn into any of the ch 2 sp, ch 3 (count as 1 dc), 2 dc into the same ch 2 sp, ch 1, *(3 dc, ch 2, 3 dc All into the next ch 2 sp/the corner), ch 1* REP from *TO* around and for the last sp is going to be the same sp that we did the first 3 ch and 2 dc/the corner, 3 dc into that sp, ch 2, sl st into the third ch, cut the yarn. Check the picture below:
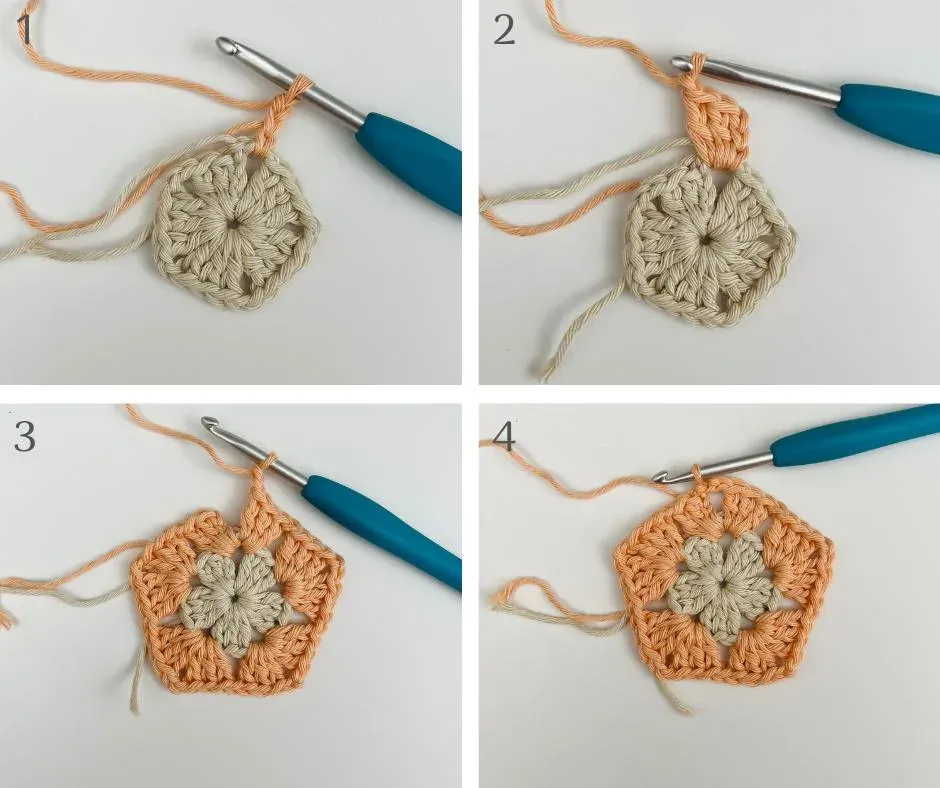
Round 3 (Color C): Add new yarn into any of the ch 2 sp/the corner, ch 3 (count as 1 dc), 2 dc into the same ch 2 sp, ch 1, 3 dc into the next ch 1 sp, ch 1, *(3 dc, ch 2, 3 dc All into the next ch 2 sp/the corner), ch 1, 3 dc into the next ch 1 sp, ch 1* REP from *TO* around and for the last sp is going to be the same sp that we did the first 3 ch and 2 dc/the corner, 3 dc into that sp, ch 2, sl st into the third ch, cut the yarn. Check the picture below:
Round 4 (Color D): Add new yarn into any of the ch 2 sp/the corner, ch 3 (count as 1 dc), 2 dc into the same ch 2 sp, ch 1, 3 dc into the next ch 1 sp, ch 1, 3 dc into the next ch 1 sp, ch 1, *(3 dc, ch 2, 3 dc All into the next ch 2 sp/the corner), ch 1, 3 dc into the next ch 1 sp, ch 1, 3 dc into the next ch 1 sp, ch 1* REP from *TO* around and for the last sp is going to be the same sp that we did the first 3 ch and 2 dc/the corner, 3 dc into that sp, ch 2, sl st into the third ch, cut the yarn. Check the picture below:
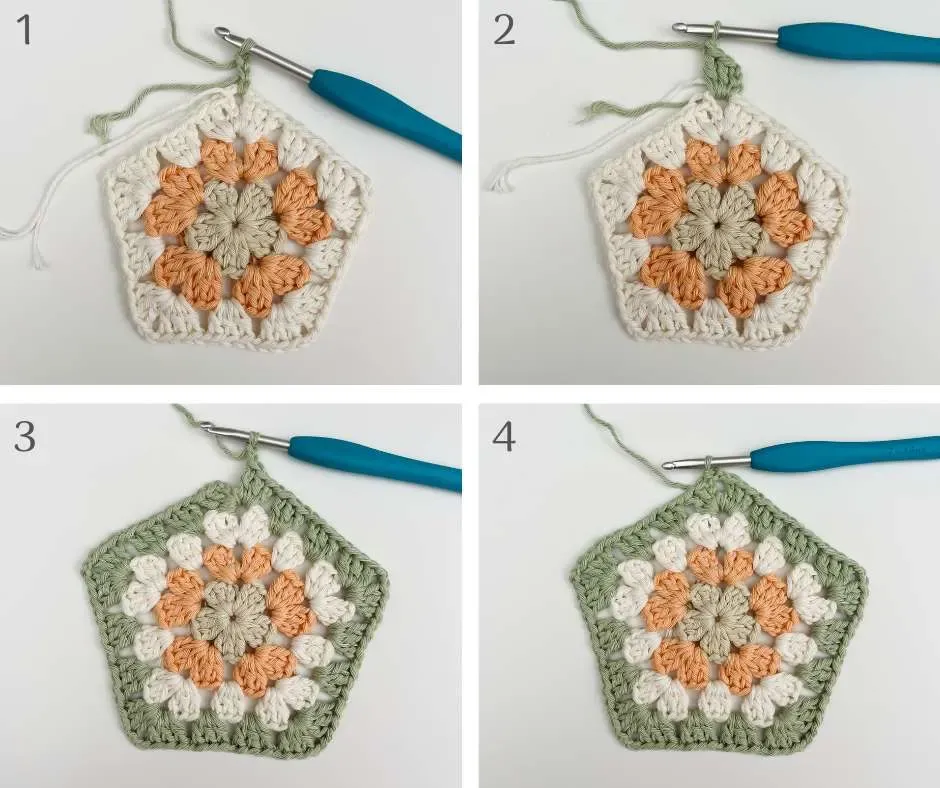
Round 5 (Color E): Add new yarn into any of the ch 2 sp/the corner, ch 3 (count as 1 dc), 2 dc into the same ch 2 sp, ch 1, 3 dc into the next ch 1 sp, ch 1, 3 dc into the next ch 1 sp, ch 1, 3 dc into the next ch 1 sp, ch 1, *(3 dc, ch 2, 3 dc All into the next ch 2 sp/the corner), ch 1, 3 dc into the next ch 1 sp, ch 1, 3 dc into the next ch 1 sp, ch 1, 3 dc into the next ch 1 sp, ch 1* REP from *TO* around and for the last sp is going to be the same sp that we did the first 3 ch and 2 dc/the corner, 3 dc into that sp, ch 2, sl st into the third ch, cut the yarn. Check the picture below:
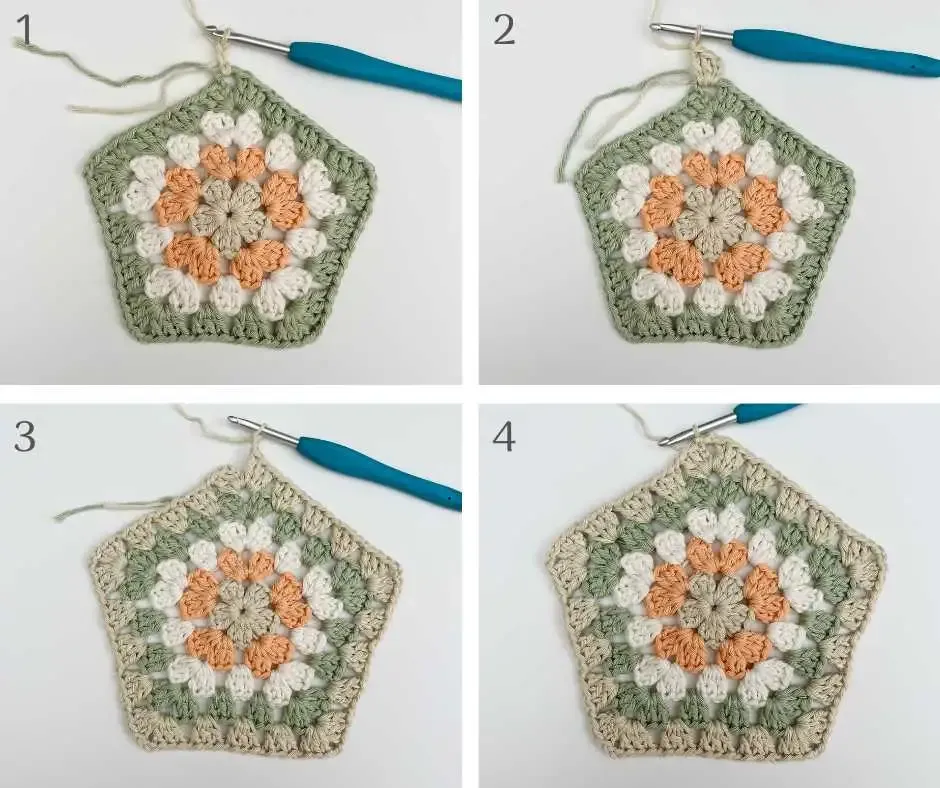
From here on you’re just going to repeat round 5 and change back and forth from color A to B, etc. The only difference will be the stitch count. You will increase by 1 group of the dc and 1 ch1 sp before you crochet into the corner/ch 2 sp. So that means every round you will automatically increase by 5 groups of dc and 5 ch1 sp. Easy!
- Funny Pictures
-
 Cute Cat Memes That Will Make Your Day Brighter
-
 Spot-on and Funny Memes About Introverts Struggles
-
 Top Wonderful Cat Memes on Their Way to Better Your Day
- Recipes
-
 Creamy Old Fashioned Rice Pudding
-
 Russian Tea Cakes (Snowball Cookies)
-
 Rigatoni with Sausage, Tomatoes, and Zucchini
- Lifehacks
-
 How to Crochet a Harlequin Stitch
-
 Removing The Toughest Stains
-
 Crochet Basics: Crumpled Griddle Stitch
- Crochet Ideas
-
 Crochet Christmas Tree
-
 Crochet Goblet of Fire
-
 Crochet Adorable Ammonite
- DIY
-
 DIY Snowman Wreath
-
 Mini Santa Sleigh Ornament
-
 Crochet Gingerbread House Blanket
- Knitting Ideas
-
 Knitted Easter Bunny
-
 Knitted Mobile Phone/Glasses Case
-
 Knitted Cabled Wallet