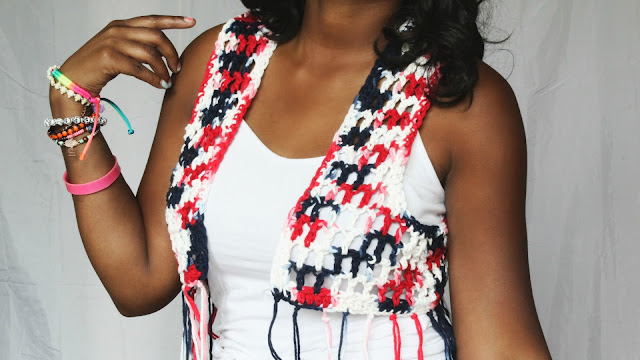
How to Make a Crochet Fringe Vest for a Boho Flair

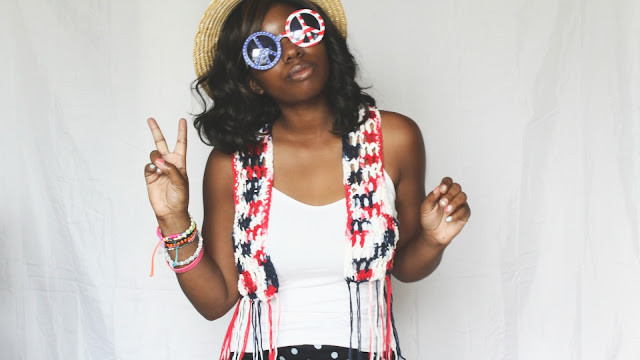
Looking for a fun way to add some boho flair to your wardrobe? Consider trying out a Crochet Fringe Vest! This trendy and playful piece is perfect for layering over your favorite outfits to instantly elevate your style. The intricate crochet pattern and whimsical fringe details add a touch of whimsy to any look. Whether you're heading to a music festival or just want to add a bit of pizzazz to your casual attire, the Crochet Fringe Vest is a versatile and charming choice. So go ahead, embrace your inner free spirit and let this adorable vest sprinkle some magic into your wardrobe!
Materials Needed
- Crochet Hook: H/8-5.50MM
- Craft Scissors
- Yarn Sewing Needle
- Yarn Used: 3 Skeins from Sugar N' Cream
- Available Sizes: Small/Medium & Large
Stitch Guide
- DC = Double Crochet
- SC = Single Crochet
- SS = Slip Stitch
- ST(S) = Stitch(es)
- CH = Chain
- R[number] = Row
Step-by-Step Instructions
Back of the Vest
To start the back of the vest:
CH 51 for Small/Medium or CH 67 for Large (or half desired waist measurement).
- R1: HDC into every ST for the entire first row; turn work when complete.
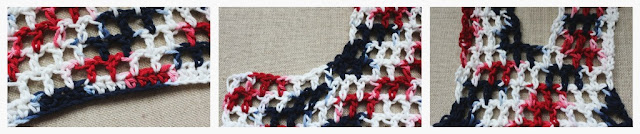
- R2-R5: DC into the first ST, CH 1, skip 1 ST, DC into the following ST (repeat this method until the end of every single row).
- [Extend from R5 for extra length]
Next, to create the back:
Skip the first and last 16 STS and insert hook into the 17 ST for 18 STS ONLY.
- R6-R10: DC into the first ST, CH 1, skip 1 ST, DC into the following ST (repeat this method until the end of every single row).
- To create the straps of the vest (both sides): Insert hook, for 7 STS only left side, leave middle ST empty, insert hook for 7 STS only right side.
- R11-R15: DC into the first ST, CH 1, skip 1 ST, DC into the following ST (repeat this method until the end of every single row). SS to complete work.
Front of the Vest
For the front of the vest:
Note: You will be creating this piece TWICE with alternating armholes.
CH 26 for Small/Medium or CH 34 for Large (or half desired waist measurement).
- R1: HDC into every ST for the entire first row; turn work when complete.
- R2-R5: DC into the first ST, CH 1, skip 1 ST, DC into the following ST (repeat this method until the end of every single row).
- Next, to create the armholes: Skip the first and last 16 STS and insert hook into the 17 ST for 10 STS ONLY.
- R6-R15: DC into the first ST, CH 1, skip 1 ST, DC into the following ST (repeat this method until the end of every single row). SS to complete work.
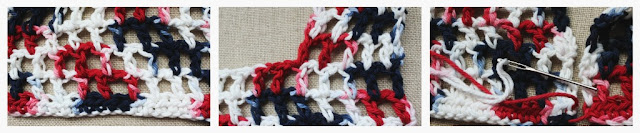
Next, you will sew ALL of the pieces together, utilizing your yarn sewing needle and cut yarn. Sew the front sides to the back portion of the vest. Leave the armholes open as well as the neckline.
Finishing Touches
For the finishing technique:
- SC around the entire finished sewn together vest only once, then SS to complete work.
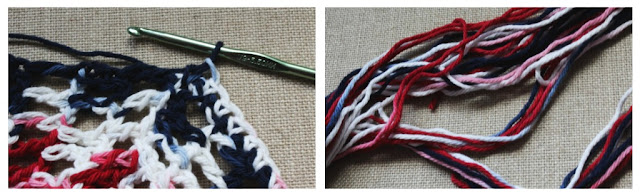
- Next, to create the fringe (optional).
Fringe will be placed at the bottom of the vest.
You will cut 20-25 strands, depending on if you want more, cut 2 inches.
You will insert each strand into every other ST using your crochet hook to insert strand, then bring the strand together to knot it to the vest.
- Funny Pictures
-
 These are the Pics That Simply Describe Your Life
-
 Hilariously Accurate Parenting Memes That Show the Other Side of Parenthood
-
 Great Pics That Just Depict Our Lives
- Recipes
-
 Crispy Baked Avocado Fries
-
 Baked Beans and Hot Dogs with Biscuit Topping
-
 Roasted Rosemary Lemon Chicken Breasts
- Lifehacks
-
 Crochet Basics: Twisted Fringe
-
 7 Crochet Tips And Tricks
-
 How To Work Crochet Into Denim
- Crochet Ideas
-
 Crochet Snorlax Plushie Doll
-
 Crochet Cat in 1 Row
-
 Crochet Beautiful Penguin Toy
- DIY
-
 Popsicle Stick and Jingle Bell Christmas Tree Ornament
-
 Upcycled Mason Jar Chicken Vase
-
 Crochet Namaste Stephanie Doll
- Knitting Ideas
-
 Knitted Keepsake Bag
-
 Knitted Textured Heart Dishcloth
-
 Knitted Snowfall Dishcloth