Easy Crochet Vest Tutorial


Crafted with intricate stitches and delicate yarn, this beautiful garment will be a stylish addition to any wardrobe. Whether you choose a classic design or opt for a more modern twist, the versatility of crochet allows you to customize the vest to suit your personal style. With endless color options and pattern variations, you can truly make this vest your own. The process of crocheting a vest involves patience and skill, as each stitch is carefully crafted to create a unique and eye-catching garment. Whether you are a seasoned crocheter or a beginner looking to try something new, making a beautiful vest through crochet is a rewarding experience that allows you to showcase your creativity and talent. So pick up your crochet hook and start creating your own beautiful vest today!
Easy Crochet Vest
Materials Used:
- Color A – Caron Simply Soft in Grey Heather (2 skeins for sizes XS – L, 3 skeins for sizes XL-3X)
- Color B – Premier Everyday Yarn in Spa (1 skein for all sizes)
- Size J/10 – 6.00 mm crochet hook
- Tapestry needle for weaving in ends
- Measuring tape or ruler
Sizes:
Bust Measurement:
XS = 30″, S = 34″, M = 38″, L = 42″, XL = 46″, 2X = 50″, 3X = 54″
Length:
The length is customized by repeating rows until your panel reaches your desired length. The crochet vest pictured is 20″ long and has 35 rows.
Abbreviations:
ch(s) = chain(s)
st(s) = stitches
dc = double crochet
hdc = half double crochet
pf = puff stitch (see description below)
sl st = slip stitch
RS = right side
WS = wrong side
American crochet terms used throughout
Special Stitch Used:
Puff Stitch:
[Yarn over and draw up a loop] 3 times, draw yarn through all 7 loops, ch 1 to close stitch.
Gauge:
4″ x 4″ = 12 dc, 7 rows

Notes:
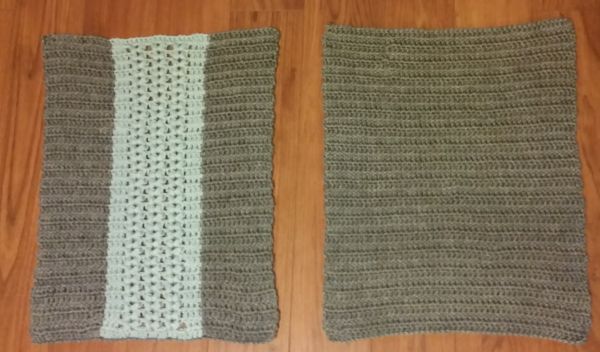
This easy crochet vest is constructed by making 2 rectangles and seaming them together along the sides and shoulders. It is designed to be close fitting. If you would like a looser or oversized sweater, you will need to size up.
The number of stitches required per size is stated in parentheses as follows: (XS, S, M, L, XL, 2X, 3X).
Instructions:
Front Panel:
Row 1 (RS):
Using color A, ch (47, 53, 59, 65, 71, 77, 83). Dc in 4th ch from hook (counts as dc) and in each of next (11, 14, 17, 20, 23, 26, 29) sts, do not fasten off and drop yarn behind work. With color B, dc in each of the next 21 sts, do not fasten off and drop yarn behind work. With the 2nd skein of color A, dc in each of the last (12, 15, 18, 21, 24, 27, 30) sts. Turn. (45, 51, 57, 63, 69, 75, 81) sts.
Row 2 (WS):
Ch 2 (does not count as dc), dc in each of the 1st (12, 15, 18, 21 24, 27, 30) sts and drop yarn in front of work. Pick up color B, dc in each of the next 3 sts, skip 3 sts, [pf, ch1, pf], skip 3 sts, [pf, ch1, pf], skip 3 sts, [pf, ch1, pf], skip 3 sts, dc in each of the next 3 sts and drop yarn in front of work. Pick up color A, dc in each of the last (12, 15, 18, 21, 24, 27, 30) sts, turn.
Row 3 (RS):
Ch 2 (does not count as dc), dc in each of the 1st (12, 15, 18, 21 24, 27, 30) sts and drop yarn behind work. Pick up color B, dc in each of next 3 sts, skip 3 sts, [pf, ch1, pf], skip 3 sts, [pf, ch1, pf], skip 3 sts, [pf, ch1, pf], skip 3 sts, dc in each of next 3 sts and drop yarn behind work. Pick up color A, dc in each of last (12, 15, 18, 21, 24, 27, 30) sts, turn.
Repeat rows 2 and 3 until rectangle is desired length, ending on a row 2 (WS).
Final Row (RS):
Ch 2 (does not count as dc), dc in each of the 1st (12, 15, 18, 21 24, 27, 30) sts and drop yarn behind work. Pick up color B, dc in each of the next 3 sts, 2 hdc in the next space, 2 hdc in the space between the two puffs, 2 hdc in the next space, 3 hdc in the space between the two puffs, 2 hdc in the next space, 2 hdc in the space between the two puffs, 2 hdc in the next space, dc in each of the next 3 sts and drop yarn behind work. Pick up color A, dc in each of last (12, 15, 18, 21, 24, 27, 30) sts, turn.
Back Panel:
Row 1:
Using color A, ch (47, 53, 59, 65, 71, 77, 83). Dc in 4th ch from hook (counts as dc) and in each st across, turn. (45, 51, 57, 63, 69, 75, 81) sts.
Row 2:
Ch 2 (does not count as dc), dc in each st across, turn.
Repeat row 2 until this panel is the same length as the front panel.
Assembly:
Lay the two panels on top of one another, right sides facing out. If you prefer to sew your panels together with the right side facing in, that is fine as well. Just use your preferred seaming method. (I have no idea why my second panel appears slightly larger in the photo below. It is not. I think I may have taken the photo at a weird angle. Sorry about that! Each panel should be the same size.)
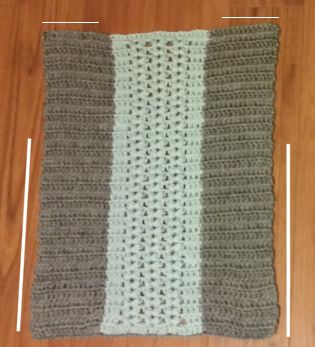
Measure (6.5″, 7″, 7.5″, 8″, 8.5″, 9″, 9.5″) down from the top. Thread needle with a length of color A and sew each side together as marked in the photo below. Fasten off.
For the shoulders, measure 2-4″ from each side. Thread needle with a length of color A and sew each shoulder together as marked in the photo below. Fasten off.
To Finish:
Armholes:
Attach color A to the bottom of each armhole and work 1 row of hdc around, sl st to beginning hdc. Fasten off.
Waistband:
Attach color A to the bottom band of the sweater and work 1 row of hdc around, sl st to beginning hdc. Fasten off.
Turtleneck:
Round 1:
Attach color B to the back middle of the neck opening. Ch 2, dc in the same st, dc each st around, sl st to beginning dc.
Round 2:
Ch 2, turn work, dc in the same st, dc in each st around, sl st to beginning dc.
Rounds 3-10:
Repeat row 2.
Fasten off and weave in all ends.
- Funny Pictures
-
 Hilarious Memes for Those Bored to Tears
-
 Weekly Treat of Funniest Parenting Memes for Good Laugh out Loud Right Now
-
 Really Funny Pics to End These Weekend Perfectly
- Recipes
-
 Crispy Baked Avocado Fries
-
 Scrambled Chickpea and Spinach Pitas
-
 Cinnamon Pancakes
- Lifehacks
-
 Crochet Basics: Aligned Cobble Stitch
-
 Brick Stitch Crochet Tutorial
-
 Crochet Basics: Wattle Stitch
- Crochet Ideas
-
 Crochet Snorlax Plushie Doll
-
 Crochet Beautiful Penguin Toy
-
 Crochet Tiny Snowman
- DIY
-
 DIY Santa Craft For Kids
-
 Paper Plate Angel Craft
-
 Upcycled Mason Jar Chicken Vase
- Knitting Ideas
-
 Knitted Bridger Cowl
-
 Knitted Keepsake Bag
-
 Knitted Cutie Cupcake Dolls