Crochet Amigurumi Wolf: A Fun and Creative Craft

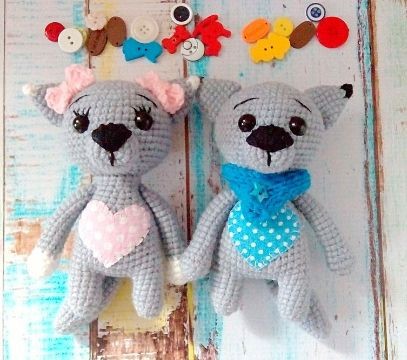
The Crochet Amigurumi Wolf is a delightful and adorable craft project that requires some basic crochet skills and a bit of creativity. You can customize the color scheme to create a realistic or whimsical look, and add details such as fur texture or a scarf to give your wolf some personality. With patience and practice, you can create a charming and cuddly amigurumi wolf that's sure to delight both kids and adults alike!
You Will Need:
- Yarn (3 colors: Alize Happy Baby in gray, black, and white)
- Filling
- Eyes (10 mm)
- Stitching needle and scissors
- Thin yarn for eyebrows and eyelashes
- A section of the fabric for decorating tummies
Symbols:
Symbols:
Satn = Table without cape
pr = Increase, tie 2 Sat from one loop
ub = Decrease, tie 2 Sat together (for the front halo)
*N = Repeat the specified number of times
Body and Feet Instructions
RND 1: 1. 6 Sat in the ring
2. 6 pr = 12
3-8. 12 Sat (6 rows)
On the first leg, fix the thread and leave a small tail (this will create a hole between the legs to sew). We knit the second leg, do not break the thread, knit 6 vp and we combine with the first foot and then knit in a circle.
9. 12 Sat on the first leg, 6 Sat on the chain of vp, 12 Sat on the second leg, 6 Sat on the chain from vp. We put the marker, here will be the beginning of the series (we define this place as the back body part). = 36 Satn
10-13. 36 Sat (4 rows)
14. (10 Satn, ub) * 3 = 33
15. 33 Sat
16. (9 Sat, ub) * 3 = 30
17. 30 Sat
18. (8 Satn, ub) * 3 = 27
19. 27 Sat
20. (7 Sat, ub) * 3 = 24
21. 24 Sat
22. (6 Satn, ub) * 3 = 21
23-24. 21 Sat (2 rows)
25. (5 Satn, ub) * 3 = 18
26-27. 18 Sat (2 rows)
Fill the body, fix the thread, leave an end for sewing heads.
Head Instructions
RND 1: 1. 6 Sat in the ring
2. 6 pr = 12
3. (1 Sat, pr) * 6 = 18
4. (2 Sat, pr) * 6 = 24
5. (3 Sat, pr) * 6 = 30
6. (4 Sat, pr) * 6 = 36
7. (5 Sat, pr) * 6 = 42
8. (6 Sat, pr) * 6 = 48
9-15. 48 Sat
16. (6 Satn, ub) * 6 = 42
17. (5 Satn, ub) * 6 = 36
18. (4 Sat, ub) * 6 = 30
19. (3 Sat, ub) * 6 = 24
20. (2 Sat, ub) * 6 = 18
Head to fill, fix the thread, hide the end. The eyes are placed between row 10 and 11 at a distance of 8-9 Sat.
Ears Instructions
We start with black yarn.
RND 1: 1. 4 Sat in the ring
2. 4 pr = 8
Change color to white.
3. (3 Sat, pr) * 2 = 10
Change color to gray.
4. (4 Sat, pr) * 2 = 12
5. (5 Sat, pr) * 2 = 14
6. (6 Sat, pr) * 2 = 16
7-8. 16 Sat (2 rows)
Fix the thread, leave the end for sewing. Do not fill.
Muzzle Instructions
RND 1: 1. 6 Sat in the ring
2. 6 pr = 12
3. (1 Sat, pr) * 6 = 18
4-7. 18 Sat (4 rows)
Stuff, fasten the thread, and sew to the head between rows 12 and 16 (17) for the nose.
Hands Instructions
We start with white yarn.
RND 1: 1. 6 Sat in the ring
2. 6 pr = 12
3. (2 Sat, pr) * 3 = 15
4. 15 Sat
5. (1 Sat, ub) * 5 = 10
Change color to gray.
6-18. 10 Sat (13 rows)
19. 5 kill.
To fill the handle first tightly, then not very much. Pull the hole, hide the thread. Apples attach to the body using a filament mount (see picture).
Tail Instructions
We start with black yarn.
RND 1: 1. 6 Sat in the ring
2. (1 Sat, pr) * 3 = 9
3. 9 Sat
Change color to white.
4. (2 Sat, pr) * 3 = 12
5. 12 Sat
6. (3 Sat, pr) * 3 = 15
Change color to sulfur.
7. (4 Sat, pr) * 3 = 18
8-11. 18 Sat (4 rows)
12. (4 Sat, ub) * 3 = 15
13-14. 15 Sat (2 rows)
15. (3 Sat, ub) * 3 = 12
16. 12 Sat
17. (2 Sat, ub) * 3 = 9
18-20. 9 Sat (3 rows)
Stretch to fill, fold the edges, tie the Sat, and sew from the back between the legs on level 12-14 row (where you would like).
- Funny Pictures
-
 Pics to Get the Excitement Today
-
 Funny Christmas Meme Dump
-
 Funniest Relatable Felines in the Form of Memes
- Recipes
-
 Cappuccino Brownies
-
 Chicken Mushroom Tortellini Bake
-
 Spinach Pie
- Lifehacks
-
 8 Necessary Tips for Baking Bread
-
 Tips & Hacks for Clean Carpets
-
 10 Uses For Old TV Armoires
- Crochet Ideas
-
 Crochet Watermelon Amigurumi
-
 Crochet Shark Applique
-
 Crochet Pineapple Amigurumi
- DIY
-
 Yarn Wrapped Christmas Wreath Ornaments
-
 Egg Carton Snowman Ornament
-
 Stick Peppermint Candy Ornament
- Knitting Ideas
-
 Knitted Star Square Dishcloth
-
 Knitted Free 2025 Year Dishcloth
-
 Knitted Belle Finger Puppet