How to Crochet an Adorable Tortoise

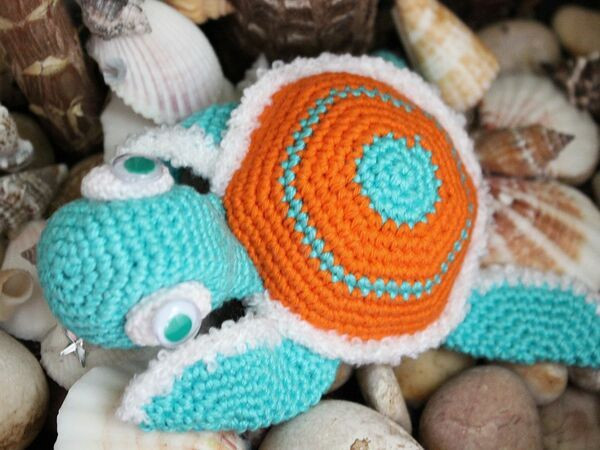
Crocheting a beautiful tortoise is a delightful and rewarding craft project! By carefully choosing your yarn colors and following a simple pattern, you can create a cute and whimsical creature that brings a touch of charm to any space. Whether you're an experienced crocheter or just starting out, this project is a fun way to showcase your creativity and attention to detail. Plus, once you finish your crocheted tortoise, it will make a lovely gift for a friend or a charming addition to your own home decor. So grab your crochet hook and let's get crafting – you'll have a new adorable tortoise friend in no time!
Materials
Schachenmayr Catania 125m/50 g, crochet hook C, 2 black beads or a pair of safety eyes, polyester fiber fill stuffing, yarn needle.
Skill Level
Easy
Abbreviations
- Ch = chain
- St = stitch
- Sc = single crochet
- Sl st = slip stitch
- Rnd = round
- Dc = double crochet
- dec = decrease stitch (two single crochets together)
- inc = increase stitch (two single crochets into one stitch)
Notes
- Do not join rounds, work in a continuous spiral.
- Use a stitch marker or a piece of yarn to mark the end or the beginning of a round.
- All stitches are worked into both loops, unless stated otherwise in the pattern.
Instructions
Shield
Rnd 1: 6 sc into Magic Ring
Rnd 2: inc 6 times (12 sts)
Rnd 3: *sc in next st, inc* (18 sts).
Rnd 4: *sc in each of next 2 sts, inc* (24 sts).
Rnd 5: *sc in each of next 3 sts, inc* (30 sts).
Rnd 6: *sc in each of next 4 sts, inc* (36 sts).
Rnd 7: *sc in each of next 5 sts, inc* (42 sts).
Rnd 8: sc in each of next 42 sts.
Rnd 9: *sc in each of next 6 sts, inc* (48 sts).
Rnd 10: *sc in each of next 7 sts, inc* (54 sts).
Rnd 11: *sc in each of next 8 sts, inc* (60 sts).
Rnd 12-13: sc in each of next 60 sts.
Change colour.
Rnd 14 (working in the back loop only): sc in each of next 60 sts.
Rnd 15: *dec, sc in each of next 7 sts* (54 sts).
Rnd 16: *dec, sc in each of next 6 sts* (48 sts).
Rnd 17: *dec, sc in each of next 5 sts* (42 sts).
Rnd 18: *dec, sc in each of next 5 sts* (36 sts).
Rnd 19: *dec, sc in each of next 4 sts* (30 sts).
Rnd 20: *dec, sc in each of next 3 sts* (24 sts).
Stuff the body.
Rnd 21: *dec, sc in each of next 2 sts* (18 sts).
Rnd 22: *dec, sc in next st* (12 sts).
Rnd 23: *dec* 6 times.
Cast off.
With fluffy yarn sc into each st around (working in the front loop of Rnd 13).
Head
Rnd 1: 6 sc into Magic Ring.
Rnd 2: inc 6 times (12 sts).
Rnd 3: *sc in next st, inc* (18 sts).
Rnd 4: *sc in each of next 2 sts, inc* (24 sts).
Rnd 5: *sc in each of next 3 sts, inc* (30 sts).
Rnd 6: *sc in each of next 4 sts, inc* (36 sts).
Rnd 7-11: sc in each of next 36 sts.
Rnd 12: *dec, sc in each of next 4 sts* (30 sts).
Rnd 13: *dec, sc in each of next 3 sts* (24 sts).
Rnd 14: *dec, sc in each of next 2 sts* (18 sts).
Rnd 15-19: sc in each of next 18 sts.
Cast off leaving a long tail for sewing. Stuff the head and sew to the shield.
Eyes
Rnd 1: 6 sc into Magic Ring
Rnd 2: inc 6 times (12 sts)
Rnd 3: *sc in next st, inc* (18 sts)
Rnd 4-5: sc in each of next 18 sts
Rnd 6: *dec, sc in next st* (12 sts).
Stuff the eye.
Rnd 7: *dec* 6 times.
Cast off leaving a long tail for sewing.
Legs (4x)
Rnd 1: 6 sc into Magic Ring.
Rnd 2: inc 6 times (12 sts).
Rnd 3: *sc in next st, inc* (18 sts).
Rnd 4: *sc in each of next 2 sts, inc* (24 sts).
Rnd 5: *sc in each of next 3 sts, inc* (30 sts).
Rnd 6: *sc in each of next 4 sts, inc* (36 sts).
Rnd 7-10: sc in each of next 10 sts, turn.
Fold and with fluffy yarn sew together.
Finishing
Using yarn needle sew legs to the shield.
Decide where you will position eyes and sew them to the head.
- Funny Pictures
-
 Relatable and Funny Memes to Distract You From the Routine
-
 Hilarious Cat Snapchats That Will Leave You With the Biggest Smile
-
 Today’s Top Funny Tweets to Scroll Before Bed
- Recipes
-
 Cappuccino Brownies
-
 Chicken Mushroom Tortellini Bake
-
 Spinach Pie
- Lifehacks
-
 8 Necessary Tips for Baking Bread
-
 Tips & Hacks for Clean Carpets
-
 10 Uses For Old TV Armoires
- Crochet Ideas
-
 Crochet Watermelon Amigurumi
-
 Crochet Flower Hat for your Pet
-
 Crochet Shark Applique
- DIY
-
 Crochet Titus the Barn Owl
-
 Crochet Rainbow Bunny
-
 DIY Washer Ornaments
- Knitting Ideas
-
 Knitted Star Square Dishcloth
-
 Knitted Free 2025 Year Dishcloth
-
 Knitted Ribbed Adult Hat