Crochet Emoji Granny Square Pattern

The Crochet Emoji Granny Square is a delightful and fun project that combines the classic granny square with adorable emoji designs. Whether you're an experienced crocheter or just starting out, this pattern is sure to bring a smile to your face with its charming and quirky designs. With a playful touch of nostalgia and creativity, each square is a mini work of art that can be combined to make a colorful and unique blanket or any other crochet project you fancy. So grab your yarn and hook, and let the Crochet Emoji Granny Square pattern unlock a world of creative possibilities and happiness in your crochet journey!
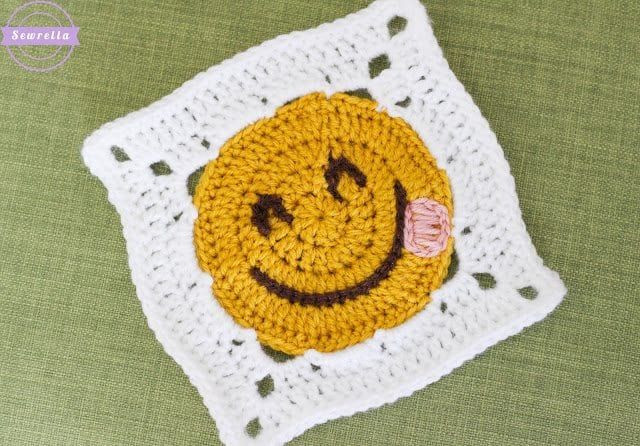
Size: 8 in. by 8 in.
Materials
- Worsted weight yarn (I used Lion Brand Vanna’s Choice) in Mustard, Chocolate, White, and Pink
- Size H (5mm) crochet hook
- Tapestry needle
Emoji Head Instructions
In Mustard, begin with a magic ring, Ch 2
- Round 1: 10 Dc inside ring, sl st to join, Ch 2 (10)
- Round 2: 2 Dc in each st around, sl st to join, Ch 2 (20)
- Round 3: Repeat Round 2 (40)
- Round 4: *Dc in first st, 2 Dc in next st, repeat from * around, sl st to join, Ch 2 (60)
- Round 5: Sc in each st around, sl st to join, proceed with granny square sts
Granny Square Instructions
- Round 1: Join White yarn, *Ch 5, skip 4 sts, sl st into 5th st from hook, repeat from * 11 more times, sl st to first Ch 5 space, Ch 2
- Round 2: (2 Dc, Ch 3, 3 Dc) in first Ch space, 4 Dc in next Ch space, 4 Dc in next Ch space, *(3 Dc, Ch 3, 3 Dc) in next Ch space, 4 Dc in next Ch space, 4 Dc in next Ch space, repeat from * 2 more times
- Round 3: (3 DC, CH 3, 3 DC) in each corner Ch 3 space, and Dc in all other sts, sl st to join to starting Ch, Ch 2
- Round 4: (3 DC, CH 3, 3 DC) in each corner Ch 3 space, and Dc in all other sts, sl st to join to starting Ch, finish off and weave all ends
Face Details
With Chocolate, surface stitch smile along the edge between Rounds 3 & 4 of the emoji head. Surface stitch eyes in arcs.
With Pink, surface stitch the tongue outline, finish off leaving a long tail, use a tapestry needle to fill in the tongue. Weave all ends.
- Funny Pictures
-
 Pics to Get the Excitement Today
-
 Funny Christmas Meme Dump
-
 Funniest Relatable Felines in the Form of Memes
- Recipes
-
 Cappuccino Brownies
-
 Chicken Mushroom Tortellini Bake
-
 Spinach Pie
- Lifehacks
-
 8 Necessary Tips for Baking Bread
-
 Tips & Hacks for Clean Carpets
-
 10 Uses For Old TV Armoires
- Crochet Ideas
-
 Crochet Watermelon Amigurumi
-
 Crochet Shark Applique
-
 Crochet Pineapple Amigurumi
- DIY
-
 Yarn Wrapped Christmas Wreath Ornaments
-
 Egg Carton Snowman Ornament
-
 Stick Peppermint Candy Ornament
- Knitting Ideas
-
 Knitted Star Square Dishcloth
-
 Knitted Free 2025 Year Dishcloth
-
 Knitted Ribbed Adult Hat