Crochet Mini Harry Potter Amigurumi: A Magical Crafting Experience

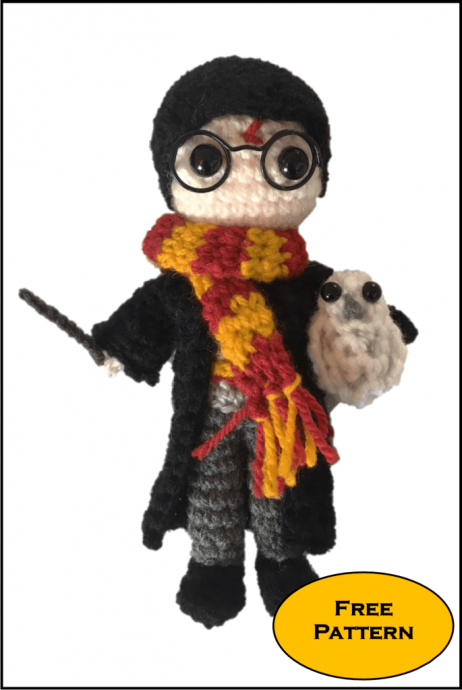
Creating Crochet Mini Harry Potter Amigurumi can be such a magical experience! These adorable handcrafted characters bring a touch of whimsy and charm to any space. With just a few crochet stitches, you can stitch up your favorite wizarding world friends like Harry, Hermione, and Ron. The best part is you can personalize them with tiny scarves, wands, and glasses to make them truly unique. Whether you are a beginner or a seasoned crocheter, crafting these mini amigurumi figures is a delightful way to infuse a bit of fantasy into your crafting projects. They make wonderful gifts for fellow Potterheads or charming decorations for your own home. Let your creativity soar as you embark on this enchanting crochet journey!
Finished Size
Size depends on hook and yarn weight. The following are a guide to sizes; however, you can use any yarn weight as long as you use a hook small enough to give the right tension (at least two sizes smaller than the recommended hook size for that yarn).
- 2.75 mm hook and dk/light worsted weight yarn – 16 cm/6.3 in
- 3.00 mm hook and dk/light worsted weight yarn – 23 cm/9 in
- 3.00 mm hook and worsted weight yarn – 24 cm/9.5 in
Materials
- Yarn in flesh, black, light grey, dark grey, yellow, and red
- Crochet hook
- Safety eyes (can be embroidered)
- Glasses (can be embroidered)
- Stuffing
You can use any yarn and crochet hook combination that gives you good tension. Normally this would be a hook around two sizes smaller than that recommended on the yarn label. For mini Harry, I used a 2.75 mm hook with 8ply/DK/Light Worsted Weight acrylic yarn.
Crochet Abbreviations (US Terminology)
sc – single crochet
dec – decrease
inc – increase
blo – crochet through back loops only
sl – slip stitch
dc – double crochet
ch – chain
tr – treble crochet
The numbers in brackets at the end of each round indicate how many stitches you should have at the end of the round.
Body
Arms (Make Two)
Using flesh colored yarn:
Round 1: 6 sc into magic ring
Round 2: 6 sc
Change to light grey colored yarn:
Round 3: 6 sl
Round 4: 6 sc blo
Rounds 5-8: 6 sc (4 rounds)
Fasten off.
Legs
Using black colored yarn:
Round 1: 4 sc into magic ring
Round 2: 4 inc (8)
Round 3: 2 sc, 2 inc, 2 sc, 2 inc (12)
Round 4: 12 sc blo
Round 5: 2 sc, 4 dec, 2 sc (8)
Change to dark grey colored yarn:
Round 6: 8 sl
Round 7: 8 sc blo
Rounds 8-12: 8 sc (5 rounds)
Fasten off. Repeat for second leg but do not fasten off. Stuff both legs.
Torso
Sc to the side of the leg, if not already there. Chain 1 stitch.
Round 1: Making sure that feet are both pointing in the same direction 8 sc around the leg you fastened off, 1 sc in chain stitch, 8 sc around the other leg, 1 sc in chain (18)
Round 2: 7 sc, 1 dec, 7 sc, 1 dec (16)
Continue to sc until you reach the middle of Harry's back (i.e. work a part round until you are at the center of Harry's back, this is just so the color change is less obvious).
Change to light grey colored yarn:
Round 3: 16 sl
Round 4: 16 sc blo
Change to red colored yarn:
Round 5: 16 sc
Change to light grey colored yarn:
Rounds 6-8: 16 sc (3 rounds)
Sc until you are at the side of Harry's body.
Round 9: 6 sc around arm, 8 sc on body, 6 sc around arm, 8 sc on body (28)
Round 10: 14 dec (14)
Stuff body.
Round 11: 7 dec (7)
Head
Change to flesh colored yarn:
Round 1: 7 sl blo
Round 2: 7 inc blo (14)
Round 3: 14 inc (28)
Round 4: 13 sc, 1 inc, 13 sc, 1 inc (30)
Rounds 5-8: 30 sc (4 rounds)
Place safety eyes between the last two rounds, leaving 4 sts between eyes.
Round 9: (3 sc, 1 dec) x 6 (24)
Round 10: (2 sc, 1 dec) x 6 (18)
Stuff Head.
Round 11: (1 sc, 1 dec) x 6 (12)
Round 12: 6 dec (6)
Fasten off.
Hair
Using black colored yarn:
Round 1: 6 sc into magic ring
Round 2: 6 inc (12)
Round 3: (1 sc, 1 inc) x 6 (18)
Round 4: (2 sc, 1 inc) x 6 (24)
Round 5: (3 sc, 1 inc) x 6 (30)
Rounds 6-9: 30 sc (4 rounds)
Round 10: (1 sc, 1 hdc, 1 dc, 1 hdc, 1 sc) x 6
Fasten off. Pin hair to head and sew in place.
Using red colored yarn embroider lightning bolt on forehead.
Using yellow colored yarn and working around posts of red stitches on body, sl 16 stitches to create yellow band.
Cloak
Sleeves (Make Two)
Using black colored yarn:
Round 1: 12 ch and join in a loop
Rounds 2-3: 12 sc (2 rounds)
Round 4: 4 sc, 1 dec, 4 sc, 1 dec (10)
Round 5: 10 sc
Round 6: 3 sc, 1 dec, 3 sc, 1 dec (8)
Round 7: 8 sc
Fasten off. Make second sleeve same as the first.
Body of Cloak
Row 1: 17 ch
Row 2: starting in second ch from hook, sc 16
Rows 3-16: 1 ch, 16 sc (14 rounds)
Row 17: 1 ch, 4 sc, 8 sc around sleeve, 8 sc on cloak, 8 sc around other sleeve, 4 sc on cloak (32)
Row 18: 32 sc
Row 19: 1 ch, 16 dec
Fasten off. Weave in ends.
Scarf
Using red colored yarn:
Round 1: 6 ch and join
Round 2: 6 sc
Change to yellow colored yarn:
Rounds 3-4: 6 sc (2 rounds)
Change to red colored yarn:
Rounds 5-6: 6 sc (2 rounds)
Repeat rounds 3-6 in alternating stripes of yellow and red until there are 19 stripes in total. Fasten off. Cut six 8 cm lengths each of yellow and red yarn. Using one length of red and one length of yellow, fold lengths in half, draw loop through scarf, and then pull cut ends through loop. Trim ends.
Wand
Using brown colored yarn, 6 ch. Fasten off. Use hairspray or spray glue to stiffen wand. Alternatively, you could use a small stick as a wand.
Owl (Hedwig)
Body
Using white colored yarn:
Round 1: 8 sc in magic ring
Rounds 2-7: 8 sc
Fasten off. Place small safety eyes two rounds from one end and two stitches apart, stuff owl body, and sew together opening. Using grey colored yarn embroider beak and V shapes on chest.
Wings
Make two wings, one on either side of body.
Row 1: Three rows from top of owl, sc 2 stitches around posts.
Rows 2-4: 1 ch, 2 sc (3 rows)
Row 5: 1 ch, 1 dec
Fasten off. Repeat on other side.
- Funny Pictures
-
 Relatable and Funny Memes to Distract You From the Routine
-
 Hilarious Cat Snapchats That Will Leave You With the Biggest Smile
-
 Today’s Top Funny Tweets to Scroll Before Bed
- Recipes
-
 Cappuccino Brownies
-
 Chicken Mushroom Tortellini Bake
-
 Spinach Pie
- Lifehacks
-
 8 Necessary Tips for Baking Bread
-
 Tips & Hacks for Clean Carpets
-
 10 Uses For Old TV Armoires
- Crochet Ideas
-
 Crochet Watermelon Amigurumi
-
 Crochet Flower Hat for your Pet
-
 Crochet Sophia and Bennet Love Birds
- DIY
-
 DIY Beaded Christmas Tree
-
 Crochet Titus the Barn Owl
-
 DIY Washer Ornaments
- Knitting Ideas
-
 Knitted Star Square Dishcloth
-
 Knitted Free 2025 Year Dishcloth
-
 Knitted Ribbed Adult Hat