Crochet Scarecrow Doll: Step-by-Step Instructions
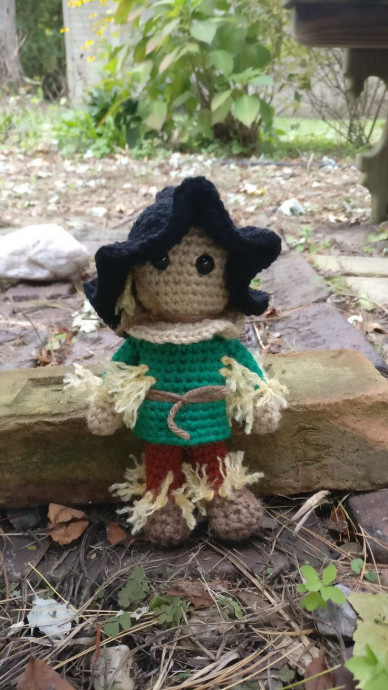
The Crochet Scarecrow Doll is the cutest addition to any fall decor or craft collection! With its charming and whimsical design, this little scarecrow is sure to bring smiles to everyone who sees it. Its carefully crafted details and warm colors make it a perfect companion for autumn, adding a festive touch to any space. Whether displayed on a shelf or gifted to a friend, the Crochet Scarecrow Doll is guaranteed to spread joy and cheer wherever it goes. Who knew something so cute could also keep the birds away from the garden?
Materials Needed
Worsted weight yarn in colors desired, G Hook and 9mm safety eyes
Body Instructions
Head and Body
Start with light tan for the head:
- 6 sc in magic circle
- 2 sc around
- *inc, sc in next sc* around
- *inc, sc in next 2 sc* around
- *inc, sc in next 3 sc* around
- 6-12. sc around
Place safety eyes between rounds 8-9:
- *dec, sc in next 3* around
- *dec, sc in next 2* around
- *dec, sc in next sc* around, make sure to stuff head and continue to stuff as you go
- *inc, sc in next sc* around in BLO then switch to green for shirt
- *inc, sc in next 2 sc* around
- 18-23. sc around
- 24. sc in BLO around then switch to reddish brown for pants
- Stuff body
- *dec, sc in next 2* around
- *dec, sc in next sc* around
- *dec around*, bind off and close up hole
Neck Ruffle
Ok admittedly this is not in the best place so it is a bit challenging. Just take it slow and don’t get frustrated. I found it best to almost push the head and body away from each other to push the FLO out more. Make sure the head is facing down:
- Attach head tan yarn in any of the round 16 FLO that are exposed.
- Ch 1, *inc* around, do NOT sl st to the first, but continue on in a spiral
- *inc, sc in next* around
- *inc, sc in next 2* around, bind off and weave in end
Shirt Ruffle
Attach shirt green color in any of the round 24 FLO that are exposed, ensuring the head is facing down:
- Ch 1, sc around, do NOT sl st to the first, but continue on in a spiral
- 2-4. sc around, bind off and weave in end
Leg Instructions
Make sure to stuff as you go, starting with medium brown for the shoes:
- 6 sc in magic circle
- 3 sc in first st, sc in next 3 sc, 3 sc in next sc, sc in next sc
- 2 hdc in next 4sc then sc in next 6 sc
- hdc in next 8 hdc then sc in next 2 sc, dec, sc in next 2 sc
- *dec, sc in next* x3, sc in next 4 sc
- sc in next 3 sc, dec, sc in next, dec, sc in next 2 sc and switch to pants color
- 7-14. sc around
- sc in next 2, inc x2, sc in next 2, inc x2 (This round is optional as it should just be some inc in the front and back of the leg, but it makes sewing the legs on easier.) Bind off and sew onto body. It helps to flip up the shirt ruffle until the legs are sewn on then flip back down.
Arm Instructions
Make sure to stuff the hand, but lightly stuff the arm, starting with light tan:
- 6 sc in magic circle
- *inc, sc in next sc* around
- 3-4. sc around
- dec x2, sc in next 5 sc, switch to green shirt color
- 6-12. sc around. Bind off and sew onto body.
Hat Instructions
- 6 sc in magic circle
- sc around
- *hdc inc, hdc in next 2* around
- *hdc inc, hdc in next 3* around
- *hdc inc, hdc in next 4* around
- *hdc inc, hdc in next 3* around
- *hdc inc, hdc in next 4* around
- *hdc inc, hdc in next 2* around
- *hdc inc, hdc in next 3* around
- *hdc inc, hdc in next 4* around
- *hdc inc, hdc in next 11* around
- FLO sc around
- *hdc inc* around
- hdc around, bind off and leave a tail for sewing. Weave end up to round 11 and then sew this round loosely to the head.
Ties
Using brown yarn, tie a length of yarn around the neck above the ruffle, leaving the ends hanging. Tie another around the waist above the shirt ruffle.
Finishing Touches: Straw
Using straw-colored yarn, attach in various places like you would hair. I used 3-4″ yarn and then just trimmed as necessary. You actually need small pieces, but those are really hard to weave in to me. I then split the yarn into strands with a needle to fluff it up a little.


