Create Your Adorable Crochet Dinosaur Doll

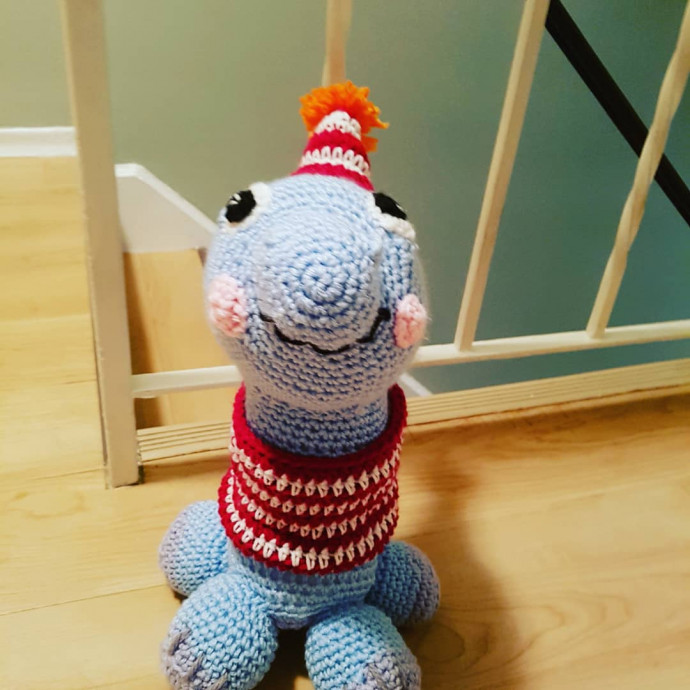
If you're looking for a fun and whimsical addition to your collection, a Crochet Dinosaur Doll is a fantastic choice! This adorable creation combines the charm of a dinosaur with the coziness of crochet, making it a delightful companion for both children and adults alike. With its vibrant colors and intricate stitching, this handmade toy is sure to bring a smile to anyone who sees it. Whether you're a crochet enthusiast or simply love unique knick-knacks, a Crochet Dinosaur Doll is a must-have item that exudes charm and creativity.
Skill Level
Beginner
Techniques Used
sc, and hdc in rounds and rows
Materials
- Crochet hook size 3.5
- Yarn needle
- Fiberfill stuffing
- Medium worsted weight yarn in:
- Light blue
- Lilac purple
- Red
- White
- Black
- Pink
- Orange
- Grey (or can use black)
Abbreviations
- rd – round
- ch – chain
- hk – hook
- ea – each
- st – stitch
- fo – fasten off
- back lps - back loops
- sl st – slip stitch
- sc = single crochet
- hdc – half double crochet
- sc2tog – single crochet 2 stitches together
- hdc2tog – half double crochet 2 stitches together
- hdc3tog – half double crochet 3 stitches together
- 5dc-bobble – 5 double crochet bobble stitch
Instructions
Head in Light Blue
Rd 1: ch 2, 6sc in 2nd ch from hk (6)
Rd 2: 2sc around (12)
Rd 3: (sc, 2sc) around (18)
Rd 4: (sc in 2, 2sc) around (24)
Rd 5: sc around (24)
Rd 6: (makes nostrils): sc in 8, 5dc-bobble, sc in 6, 5dc-bobble, sc in 8 (24)
Rd 7-9: sc around (24)
Rd 10: (sc in 3, 2sc) around (30)
Rd 11: (sc in 4, 2sc) around (36)
Rd 12: sc in 8, 2sc in 12, sc in 16 (46)
Rd 13-23: sc around (46)
Rd 24: (sc in 6, sc2tog) around (42)
Rd 25: (sc in 5, sc2tog) around (36)
Rd 26: (sc in 4, sc2tog) around (30)
Rd 27: (sc in 3, sc2tog) around (24)
Rd 28: (sc in 2, sc2tog) around (18)
Rd 29: (sc, sc2tog) around (12)
STUFF
Rd 30: sc2tog around (6). sl st, FO and sew closed.
Cheeks (Make 2 in Pink)
Rd 1: ch 2, 6 sc in 2nd ch from hk
Rd 2: sc around (6), sl st, FO and sew to face
Eyes and Eyelids (Make 2)
With White:
Rd 1: ch 2, 8sc in 2nd ch from hk (8)
Rd 2: 2sc around (16). sl st, FO, leave a long end
With Black:
Rd 1: ch 2, 6sc in 2nd ch from hk (6), sl st, FO and sew onto whites.
Use white thread to sew on a twinkle. Sew eyes to face.
Eyelid with Blue
ch 6, sc in 2nd ch from hk and in each st across. sl st, FO and sew to the top of the eyes.
Mouth
Embroider a zigzag pattern to hint at a toothy smile.
Neck (in Blue)
Hold your dino head upside down and identify a circle of 34 stitches. You may want to use chalk or stitch markers to help.
Rd 1: attach blue with a sl st, and proceed to sc 34 stitches in a circle.
Rd 2-14: sc around (34)
Rd 15: (sc2tog, sc in 3)x6, sc2tog, sc in last 2 (27)
Rd 16: sc around (27)
Flap to sew neck:
Switch to working in rows
Row 1: sc in 10, ch 1, turn (10)
Rd 2: sc2tog, sc in 6, sc2tog (8)
Finish with round 17: sc in each st around, including the sides of the flap (34). sl st, FO, stuff and set aside.
Body (in Blue)
Rd 1: ch 2, 8 sc in 2nd ch from hk (8)
Rd 2: 2sc around (16)
Rd 3: (sc, 2sc) around (24)
Rd 4: (sc in 2, 2sc) around (32)
Rd 5: (sc in 3, 2sc) around (40)
Rd 6-14: sc around (40)
Rd 15: attach lilac and FO blue; sc around in back loops (40)
Rd 16: (sc in 3, sc2tog) around (32)
Rd 17: (sc in 2, sc2tog) around (24)
Rd 18: (sc, sc2tog) around (16)
STUFF
Rd 19: sc2tog around (8). sl st, FO and sew closed.
Sew the neck to the body. The neck flap will be along the top of the body (the lilac is the underbelly of the body).
Tail (in Blue)
Rd 1: ch 2, 6 sc in 2nd ch from hk
Rd 2: sc around (6)
Rd 3: (sc, 2sc) around (9)
Rd 4-6: sc around (9)
Rd 7: (sc in 2, 2sc) around (12)
Rd 8-10: sc around (12)
Rd 11: (sc in 3, 2sc) around (15)
Rd 12-14: sc around (15)
Rd 15: (sc in 4, 2sc) around: (18)
Rd 16-18: sc around (18)
Rd 19: (sc in 5, 2sc) around (21)
Rd 20-22: sc around (21)
Rd 23: (sc in 6, 2sc) around (24)
Rd 24-26: sc around (24)
Rd 27: (sc in 7, 2sc) around (27)
Rd 28-30: sc around (27)
Rd 31: (sc in 8, 2sc) around (30)
Rd 32-34: sc around (30)
Rd 35: (sc in 9, 2sc) around (33)
Rd 36-39: sc around (33). sl st, FO, stuff. Sew to the back of the body.
Tail Underbelly (in Lilac)
Row 1: ch 10, hdc in 2nd ch and in each ch down (9)
Row 2: ch 1, turn, hdc across (9)
Row 3: ch 1, turn, 2hdc, hdc in 7, 2hdc (11)
Row 4-6: ch 1, turn, hdc in 11 (11)
Rd 7: ch 1, turn, hdc2tog, hdc in 7, hdc2tog (9)
Rd 8: ch 1, turn, hdc across (9)
Rd 9: ch 1, turn, hdc2tog, hdc in 5, hdc2tog (7)
Rd 10-12: ch 1, turn, hdc across (7)
Rd 13: ch 1, turn, hdc2tog, hdc in 3, hdc2tog (5)
Rd 14-17: ch 1, turn, hdc across (5)
Rd 18: ch 1, turn, hdc2tog, hdc in 1, hdc2tog (3)
Rd 19: ch 1, turn, hdc across (3)
Rd 30: ch 1, turn, hdc3tog (1)
Rd 31: ch 1, turn, sc, ch 1, FO. Sew to the bottom of the tail, ensuring the lilac of the body’s underbelly reaches the wider end of the tail’s underbelly.
Legs (Make 4: Begin with Lilac)
Rd 1: ch 2, 8sc in 2nd ch from hk (8)
Rd 2: 2sc around (16)
Rd 3: (sc, 2sc) around (24)
Rd 4-6: sc around (24)
Switch to blue, FO lilac
Rd 7-13: sc around. sl st, FO. Stuff and sew to the bottom of the body. Use grey or black to embroider three claws to the front two legs.
Scarf
Rd 1: with red, ch 42, sl st closed
Rd 2: sc around (42)
Alternate white and red for the next rounds:
Rd 3-10: sc around (42), sl st, FO and weave in ends
Squeeze scarf down past the head to rest around the neck. Do not sew.
Hat
Rd 1: with red: ch 2, 6 sc in 2nd ch from hk (6)
Rd 2: sc around (6)
Rd 3: white: (sc, 2sc) around (9)
Rd 4: sc around (9)
Rd 5: red: (sc in 2, 2sc) around (12)
Rd 6: sc around (12)
Rd 7: white (sc in 3, 2sc) around (15)
Rd 8: sc around (15)
Rd 9: red (sc in 4, 2sc) around (18)
Rd 10: sc around (18). sl st, fasten off.
Pompom in Orange
- Wrap orange yarn around two fingers several times.
- Carefully pull the yarn off the fingers, keeping its shape.
- Tie an orange string around the center, as tightly as possible.
- Carefully cut the loops on either side.
- Trim your pompom as appropriate.
- Use the string that tied the pompom to sew onto the top of the hat.
Stuff the hat and sew onto the top of the head.
Finished!!
- Funny Pictures
-
 Hilarious Memes for Those Bored to Tears
-
 Weekly Treat of Funniest Parenting Memes for Good Laugh out Loud Right Now
-
 Really Funny Pics to End These Weekend Perfectly
- Recipes
-
 Crispy Baked Avocado Fries
-
 Scrambled Chickpea and Spinach Pitas
-
 Cinnamon Pancakes
- Lifehacks
-
 Crochet Basics: Aligned Cobble Stitch
-
 Brick Stitch Crochet Tutorial
-
 Crochet Basics: Wattle Stitch
- Crochet Ideas
-
 Crochet Snorlax Plushie Doll
-
 Crochet Beautiful Penguin Toy
-
 Crochet Tiny Snowman
- DIY
-
 DIY Santa Craft For Kids
-
 Paper Plate Angel Craft
-
 Upcycled Mason Jar Chicken Vase
- Knitting Ideas
-
 Knitted Bridger Cowl
-
 Knitted Keepsake Bag
-
 Knitted Cutie Cupcake Dolls