Create Your Own Whimsical Crochet Mushroom Doll

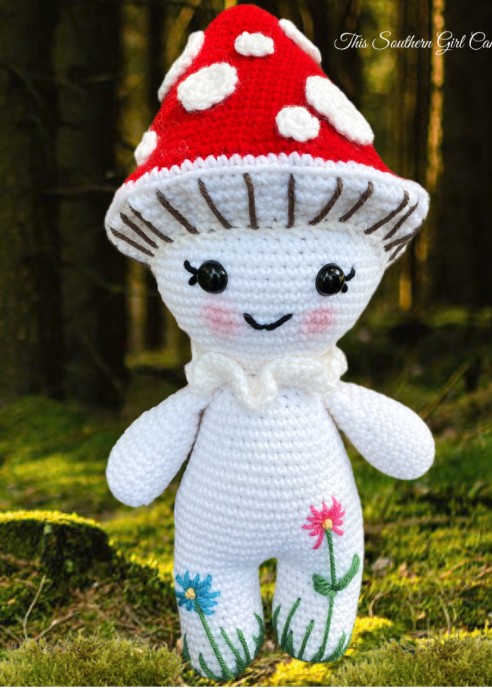
Create your very own whimsical mushroom doll using the art of crochet. This adorable project combines the charm of a classic doll with the unique shape of a mushroom, making it a fun and creative addition to your collection. By following a simple crochet pattern, you can bring this magical creature to life with your choice of colors and embellishments. Whether you're a seasoned crocheter or just starting out, this project is sure to spark your creativity and bring a smile to your face. Whether you're looking for a unique gift for a friend or simply want to add a touch of whimsy to your home decor, the crochet mushroom doll is a delightful project that is sure to bring joy and creativity into your life. So pick up your crochet hook and get ready to bring a little magic into your world with this fun and imaginative project.
Supplies Needed
- 4.5mm crochet hook
- Yarn needle
- Scissors
- Red Heart Super Saver yarn in the colors red, white, black, brown, green, pink, blue, and yellow
- Polyester fiberfill stuffing
- 16mm black safety eyes, or whatever size and color you prefer
- Blush for the cheeks
Abbreviations Used (American Terms)
- Sc= single crochet
- Ch= chain
- SlSt= slip stitch
- Dec= decrease
- MC= magic circle
- Inc= increase (work 2 stitches into the same stitch)
Notes
Measures 15” tall. I always prefer to start projects worked in the round with a magic circle. If you do not prefer this method, simply chain 2, and start working in the 2nd chain from the hook.
Worked in the round. Do not join at the end of each round. Stuff the piece firmly as you go.
Legs, Body, and Head: Worked as One Piece
Color: White
Round Instructions
- Round 1: MC, ch1, scx6 (6)
- Round 2: Inc in each stitch around (12)
- Round 3: Sc, inc. Repeat around (18)
- Round 4: Scx8, inc. Repeat (20)
- Rounds 5 & 6: Sc around (20)
- Rounds 7 & 8: Sc around (20)
- Rounds 9-14: Sc around (20)
Finish off. Make leg number 2, but DO NOT finish it off. Join the 2nd leg to the 1st leg with a slst. You will make the joining sl st in the stitch after the last stitch made on the 1st leg.
Connect the Legs
- Round 15: Scx39, inc. You have now connected the 2 legs (41)
- Round 16: Inc, scx18, inc, sc, inc, scx19 (44)
- Rounds 17-19: Sc around (44)
- Round 20: Scx11, dec, scx20, dec, scx9 (42)
- Rounds 21 & 22: Sc around (42)
- Round 23: Scx12, dec, scx18, dec, scx8 (40)
- Round 24: Scx10, dec, scx18, dec, scx8 (38)
- Rounds 25 & 26: Sc around (38)
- Round 27: Scx11, dec, scx16, dec, scx7 (36)
- Round 28: Sc around (36)
- Round 29: Scx7, dec. Repeat around (32)
- Round 30: Scx14, dec. Repeat (30)
- Rounds 31 & 32: Sc around (30)
Head Shaping and Finishing
- Round 33: Scx3, dec. Repeat all the way around (24)
- Rounds 34-36: Sc around (24)
- Round 37: Scx3, inc. Repeat around (30)
- Round 38: Scx4, inc. Repeat around (36)
- Round 39: Scx5, inc. Repeat around (42)
- Round 40: Scx6, inc. Repeat around (48)
- Round 41: Scx7, inc. Repeat around (54)
- Round 42: Scx8, inc. Repeat around (60)
- Rounds 43-53: Sc around (60)
Insert safety eyes between rounds 46 & 47, with roughly 8 stitches between them.
- Round 54: Scx8, dec. Repeat around (54)
- Round 55: Scx7, dec. Repeat around (48)
- Round 56: Scx6, dec. Repeat around (42)
- Round 57: Scx5, dec. Repeat around (36)
- Round 58: Scx4, dec. Repeat around (30)
- Round 59: Scx3, dec. Repeat around (24)
- Round 60: Scx2, dec. Repeat around (18)
- Round 61: Sc, dec. Repeat around (12)
- Round 62: Decx4.
Fasten off, leaving a 12 inch tail. Using a yarn needle, weave the yarn in and out of the remaining stitches and pull tight to close. Fasten off. Work away the end.
Arms (Make 2)
Color: White
Arm Instructions
- Round 1: MC, ch1, scx6 (6)
- Round 2: Inc in each stitch around (12)
- Round 3: Sc, inc. Repeat around (18)
- Round 4: Sc around (18)
- Round 5: Sc around (18)
- Round 6: Sc around (18)
- Rounds 7-9: Sc around (18)
Decreasing for Arms
- Round 10: Scx7, dec. Repeat (16)
- Round 11: Sc around (16)
- Round 12: Scx6, dec. Repeat (14)
- Round 13: Sc around (14)
- Round 14: Scx5, dec. (12)
- Round 15: Sc around (12)
Finish off, leaving a long tail for sewing them to the body.
Mushroom Cap Hat
Hat Instructions
- Round 1: scx6 in a MC (6)
- Round 2: Incx6 (12)
- Round 3: sc, inc. Repeat around (18)
- Round 4: scx2, inc. Repeat around (24)
- Round 5: sc around (24)
- Round 6: scx3, inc. Repeat around (30)
- Round 7: sc around (30)
- Round 8: scx4, inc. Repeat around (36)
- Round 9: sc around (36)
- Round 10: scx5, inc. Repeat around (42)
- Round 11: sc around (42)
- Round 12: scx6, inc. Repeat around (48)
- Round 13: sc around (48)
- Round 14: scx7, inc. Repeat around (54)
- Round 15: sc around (54)
- Round 16: scx8, inc. Repeat around (60)
- Round 17: sc around (60)
- Round 18: scx9, inc. Repeat around (66)
- Round 19: sc around (66)
- Round 20: scx10, inc. Repeat around (72)
- Round 21: sc around (72)
- Round 22: scx11, inc. Repeat around (78)
- Round 23: sc around (78)
- Round 24: scx4, inc. Repeat around scx3 (93)
- Round 25: scx5, inc. Repeat around scx3 (108)
Change to white
- Round 26: sc around (108)
- Round 28: BLO sc around (108)
- Round 29: scx5, dec. Repeat around scx3 (93)
- Round 30: scx4, dec. Repeat around scx3 (78)
- Round 31: scx3, dec. Repeat around scx3 (63)
- Round 32: scx2, dec. Repeat around sc dec (47)
Spots for the Mushroom Cap
Large Spot
- Round 1: 6sc in a MC (6)
- Round 2: Inc around (12)
- Round 3: Sc, inc. Repeat around (18)
Medium Spot
- Round 1: 6sc in a MC (6)
- Round 2: Inc around (12)
Small Spot
- Round 1: 6sc in a MC (6)
Finish off. Make as many spots as you like, and sew them onto the hat. Stuff the mushroom hat lightly, and sew onto the head. Refer to photos.
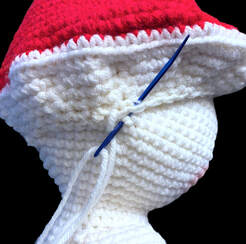
Neck Ruffle
- Ch27
- Row 1: dcx3 in the 3rd ch from the hook, and in every stitch across.
Finish off, and leave a long tail for sewing. Your piece should look like a long curl. Holding both ends of the curl, try to straighten it as much as possible. This will cause the stitches to ruffle. Wrap the ruffle around the neck of your doll, and using a yarn needle, stitch the two ends together.
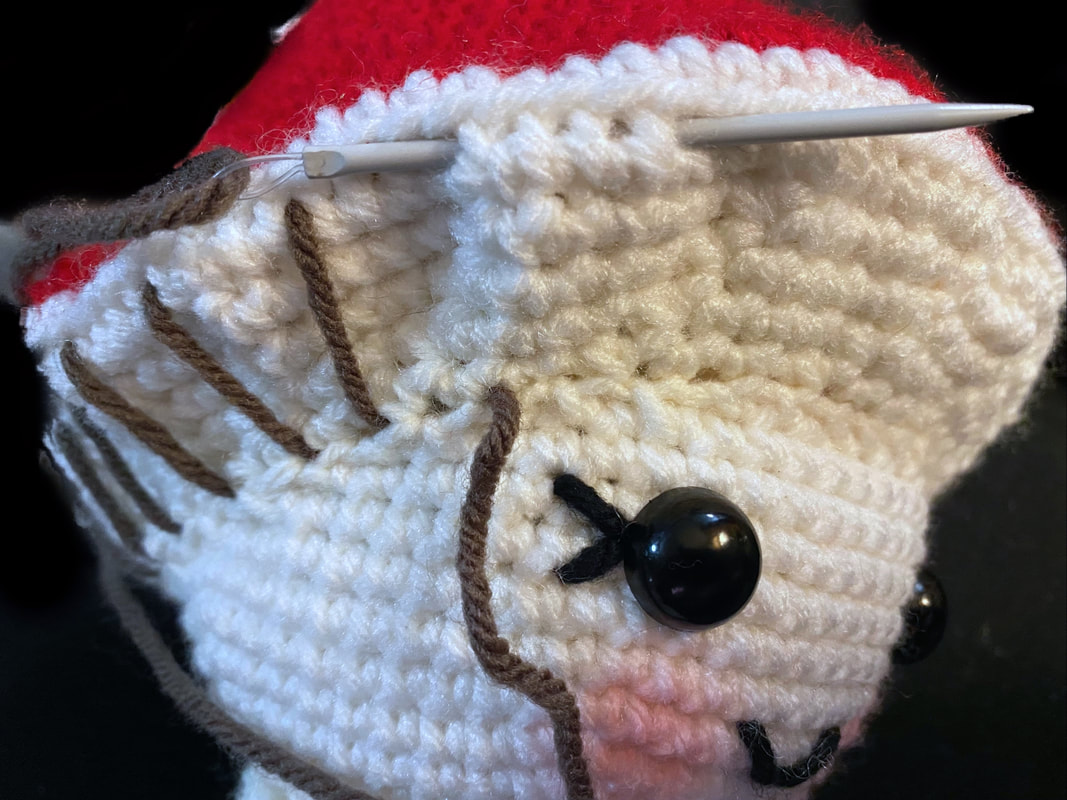
Adding Face Features
Using black yarn, stitch on a mouth and eyelashes.
Optional Embellishments
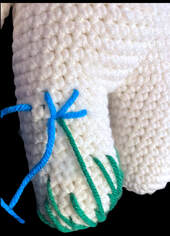
Using green yarn, and the color of flowers of your choice, stitch on the flower design as shown in the photo. I began by running my yarn into the center of the bottom of the foot, coming up where I wanted the top of the grass to be, then back down, and into the bottom of the foot again. Repeat for as many blades of grass as you like.
The flowers are stitched on the same way, but start at the top of the blade of grass where you want the flower to be. For the yellow center, you can use yellow yarn to make a French knot. Or, tie a square knot three or four times, thread the loose ends of your yarn into your needle, and thread it directly through the center of the flower.
Brown Cap Stripes
With a long length of brown yarn, stitch on cap stripes. I started at the back of the hat, where it is stitched to the body. Simply run your yarn back and forth between the bottom row of the hat, and the front loop stitches.
- Funny Pictures
-
 Hilarious Memes for Those Bored to Tears
-
 Weekly Treat of Funniest Parenting Memes for Good Laugh out Loud Right Now
-
 Really Funny Pics to End These Weekend Perfectly
- Recipes
-
 Crispy Baked Avocado Fries
-
 Scrambled Chickpea and Spinach Pitas
-
 Cinnamon Pancakes
- Lifehacks
-
 Crochet Basics: Aligned Cobble Stitch
-
 Brick Stitch Crochet Tutorial
-
 Crochet Basics: Wattle Stitch
- Crochet Ideas
-
 Crochet Snorlax Plushie Doll
-
 Crochet Beautiful Penguin Toy
-
 Crochet Tiny Snowman
- DIY
-
 DIY Santa Craft For Kids
-
 Paper Plate Angel Craft
-
 Upcycled Mason Jar Chicken Vase
- Knitting Ideas
-
 Knitted Bridger Cowl
-
 Knitted Keepsake Bag
-
 Knitted Cutie Cupcake Dolls