Crochet Hermione Granger Doll Guide

Introduction
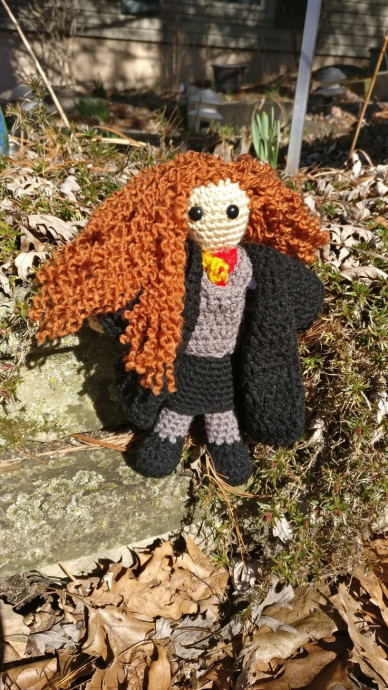
The Crochet Hermione Granger Doll is a charming and intricate creation that delights Harry Potter fans and craft enthusiasts alike. With cleverly woven details mimicking Hermione's iconic attire and features, this handmade doll is a true labor of love.
From her bushy crocheted hair to her tiny Gryffindor scarf, every stitch captures the essence of the beloved character. Displaying skillful craftsmanship and a touch of whimsy, the Crochet Hermione Granger Doll is sure to bring a smile to anyone who beholds its magical charm.
Materials Needed
- Worsted weight yarn (or any weight of your choosing)
- Size G hook (or whatever hook to make a tight crochet with your yarn)
- Safety eyes, 9mm
- Poly-fil for stuffing
Creating the Legs
Legs (make two) start with black:
- 8 sc in magic circle
- inc around
- sc around for 2 rounds
- dec x4, sc x8
- dec x2, sc x8 (by this round it should be 10sc). Stuff foot and continue to stuff as you go and then change to gray.
- sc around for 10 rounds. Bind off, but no need to leave a long tail for sewing.
Joining the Legs
Now about joining the legs, what you need to do is hold the legs together and sl st through both the legs twice in the middle where they meet, from the front of the legs to the back. Then continue around the legs. You should end with 2 sl st and 16 sc (8 sc around each leg). Moving on to the body you will forgo the sl st and only work in the sc.
Creating the Body
Body continuing with gray:
- sc around for 3 rounds
- *dec, 3* x3, sc, make sure to continue to stuff as you go and switch to white
- sc around in back loop only just for this round
- sc around for 7 rounds
- sc, dec, dec, 2 sc, dec, dec
- dec around, Bind off both, but no need to leave a long tail for sewing.
Making the Skirt
Skirt in black:
- Attach yarn in the front loops of the back loop only row with the legs facing up
- sc around and do not sl st to join, just keep going to start a spiral
- sc around for 3 rounds
- *inc, sc* around
- sc around for 6 rounds, bind off and weave in end
Creating the Arms
Arms (make two) start with skin color:
- 6 sc in magic circle
- inc around
- sc around for 2 rounds
- *dec, sc in next 2* around, make sure to stuff lightly as you go and switch to white
- sc around for 10 rounds. Bind off, leaving a tail to go ahead and sew onto the sides of the body.
Creating the Head
Head:
- 6 sc in magic circle
- inc around
- *inc, sc* around
- *inc, sc in next 2* around
- sc around for 6 rounds, insert safety eyes between rounds 5 and 6 (not counting the magic circle as a round), leaving about 3 sc in between.
- *dec, sc in next 2* around
- *dec, sc* around, be sure to stuff
- dec around, bind off, leaving a tail to go ahead and sew on.
Creating the Tie
Tie:
So, I played around with quite a few ideas to make this happen… more than I would like to admit for a tie. Now if you would like another way than what I am about to describe, then in one color just ch 21, sc across then use the other color to sew in the stripes. If you want another way, here’s what I did.
Essentially you are going to be doing a foundation sc row. On every third sc, change to the next color. Make sure you crochet over the end and carry the unused yarn by crocheting over it. Make 30 foundation sc then just bind off and weave in the ends. Tie it around the neck flipping both ends down. The vest will hold the tie down.
Creating the Vest
Vest in gray:
- ch 18 (make sure this goes around the doll’s waist)
- sl st to first sc, making sure not to twist, ch 2 (does not count as a st) dc around, sl st to the beginning
- ch 2, dc around for 3 rounds, for a total of 4 rounds
- ch 11, turn and hdc in the 2nd ch and across (10 hdc) then sc in the first dc. Sc in next 3 dc.
- ch 11, turn and hdc in the 2nd ch and across (10 hdc) then sc in next unused dc.
- Bind off and leave a long end. Slide vest onto the body then sew the vest straps to the vest. Make sure to position the tie inside the vest how you want it to look.
Creating the Cloak
Cloak in black:
- ch 21, turn and sc in each ch, ch 1 and turn
- *inc, sc* across, ch 1 and turn
- *inc, sc in next 2, ch 1 and turn
- sc in next 3, ch 6 and skip 12 sc, sc in next 10, ch 6 and skip 12 sc, sc in next 3, ch 1 and turn
- sc across in all sc and ch, ch 2 (does not count as stitch) and turn
- *dc inc, dc in next 3* dc in last, ch 2 and turn
- dc across for 8 rows
- ch 1 and sc around the opening and bottom of the cloak, sl st to the first and weave in end
- Cloak sleeves, repeat on each arm
- Join the yarn in one of the corners of the sleeve opening. Ch 1 and sc around the opening, sl st to beginning, ch 2 (does not count as stitch)
- Dc around, sl st to beginning and ch 2. Repeat for a total of 4 rounds. Ch 1 and then sc around, sl st to beginning, bind off and weave in the ends.
Creating the Hair
Hair in brown
I cut about 12″ strands and hooked them onto the head. Then I split the strands apart with the help of a needle to help give that bushy effect.
- Funny Pictures
-
 Relatable and Funny Memes to Distract You From the Routine
-
 Hilarious Cat Snapchats That Will Leave You With the Biggest Smile
-
 Today’s Top Funny Tweets to Scroll Before Bed
- Recipes
-
 Cappuccino Brownies
-
 Chicken Mushroom Tortellini Bake
-
 Spinach Pie
- Lifehacks
-
 8 Necessary Tips for Baking Bread
-
 Tips & Hacks for Clean Carpets
-
 10 Uses For Old TV Armoires
- Crochet Ideas
-
 Crochet Watermelon Amigurumi
-
 Crochet Flower Hat for your Pet
-
 Crochet Sophia and Bennet Love Birds
- DIY
-
 DIY Beaded Christmas Tree
-
 Crochet Titus the Barn Owl
-
 DIY Washer Ornaments
- Knitting Ideas
-
 Knitted Star Square Dishcloth
-
 Knitted Free 2025 Year Dishcloth
-
 Knitted Ribbed Adult Hat