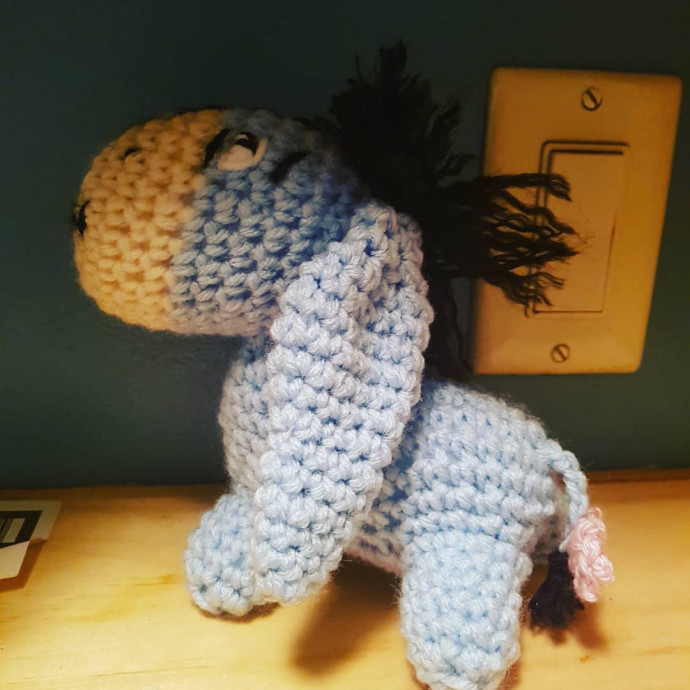
How to Crochet Your Own Eeyore Toy

Crafting your very own Crochet Eeyore toy can be a delightful project that brings out your creative side! With his droopy eyes and endearing personality, Eeyore is a beloved character to crochet for yourself or as a heartwarming gift for a friend, especially if they're a fan of Winnie the Pooh. The process of creating this sweet toy is not only fun and rewarding but also allows you to infuse your own personal touch into each stitch, making your Eeyore truly unique. So grab your crochet hook, some soft yarn in shades of gray and blue, and get ready to bring this whimsical donkey to life stitch by stitch! It's sure to bring a smile to your face as you see your handmade creation take shape.
Skill Level and Techniques
Beginner with sc stitches worked in rounds and rows.
Supplies
- Crochet hook size 3.5
- Yarn needle
- Fiberfill stuffing
- Yarn in:
- Light blue
- Aran (off-white)
- White
- Black
- Pink
- Lavender
Abbreviations
- hk – hook
- ch - chain
- sc – single crochet
- sl st - slip stitch
- st – stitch
- sc2tog (=dec=inv dec) – decrease two single crochet stitches into 1 sc
- ea – each
- sk – skip
- fo – fasten off
Begin Crocheting the Snout
Start with the snout in aran
Rd 1: ch 2, 8sc in 2nd ch from hk (8)
Rd 2: 2sc around (16)
Rd 3: (sc, 2sc) around (24)
Rd 4: sc around (24)
Fo aran and switch to light blue:
Rd 5-9: sc around (24)
Rd 10: (sc, sc2tog) around (16)
Rd 11-12: sc around (16)
Stuff
Rd 13: sc2tog around (8) sl st and FO, finish stuffing and sew closed.
Finishing the Face
Use back to embroider the stitches, mouth, nostril, pupils, and eyebrows as shown in the picture. Use white yarn or floss for the eye whites and eye sparkle.
Cut strands of black yarn for the hair. Tie them to the top of his head. Use your fingers or a needle to separate the yarn into its 4 individual strands. Brush with a round or steel brush to fluff the hair. Add as many hairs as you want until you are happy with the volume.
Ears (in light blue) - Make 2
Rd 1: ch 2, 6 sc in 2nd ch from hk (6)
Rd 2: sc around (6)
Rd 3: (sc, 2sc) around (9)
Rd 4-6: sc around (9)
Rd 7: (sc in 2, 2sc) around (12)
Rd 8: sc around (12)
Rd 9: (sc in 3, 2sc) around (15)
Rd 10-12: sc around (15)
Rd 13: (sc in 2, sc2tog) around (12)
Rd 14: (sc, sc2tog) around (8)
Rd 15-16: sc around (8).
sl st, FO, do not stuff. Sew to top of head.
Neck and Body in Light Blue
Rd 1: ch 20, sl st into a circle and sc around (20)
Rd 2: sc around (20)
Rd 3: ch 6, 2sc in 2nd ch from hk, sc in next 3 ch, sc around, sc back up the other side of the ch, 2sc in last ch. (30)
Rd 4: 2sc in 2sc, sc around the body, sc back up the extension with 2sc in the last 2sc (34)
Rd 5: 2sc, sc around, 2sc in last sc (36)
Rd 6-8: sc around (36).
sl st FO
Front Underbelly Flap in Lavender
Locate the middle front of the body. Count 2 st back from the middle and attach lavender.
Row 1-5: sc in 5, ch 1, turn. At the end of row 5, sl st, FO and leave a long tail for sewing.
Front Legs in Light Blue
You are going to repeat this on either side of the lavender underbelly.
Rd 1: Attach light blue, sc in 6, ch 4, sl st to first sc to form a circle, ch 1 and sc in same sp as sl st.
Rd 2-4: sc around (10)
Rd 5: sc2tog around (5). Sew closed.
Underbelly Flap – Side in Lavender
Attach lavender beside one of the front legs (in the same st as the leg attachment)
Row 1-6: sc in 4, ch 1, turn. At the end of Row 6, sl st, FO. Sew directly across to the other side of the body. Make sure it lines up evenly.
Back Legs: In Light Blue - Make 2
Attach light blue in the same st as the side flap and follow the same stitches as the front legs.
Underbelly Flap – Back in Lavender
Attach lavender in same st as the back leg and work in the middle back of Eeyore’s body by following the same stitches as the front belly flap.
Finishing the Body
Stuff the legs and body as you work. Sew the front and back flaps to the middle flap and to the legs. If you desire, you can narrow the space between legs by pulling the sewing tight.
Finishing the Neck
Reattach blue to the back of the neck. The following stitches will help with the position of the head:
Row 1: sc, 5dc, sc, FO. Finish stuffing the body and sew the head onto the neck.
Tail in Light Blue
Attach light blue to Eeyore’s body with a sl st and sc. ch 6. FO
Tie strands of black yarn to the last ch. Separate the yarn into 4 strands and use a brush to frizz.
Tail Bow in Pink
Row 1: ch 6, sc in 2nd ch from hk and in ea st across (5)
Rd 2-3 ch 1, turn, sc across (5). sl st, FO
Attach pink yarn into the middle of the bow. Wrap around tightly several times to create the bow shape. Tie in place and sew to the tail.
And that’s it!


