Adorable Handmade Crochet Father Pig Toy: Step-by-Step Guide

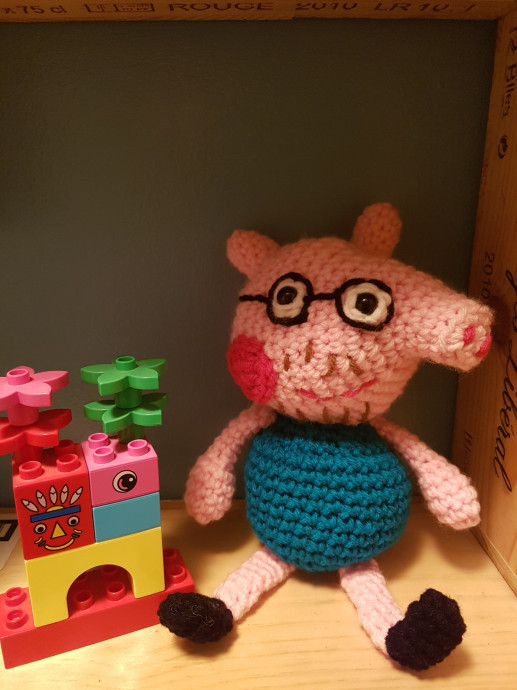
The Crochet Father Pig Toy is an adorable handmade creation that exudes charm and warmth. With its intricately woven design and soft yarn material, this little pig is perfect for cuddling and playtime. The attention to detail in the crocheting process gives the toy a unique and lovable personality that is sure to bring joy to anyone who receives it. Whether it's a gift for a child or a fun addition to your own collection, this Father Pig Toy is a delightful and heartwarming companion that will brighten up your day with its endearing presence.
Working in Rounds
Starting with the nose in pink:
Instructions
RND 1: ch 2, 6 sc in 2nd ch from hk
RND 2: 2 sc in each sc around (12)
RND 3: In back loops only, sc around (12)
RND 4-7: sc around (12)
RND 8: 2 sc in 6 st (12); sc in next 6 st (18)
RND 9: (1 sc, 2 sc around) 6 times; sc in last 6 st (24)
RND 10: (1 sc in next 2 st, 2 sc) 6 times; sc in last 6 st (30)
RND 11: (1 sc in next 3 st, 2 sc) 6 times; sc in last 6 st (36)
RND 12-13: sc around (36)
RND 14: 2 sc in next 2 st, sc around except for last 2 st; 2 sc in last 2 st (40)
RND 15 -20: sc around (40)
RND 21: (sc in next 3 st, sc2tog) around (32)
RND 22: (sc in next 2 st, sc2tog) around (24)
RND 23: (sc, sc2tog) around (16)
STOP HERE, leaving the pink yarn attached in order to embroider your face!
Face Embellishments
There are multiple options to create your face, from embroidering or crochet to gluing on felt, buttons, or fabric. I will describe how I did it but feel free to use your own method.
Eyes/Glasses
I used black safety eyes and embroidered white yarn around them. I then used black yarn for the glasses.
Mouth and Nostrils
Embroidered in dark pink.
Whiskers
Embroidered above and below the mouth in brown.
Cheek
Crocheted in dark pink:
RND 1: ch 2, 8 sc in 2nd ch from hook
RND 2: sc around (8); sl st. Fasten off leaving a long end for sewing and attach to the face
Ears (Make 2)
In the same pink as the face:
RND 1: ch 2, 6 sc in 2nd ch from hk
RND 2-6: sc around (6). sl st and fasten off, leaving an end to sew and attach to the top of the head.
Finishing the Face
Stuff firmly and start back at RND 24.
RND 24: sc2tog around (8)
RND 25: sc around (8) sl st and fasten off leaving an end to sew.
Finish stuffing.
Sew shut!
Creating the Body
In turquoise:
RND 1: ch 2, 8 sc in 2nd ch from hk (8)
RND 2: 2 sc in each st around (16)
RND 3: (1 sc in next sc, 2 sc in next) around (24)
RND 4: (sc in next 2 sc, 2 sc) around (32)
RND 5-12: sc around (32)
RND 13: (sc in next 2, sc2tog) around (24)
RND 14: (sc, sc2tog) around (16)
Sl st and fasten off, leaving a long end for sewing. Stuff body firmly and sew open end to the bottom of the head.
Making the Arms
(Make 2) in pink:
RND 1: ch 2, 6 sc in 2nd ch from hk (6)
RND 2: (sc, 2 sc) around (9)
RND 3-5: sc around (9)
RND 6: (sc, sc2tog) around (6)
Stuff the hand – do not stuff the rest of the arm.
RND 7-11: sc around (6). Sl st and fasten off, leaving a long end for sewing. Sew to the side of the body.
Creating the Legs and Shoes
Legs
(Make 2) in pink:
RND 1: ch 2, 6 sc in 2nd ch from hk (6)
RND 2-10: sc around (6) sl st and fasten off leaving a long end to sew onto the body.
Shoes
In black:
RND 1: ch 2, 6 sc in 2nd ch from hk (6)
RND 2-6: sc around (6) sl st closed and sew to leg.
Creating the Tail
(In pink)
Ch 7. Turn. 2 sc down (12). Sew onto body.
And that’s it!!
- Funny Pictures
-
 Cute Cat Memes That Will Make Your Day Brighter
-
 Spot-on and Funny Memes About Introverts Struggles
-
 Top Wonderful Cat Memes on Their Way to Better Your Day
- Recipes
-
 Creamy Old Fashioned Rice Pudding
-
 Russian Tea Cakes (Snowball Cookies)
-
 Rigatoni with Sausage, Tomatoes, and Zucchini
- Lifehacks
-
 How to Crochet a Harlequin Stitch
-
 Removing The Toughest Stains
-
 Crochet Basics: Crumpled Griddle Stitch
- Crochet Ideas
-
 Crochet Christmas Tree
-
 Crochet Goblet of Fire
-
 Crochet Adorable Ammonite
- DIY
-
 DIY Snowman Wreath
-
 Mini Santa Sleigh Ornament
-
 Crochet Gingerbread House Blanket
- Knitting Ideas
-
 Knitted Easter Bunny
-
 Knitted Mobile Phone/Glasses Case
-
 Knitted Cabled Wallet