Crochet Branch Doll: A Fun and Whimsical Amigurumi Project

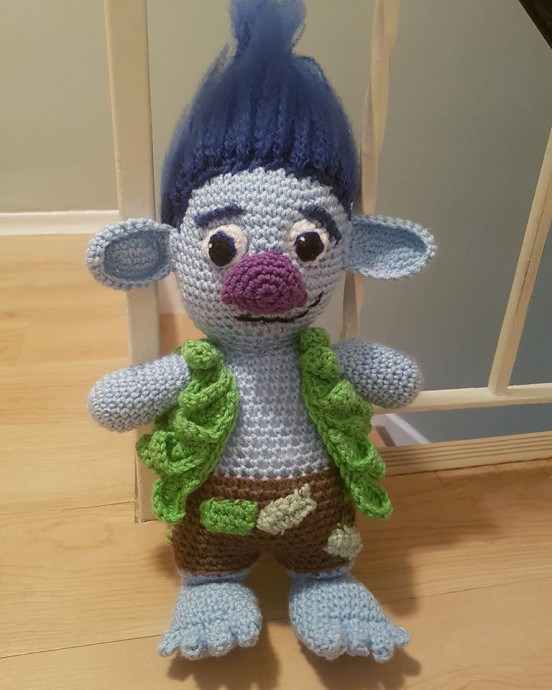
The Crochet Branch Doll is an adorable handmade plushie that will surely bring a smile to your face! Crafted with love and creativity, this doll is not only a fun addition to your collection but also a unique piece of art. With its intricate details and charming design, it's bound to become a favorite companion for both kids and adults. So, why not treat yourself to this cute little creation that is guaranteed to brighten up your day? Get ready to cuddle up with the Crochet Branch Doll and let its whimsical charm enchant you!
Skill Level
Beginner/Intermediate
Techniques
Made using single crochet in rounds and rows
Supplies
- Hook size 4.0 and 3.5 (use smaller hook when indicated)
- Yarn Needle
- Yarn in the following colors:
- Light blue or grey/blue (head/body)
- Lavender (nose)
- Dark blue or black (hair, eyebrows, mouth)
- Brown (shorts)
- Green (shirt)
- 3 different shades of green (patchwork)
- Blue, black, and white (eye)
- Fibre Fill Stuffing
Abbreviations
- Rd – round
- hk – hook
- st – stitch
- ch – chain
- sc – single crochet
- ea – each
- sc2tog – single crochet 2 stitches together to make 1 single crochet stitch (you may also use invisible decrease stitch)
- 5-bobble dc – 5 bobble double crochet stitch
- sl st – slip stitch
- FO – fasten off
Starting with the Head: Light Blue or Grey/Blue
Rd 1: ch 2 (or make a magic ring). Work 8sc in 2nd ch from hook (8)
Rd 2: 2sc around (16)
Rd 3: (2sc, sc) around (24)
Rd 4: (2sc, sc in 2) around (32)
Rd 5: (2sc, sc in 3) around (40)
Rd 6: (2sc, sc in 4) around (48)
Rd 7: (2sc, sc in 5) around (56)
Rd 8-20: sc around (56)
Rd 21: (sc2tog, sc in 5) around (48)
Rd 22: (sc2tog, sc in 4) around (40)
Rd 23: (sc2tog, sc in 3) around (32)
Rd 24: (sc2tog, sc in 2) around (24)
Neck
Rd 25: (sc2tog, sc) around (16)
Rd 26: sc around (16)
Body
Rd 27: (2sc, sc) around (24)
Rd 28: (2sc, sc in 2) around (32)
Rd 29: (2sc, sc in 3) around (40)
Rd 30-38: sc around (40)
Shorts – Switch to Brown
Rd 39-47: sc around (40)
Shorts – Leg Holes
Divide the body into two sections of 20 using a stitch marker.
Rd 48-50: sc around in 20, leaving the other 20 stitches unworked. sl st, fasten off.
Reattach brown at rd 47 of the unworked 20 stitches.
Repeat rounds 48-50. sl st and fasten off.
Patches: Make 7 in Different Shades of Green
Row 1: ch 6, sc in 2nd ch from hook and in each across (5)
Row 2: ch 1, turn, sc across (5). sl st, fasten off. Sew onto shorts.
If desired, add a third row, repeating row 2, to make 1-2 larger patches. You can also embroider stitches with a dark green on a few patches.
Weave in the ends and stuff work firmly
Legs (Repeat Twice)
Attach blue to the bottom of shorts
Rd 1-3: sc around (20). Stuff. Leave an end for sewing to feet.
Feet in Blue (Repeat Twice)
Rd 1: ch 2: 8 sc in 2nd ch from hook (8)
Rd 2: (sc, 2sc) around (12)
Rd 3: (sc in 2, 2sc) around (16)
Rd 4: (sc in 3, 2sc) around (20)
Rd 5-11: sc around (20)
Stuff the foot
Toes
Rd 12: (Big Toe) sc in 3, in the 18th stitch of rd 11, sc in 2.
Rd 13-14: sc around (6)
Rd 15: sc2tog twice. sl st. fasten off, stuff and sew the top of the toe closed.
Rd 12 (2nd Toe) – attach blue beside the big toe, sc in 3. sc in the 19th stitch of rd 11, sc in next stitch.
Rd 13-14: sc around (5)
Rd 15: sc, sc2tog twice. sl st, fasten off, stuff, and sew closed
3rd Toe – repeat instructions for 2nd toe (but work beside the 2nd toe)
Rd 12-13: (Little Toe) – sc in last 4 stitches
Rd 14: sc2tog, sl st closed.
Arms in Blue (Make 2)
Rd 2: ch 2, 8 sc in 2nd ch from hook (8)
Rd 2-15: sc around (16) sl st fasten off. Stuff. Sew the open end of the arms to the body
Ears (Make 2 in Blue)
Rd 1: ch 6, sc in 4, 3sc in last stitch. Turn to work on the bottom of the chains. sc in 3, 3sc in last stitch (13)
Rd 2: sc in 4, 2sc in 2 stitches, sc in 5, 2sc in last 2 stitches (17)
Rd 3: sc in 7, 2sc in 2 stitches, sc in 8, 2sc in last 2 stitches (21)
Rd 4: sc in 10, 2sc in 2 stitches, sc in 11, 2sc in 2 stitches (25)
Rd 5: sc around (25). sl st, fasten off. Sew to head. sl st, fasten off and sew to the sides of the head.
Nose in Purple with 3.5 Hook
Rd 1: ch 2, 6sc in 2nd ch from hook (6)
Rd 2: 2sc around (12)
Rd 3: (sc, 2sc) around (18)
Rd 4: sc around (18)
(Nostrils) Rd 5: 5-bobble dc, sc in 6, 5-bobble dc, sc in next stitch, sl st in next stitch. Fasten off, stuff, and sew to face.
Eyes (Make 2 with 3.5 Hook)
Row 1: in white, ch 2, 6 sc in 2nd ch from hook. Do not close (6) ch 1, turn
Row 2: (sc, 2sc) to end, (9). sc in next 3 (on flat end). sl st fasten off
Pupils in Black
Rd 1: ch 2, 5 sc in 2nd ch from hook. Sl st closed. Fasten off. Sew onto whites.
Finishing the Eyes
With blue, sl st from the back of the eye to the front of the eye around the pupil. Embroider a white eye sparkle. Sew eyes onto the head.
Eyebrows in Black Blue or Dark Blue (Make 2)
Row 1: ch 6, fasten off, and sew above eyes.
Vest Options
You have a few options here:
- Crochet a green vest
- Crochet a green vest, crochet leaves separately and sew onto the vest (this is what I did)
- Crochet leaves and then sew the leaves together to form a vest
Regardless of your choice,
I used the Free Crochet Leaf Pattern by Repeat Crafter Me for the leaves. I made enough to cover the vest well and sewed them with some overlapping.
For the vest, I used a pattern by Yan Schenkel Animal Friends of Pica Pau: Gather All 20 Colorful Amigurumi Animal Characters.
Hair (Dark Blue)
The hair is made in two parts. First, you will make a cone that is stuffed and sits onto his head.
Rd 1: ch 2, 6 sc in 2nd ch from hook (8)
Rd 2: sc around (8)
Rd 3: (sc, 2sc) around (12)
Rd 4: sc around (12)
Rd 5: (sc in 2, 2sc) around (16)
Rd 6: (sc in 3, 2sc) around (20)
Rd 7: (sc in 4, 2sc) around (24)
Rd 8: (sc in 5, 2sc) around (24)
Rd 9: (sc in 6, 2sc) around (28)
Rd 10: (sc in 7, 2sc) around (32)
Rd 11: (sc in 8, 2sc) around (36)
Rd 12: (sc in 9, 2sc) around (40)
Rd 13: (sc in 10, 2sc) around (44)
Rd 14: (sc in 11, 2sc) around (48)
Rd 15: (sc in 12, 2sc) around (52)
Rd 16: (sc in 13, 2sc) around (56)
Rd 17: (sc in 14, 2sc) around (60)
Rd 18: sc around (60). Check for size on the head and add or take away rounds as desired. Sl st, fasten off, stuff and sew onto the head.
Now, for the second part. You will cut yarn, tie it on the cone, detangle the 4 strands that form each piece of yarn, and brush until they become fuzzy. This step takes a while. You do not have to put hair onto each stitch. Just do enough to have the volume of hair you want.
- Funny Pictures
-
 Pics to Get the Excitement Today
-
 Funny Christmas Meme Dump
-
 Funniest Relatable Felines in the Form of Memes
- Recipes
-
 Cappuccino Brownies
-
 Chicken Mushroom Tortellini Bake
-
 Spinach Pie
- Lifehacks
-
 8 Necessary Tips for Baking Bread
-
 Tips & Hacks for Clean Carpets
-
 10 Uses For Old TV Armoires
- Crochet Ideas
-
 Crochet Watermelon Amigurumi
-
 Crochet Shark Applique
-
 Crochet Pineapple Amigurumi
- DIY
-
 Yarn Wrapped Christmas Wreath Ornaments
-
 Egg Carton Snowman Ornament
-
 Stick Peppermint Candy Ornament
- Knitting Ideas
-
 Knitted Star Square Dishcloth
-
 Knitted Free 2025 Year Dishcloth
-
 Knitted Ribbed Adult Hat