Crochet Mini Granny Hexagon Stocking Pattern

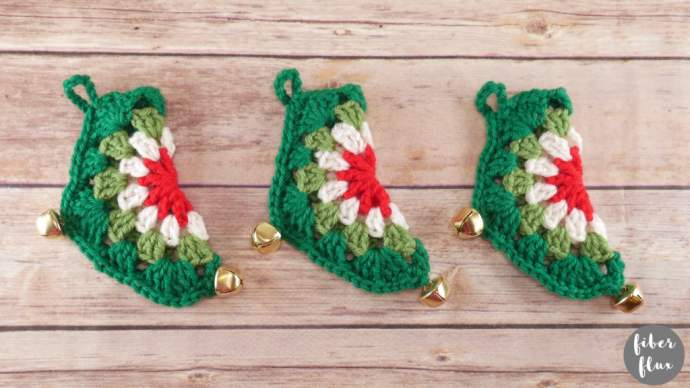
The Crochet Mini Granny Hexagon Stocking is a delightful and fun project to work on for the holiday season. These cute little stockings can add a touch of handmade charm to your Christmas decorations. The hexagon shape gives them a unique twist compared to traditional stockings, making them stand out in a crowd. Whether you're an experienced crocheter looking for a quick project or a beginner eager to try something new, this pattern is perfect for all skill levels. The colorful yarn choices and intricate stitching make each stocking a small work of art that you'll be proud to display year after year. So grab your crochet hook and get ready to spread some festive cheer with these adorable Mini Granny Hexagon Stockings!
Materials
- H (5.0 mm) crochet hook
- Small amounts of medium weight/#4 weight yarn (approximately a half ounce total, using 4 colors of Friends Wool from Hobbii: light green, dark green, red, and white)
- Yarn/tapestry needle
- Scissors
- Measuring tape
- Optional: bells, bows, pompoms, or any embellishments you prefer!
Sizing
- Hexagon before seaming is approximately 5 inches across from its widest points.
- Finished stocking (including hanging loop) measures about 5.5 inches tall.
Pattern Notes
- To make your stocking smaller, work fewer rounds of the hexagon pattern before seaming.
- To make your stocking larger, work more rounds of the hexagon pattern before seaming.
- The hanging loop is optional, and you can adjust its size by working more or fewer chains.
- This stocking is fun to embellish! Try adding bells like I did to the heel and toe, or for a quieter option, a cute tiny pom pom. You could also add a tiny bow to the top for extra charm.
Mini Granny Hexagon Stocking Pattern
The Granny Hexagon
- Chain 4 and join the furthest chain from the hook with a slip stitch to create a ring.
- Round 1 (shown in red): Chain 4 (counts as a double crochet), then work (a double crochet into the center of the ring, chain 1) 11 times. Join to close with a slip stitch.
Note
If you want to make the rounds in the same color, simply slip stitch over until you reach a chain 1 space and continue. If you want to switch colors, cut the yarn and join the new yarn at one of the chain 1 spaces and tie securely.
- Round 2: Chain 3 and work a double crochet in the same space. Chain 1, then work two double crochets in the next (chain 1) space. Continue this around, working 2 double crochets in each space, followed by a chain 1. Join to close with a slip stitch.
- Round 3: Chain 3, then work 2 double crochets in the same space, then chain 1. In the next space, work three double crochets followed by a chain 1. Repeat this pattern around the circle, working 3 double crochets and a chain 1 in each space. Join with a slip stitch to close.
- Round 4 (this round transforms the circle into a hexagon): Chain 4, and in the first space work 2 double crochets, chain 1, then 3 double crochets all in the same space to create the first hexagon corner. In the next space, chain 1 and work 3 double crochets to form the hexagon side. Continue this sequence, creating a corner of two clusters and a side of one cluster, each separated by a chain 1. Join with a slip stitch to close the round and do not cut the yarn.
Hanging Loop, Seaming, & Finishing
- Slip stitch over to the next corner space, then into the first stitch after the corner space.
- Chain 8 for the hanging loop.
- Next, fold the hexagon in half. If you face the hexagon towards you, with one of the flat sides at the top, draw an imaginary line right down the middle of one of the flat sides and fold along that line.

- Work a single crochet into the same stitch (where you made the chains for the hanging loop) into both layers.
- Continue working a single crochet into each stitch and in each space until you reach the “heel,” which is the next corner space.
- Work 3 single crochets into the corner space (the heel of the stocking).
- Keep working a single crochet into each stitch and space around to the toe to seam the remainder of the stocking.
- Fasten off and weave in any ends.
- Embellish the stocking with bells, pompoms, bows, or anything else you like!
- Funny Pictures
-
 Cute Cat Memes That Will Make Your Day Brighter
-
 Spot-on and Funny Memes About Introverts Struggles
-
 Top Wonderful Cat Memes on Their Way to Better Your Day
- Recipes
-
 Creamy Old Fashioned Rice Pudding
-
 Cream of Mushroom Soup
-
 Homemade Breakfast Sausage
- Lifehacks
-
 Crochet Basics: Crumpled Griddle Stitch
-
 Crochet Basics: Sedge Stitch
-
 Surprising Ways to Use Dryer Sheets
- Crochet Ideas
-
 Crochet Christmas Tree
-
 Crochet Goblet of Fire
-
 Crochet Adorable Ammonite
- DIY
-
 DIY Snowman Wreath
-
 Mini Santa Sleigh Ornament
-
 Crochet Gingerbread House Blanket
- Knitting Ideas
-
 Knitted Easter Bunny
-
 Knitted Mobile Phone/Glasses Case
-
 Knitted Cabled Wallet