Create Beautiful Crochet Solid Granny Squares

Crochet Solid Granny Squares are a delightful and versatile pattern that every crochet enthusiast should have in their repertoire. These squares are a fantastic way to hone your crochet skills while creating a charming and textured finished piece. With a friendly tone of voice, it's like embarking on a crafting adventure with an old friend by your side. The rhythmic repetition of stitches in the round forms a timeless square that can be used individually or combined to make beautiful blankets, bags, or even colorful home decor items. So grab your crochet hook, pick out some colorful yarn, and get ready to dive into the soothing world of crafting with these classic and endlessly customizable Granny Squares!
Essential Materials for Crochet Solid Granny Squares
To get started, you’ll need some basic materials, such as a crochet hook, yarn in different colors, and a yarn needle. Choose your hook size according to your yarn; typically, a 5mm (H) hook works well with worsted-weight yarn or cotton yarn. Adjust your hook size accordingly for projects with different yarn weights.
Step-by-Step Guide to Creating Granny Squares
Starting with the Magic Ring
1. Begin with a magic ring or circle, a great way to start your granny square without a hole in the center. Insert your hook into the ring and make your first chain.
Building Your Square
2. Work your first double crochet (dc) into the magic ring, followed by chain spaces and clusters as specified in your written pattern or video tutorial.
3. As you progress through the pattern, you’ll encounter different stitches, such as single crochets, treble crochets, and puff stitches, all of which add unique textures to your square.
Changing Colors
4. Changing colors can bring a new dimension to your square. Cut the yarn and join the new color in the last step of a stitch, leaving a tail to weave in later.
Finishing Your Square
5. Continue to follow your pattern, working your way around the square. Pay attention to the corners to maintain the square’s shape.
6. Once you’ve completed the last corner, finish off your square with a slip stitch (sl st) and fasten off your loose ends using a yarn needle.
Supplies Required
Any Size hook depending on the pattern.
Any type of yarn depending on the pattern.
Common Abbreviations
sl st = slip stitch
sc = single crochet
dc = double crochet
ch = chain
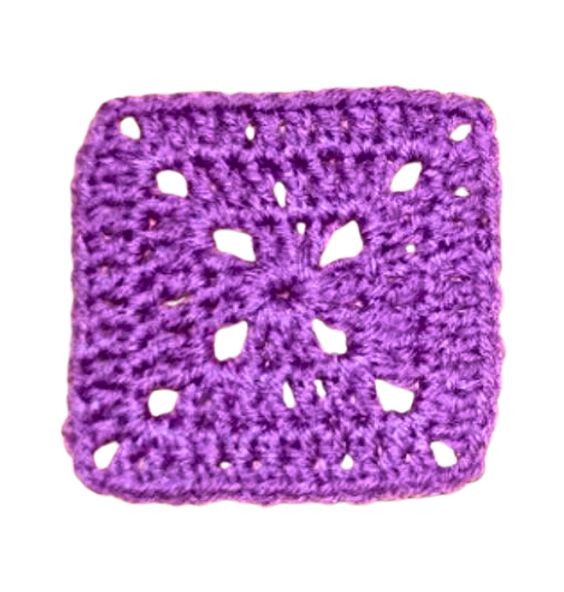
Round Instructions
RND 1: Chain 4, sl st beginning ch to create a ring.
RND 2: Ch 5, work 3 dc in the ring, ch 2, work 3 dc in the ring, ch 2, work 3 dc in the ring, ch 2, work 2 dc in the ring, sl st on top of the ch 3.
RND 3: Ch 3, work 2 dc in the ch 2 corner, ch 2, work 2 dc in the same space, dc in the next 3 dc, *2 dc, ch 2, 2 dc in the next ch 2 space corner, dc in the next 3 dc, *Repeat around, at the end, dc in the next 2 stitches, sl st on top of the ch 3 to join.
RND 4: Ch 3, dc in the next two stitches, work 2 dc, ch 2, 2 dc in the ch 2 space corner, *dc in the next 7 dc, work 2 dc, ch 2, 2 dc in the next ch 2 space corner, *Repeat around, at the end, dc in the last 4 dc, sl st on top of the ch 3.
If you like to make it bigger then just keep dc across and work your corners with 2 dc, ch 2, 2 dc.
- Funny Pictures
-
 Cute Cat Memes That Will Make Your Day Brighter
-
 Spot-on and Funny Memes About Introverts Struggles
-
 Top Wonderful Cat Memes on Their Way to Better Your Day
- Recipes
-
 Creamy Old Fashioned Rice Pudding
-
 Russian Tea Cakes (Snowball Cookies)
-
 Rigatoni with Sausage, Tomatoes, and Zucchini
- Lifehacks
-
 How to Crochet a Harlequin Stitch
-
 Removing The Toughest Stains
-
 Crochet Basics: Crumpled Griddle Stitch
- Crochet Ideas
-
 Crochet Christmas Tree
-
 Crochet Goblet of Fire
-
 Crochet Adorable Ammonite
- DIY
-
 DIY Snowman Wreath
-
 Mini Santa Sleigh Ornament
-
 Crochet Gingerbread House Blanket
- Knitting Ideas
-
 Knitted Easter Bunny
-
 Knitted Mobile Phone/Glasses Case
-
 Knitted Cabled Wallet