Crochet Sunburst Granny Square: A Delightful Pattern

Introduction
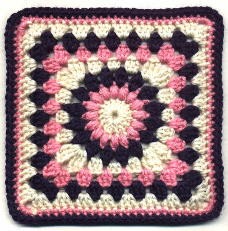
The Crochet Sunburst Granny Square is a delightful and eye-catching pattern that brings a burst of sunshine to your projects. With its intricate design and vibrant color combinations, this granny square is sure to add a charming touch to any crochet creation. Whether you're a seasoned crocheter or just starting out, creating a Crochet Sunburst Granny Square is a fun and rewarding experience. The repetitive yet engaging nature of the pattern allows for a relaxing crocheting session while producing a beautiful piece of work. So grab your crochet hook, pick out some cheerful yarn colors, and get ready to infuse your next project with a touch of sunny flair!
Materials
- 3, 4, or 5 colors of limp worsted weight yarn (such as wintuk or one of the “soft” yarns)
- Crochet hook size F
Gauge: Rounds 1-3 = 3 1/2”
Finished size: 6” (with variation for 7”)
Special Stitches
Puff Stitch
To work puff st: (yo, insert hook in indicated st and pull up a long loop) 3 times, yo and pull through all 7 remaining loops on hook, ch 1 to lock.
Cluster Stitch
To work cluster st: (yo, insert hook in indicated st and pull up a loop, yo and pull through 2 loops) 4 times, yo and pull through all 5 remaining loops on hook.
Ch 5; join with a sl st to form ring.
Round Instructions
Round 1
Ch 3 to count as the first dc, work 15 more dc in the ring; join with a sl st to the top of the beginning ch 3. (16 dc) Fasten off.
Round 2
Attach next color with a sl st to any dc, ch 1, puff st in the same st and in each dc around; join with a sl st to the first puff st. (16 puff sts) Fasten off.
Round 3
Attach next color with a sl st in the ch 1 sp of any puff st, ch 2, (cluster st, ch 2) in the same sp and in each ch 1 sp around; join with a sl st to the beginning cluster st. (16 cluster sts) Fasten off.
Round 4
Attach next color with a sl st to any ch 2 sp, ch 4 to count as the first trc, 2 trc in the same sp, (*3 dc in the next ch 2 sp, 3 hdc in the next ch 2 sp, 3 dc in the next ch 2 sp*, [3 trc, ch 3, 3 trc] all in the next ch 2 sp for corner) Repeat between ( )’s 2 times, then repeat from * to * once; 3 trc in the same sp as beginning trc, ch 3; join with a sl st to the top of the beginning ch 4. Fasten off.
Round 5
Attach next color with a sl st in the ch 3 sp of any corner, ch 3 to count as the first dc, work 2 more dc in the same sp; work 3 dc in between each 3 dc group of the previous round (as for a regular granny square), working (3 dc, ch 3, 3 dc) in the ch 3 sp of each corner. End with 3 dc in the same sp as the beginning dc, ch 3; join with a sl st to the top of the beginning ch 3. Fasten off.
Round 6
With next color, repeat round 5. Fasten off.
Round 7 (For 7” Square Only)
With next color, repeat round 5. Fasten off.
Next Round
(Fudging round, to achieve size) Attach next color with a sl st to any ch 3 sp, ch 1, work 3 sc in the same sp, sc in each dc around, working 3 sc in each ch 3 sp; join with a sl st to the first sc. Fasten off.
Following Round
(Fudging round, to achieve size) Attach next color with a sl st to the center sc of any corner, ch 1, 3 sc in the same st; sc in each sc around, working 3 sc in the center sc of each corner; join with a sl st to the first sc. Fasten off. Weave in ends.
- Funny Pictures
-
 Cute Cat Memes That Will Make Your Day Brighter
-
 Spot-on and Funny Memes About Introverts Struggles
-
 Top Wonderful Cat Memes on Their Way to Better Your Day
- Recipes
-
 Creamy Old Fashioned Rice Pudding
-
 Russian Tea Cakes (Snowball Cookies)
-
 Rigatoni with Sausage, Tomatoes, and Zucchini
- Lifehacks
-
 How to Crochet a Harlequin Stitch
-
 Removing The Toughest Stains
-
 Crochet Basics: Crumpled Griddle Stitch
- Crochet Ideas
-
 Crochet Christmas Tree
-
 Crochet Goblet of Fire
-
 Crochet Adorable Ammonite
- DIY
-
 DIY Snowman Wreath
-
 Mini Santa Sleigh Ornament
-
 Crochet Gingerbread House Blanket
- Knitting Ideas
-
 Knitted Easter Bunny
-
 Knitted Mobile Phone/Glasses Case
-
 Knitted Cabled Wallet