Crochet Little Caterpillar: A Step-by-Step Guide

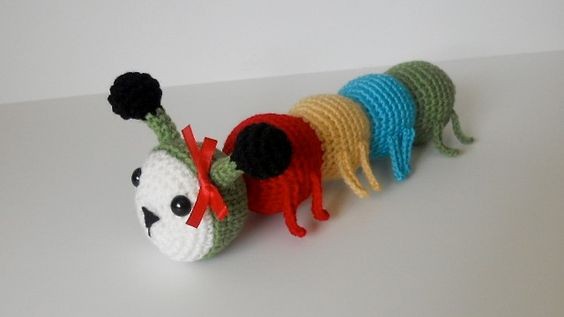
The Crochet Little Caterpillar is a charming and delightful project that is perfect for both beginners and experienced crafters alike. With its simple yet captivating design, this adorable caterpillar is sure to bring a smile to anyone's face. The step-by-step instructions make it easy to follow along and create your very own cuddly companion. Whether you're looking to add a touch of whimsy to your home decor or create a special gift for a loved one, the Crochet Little Caterpillar is a fun and rewarding project that will spark your creativity and brighten your day. So grab your crochet hook and yarn, and get ready to embark on a creative journey filled with joy and charm!
Materials
– Medium/4 worsted yarn in the following colors: white, green, red, yellow, blue, and black. (You can pick any colors you like; I just liked that combination.)
– 2.75mm hook
– Fiberfill for stuffing
– 12mm safety eyes (you can also use googly eyes)
– Yarn needle
– Ribbon
Abbreviations
– ch = chain
– rnd = round
– sc = single crochet
– inc = increase
– dec = decrease
– beg = beginning
Head
With green yarn, make a magic ring
Rnd 1: 6 sc in center of the ring (6)
Rnd 2: 2 sc in each st around (12)
Rnd 3: [1 sc, inc] 6 times (18)
Rnd 4: [2 sc, inc] 6 times (24)
Rnd 5: [3 sc, inc] 6 times (30)
Rnd 6: sc in each st around (30)
Rnd 7: [6 sc, inc] 4 times, 2 sc (34)
Rnd 8 to 10: sc in each st around (34)
Change yarn to white
Rnd 11: sc in each st around using back stitches only (34)
Rnd 12: [6 sc, dec] 4 times, 2 sc (30)
Rnd 13: sc in each st around (30)
Rnd 14: [3 sc, dec] 6 times (24)
Rnd 15: [2 sc, dec] 6 times (18)
Rnd 16: [1 sc, dec] 6 times (12)
Rnd 17: dec 6 times (6)
Fasten off and sew the remaining stitches together to close the hole: Insert your yarn needle in each front stitch and pull.
Note: Do not forget to stuff the head with fiberfill and insert the safety eyes along the way.
Body
With red yarn, make a magic ring
Rnd 1: 6 sc in center of the ring (6)
Rnd 2: 2 sc in each st around (12)
Rnd 3: [1 sc, inc] 6 times (18)
Rnd 4: [2 sc, inc] 6 times (24)
Rnd 5: [3 sc, inc] 6 times (30)
Rnd 6: [4 sc, inc] 6 times (36)
Rnd 7 to 11: sc in each st around (36)
Rnd 12: [4 sc, dec] 6 times (30)
Rnd 13: [3 sc, dec] 6 times (24)
Start stuffing and continue along the way
Rnd 14: [2 sc, dec] 6 times (18)
Rnd 15: [1 sc, dec] 6 times (12)
Change color to yellow
Repeat from rnd 3 to 15 three more times with different colors (if you want your caterpillar to be longer, you can add more).
Decrease 6 times on the last row of the last ball just like the head.
Antennae
With black yarn, make a magic ring
Rnd 1: 6 sc in center of the ring (6)
Rnd 2: 2 sc in each st around (12)
Rnd 3: [1 sc, inc] 6 times (18)
Rnd 4: sc in each st around (18)
Start stuffing with fiberfill and continue along the way
Rnd 5: [1 sc, dec] 6 times (12)
Rnd 6: dec 6 times (6)
Change color to green
Rnd 7 to 11: sc in each st around (6)
Fasten off and sew on top of the head with the remaining threads.
Legs
(make 2 for each section in the respective colors):
Leave a long tail at the beginning and end.
10 in ch.
Row 1: 9 sc.
Fasten off. Use the remaining threads of each leg to attach the legs on the sides. Hide the extra threads into the body.
Voila!
- Funny Pictures
-
 Hilarious Memes for Those Bored to Tears
-
 Weekly Treat of Funniest Parenting Memes for Good Laugh out Loud Right Now
-
 Really Funny Pics to End These Weekend Perfectly
- Recipes
-
 Crispy Baked Avocado Fries
-
 Scrambled Chickpea and Spinach Pitas
-
 Cinnamon Pancakes
- Lifehacks
-
 Crochet Basics: Aligned Cobble Stitch
-
 Brick Stitch Crochet Tutorial
-
 Crochet Basics: Wattle Stitch
- Crochet Ideas
-
 Crochet Snorlax Plushie Doll
-
 Crochet Beautiful Penguin Toy
-
 Crochet Tiny Snowman
- DIY
-
 DIY Santa Craft For Kids
-
 Paper Plate Angel Craft
-
 Upcycled Mason Jar Chicken Vase
- Knitting Ideas
-
 Knitted Bridger Cowl
-
 Knitted Keepsake Bag
-
 Knitted Cutie Cupcake Dolls