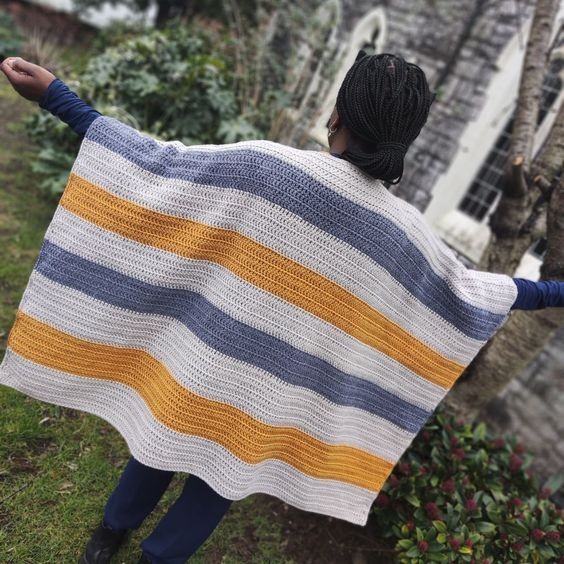
Create a Unique Crochet Ruana: Your Step-by-Step Guide

Introduction
Unleash your creativity and embark on a mesmerizing journey into the world of crochet with the goal of creating a beautiful and unique ruana. This versatile garment, with its flowing silhouette and intricate patterns, is the perfect addition to any wardrobe. With just a hook and some yarn, you can transform simple stitches into a stunning piece of wearable art. Immerse yourself in the art of crochet as you explore various techniques and stitches to bring your ruana to life.
Supplies Needed to Make a Crochet Ruana Pattern
- Yarn: Hobbii Mega Ball, Aran weight, #4 (100% Acrylic, 1200 m (1312 yds) per 14.1oz/400g Ball)
- Estimated Total Yardage:
- Main Color – Cream: 1100 (1400, 1600) yards
- Contrasting Color 1 – Mustard: 500 (700, 900) yards
- Contrasting Color 2 – Grey: 300 (500, 700) yards
- Hook: 6 mm Crochet Hook
- Gauge: 13 sts over 8 Rows = 4 x 4” made in dc before blocking.
Easy Crochet Ruana Pattern Notes
- Please kindly read through the pattern before starting.
- Any worsted-weight yarn in colors of your choice can be used.
- Check the gauge swatch before starting, and adjust the hook size if needed.
- Beginning chains do not count as a stitch throughout the pattern.
- The stitch count is written after each row, with size S written first in green and the other in the (), i.e. S (M, L).
- For a shorter ruana, reduce the foundation chain, but make sure to correspond this to the other panels.
Skill Level: Easy
Terms: US Terminology
Stitch Pattern
- Chain space – ch sp
- Stitch(es) – st(s)
- Single Crochet – sc
- Double Crochet – dc
Finished Measurements
- Size(s) and color codes – S (M, L)
- Bust Measurement to size fits: 28 – 38 (39 – 50, 51 – 64)”
- Finished width measures = 80 (92, 102)”
- Length: 33”
The modeled garment is shown in M.
Construction Note
This project is made in flat (rows), after which the panels are joined together at the shoulder.
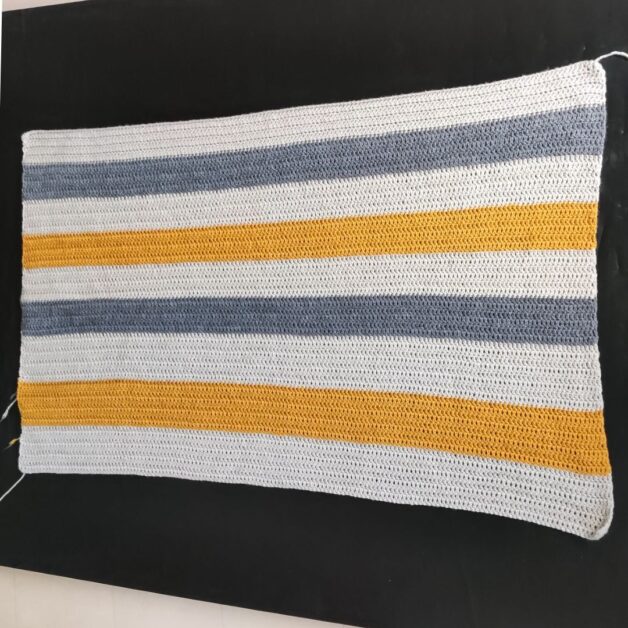
Section 1 – Back Panel
The panel should measure about 40 (48, 52)” by 33”
With MC – Chain 132 (152, 172)
Row 1: Dc in 3rd ch from hook and in each ch across till the last stitch, turn. 130 (150, 170) dc
Rows 2 – 8: Ch 2, dc in each st across, turn. 130 (150, 170) dc
Fasten off MC, join CC 1
Rows 9 – 16: Ch 2, dc in each st across, turn. 130 (150, 170) dc
Fasten off CC 1, join MC
Rows 17 – 24: Ch 2, dc in each st across, turn. 130 (150, 170) dc
Fasten off MC, join CC 2
Rows 25 – 32: Ch 2, dc in each st across, turn. 130 (150, 170) dc
Fasten off CC 2, join MC
Rows 33 – 40: Ch 2, dc in each st across, turn. 130 (150, 170) dc
Fasten off MC, join CC 1
Rows 41 – 48: Ch 2, dc in each st across, turn. 130 (150, 170) dc
Fasten off CC 1, join MC
Rows 49 – 56: Ch 2, dc in each st across, turn. 130 (150, 170) dc
Fasten off MC, join CC 2
Rows 57 – 64: Ch 2, dc in each st across, turn. 130 (150, 170) dc
Fasten off CC 2, join MC
Rows 65 – 72: Ch 2, dc in each st across, turn. 130 (150, 170) dc
Edging
Crocheting around the whole panel, switch to the next color at each edge of the
Section 1 – Front Panels
Make 2
With MC – Chain 46 (54, 64) dc
Row 1: Dc in 3rd ch from hook and in each ch across, turn. 42 (52, 62) dc
Rows 2 – 8: Ch 2, dc in each st across, turn. 42 (52, 62) dc
Fasten off MC, join CC 1
Row 9: With CC1, ch 2, dc in first 8 (12, 14) sts, drop CC1, Pick up CC2, dc in the remaining sts until the end of row, turn. 42 (52, 62) dc
Row 10: With CC2, ch 2, dc in the first 34 (40, 48) sts, drop CC2, pick up CC1, dc in the remaining sts, and turn.
Rows 11 – 16: Repeat rows 9 – 10. Fasten off CC 1 and CC2, and join MC.
Rows 17 – 24: Ch 2, dc in each st across, and turn. 42 (52, 62) dc
Rows 25 – 32: Repeat Rows 9 – 16
Fasten off CC 1 and CC2, join MC
Rows 33 – 40: Ch 2, dc in each st across, turn. 42 (52, 62) dc
Rows 41 – 48: Repeat Rows 9 – 16
Fasten off CC 1 and CC2, join MC
Rows 49 – 56: Ch 2, dc in each st across, turn. 42 (52, 62) dc
Rows 57 – 64: Repeat Rows 9 – 16
Fasten off CC 1 and CC2, join MC
Rows 65 – 72: Ch 2, dc in each st across, turn. 42 (52, 62) dc
Crocheting across just one of the long sides.
Turn your project to have the side with the mustard (or the equivalent of your CC1) on the bottom.
You can fasten off and rejoin your MC if this is not the same side you completed the last round on.
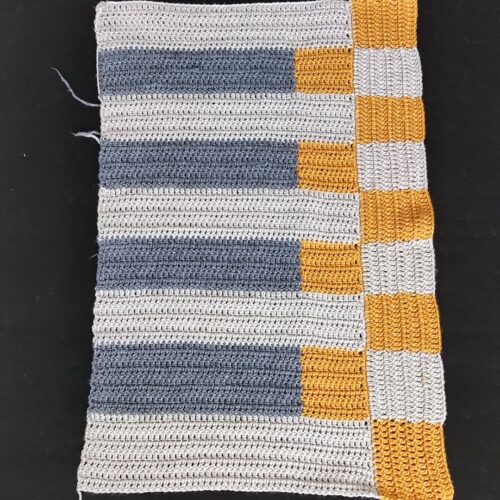
Edging
Crocheting around the whole panel, switch to the next color at each edge of the start of the new color for a perfect project.
Round 1: Ch 1, sc in each st/edge around, join with a sl st to the beginning chain.
Side Extension
- This part uses just two colors – MC and CC1.
- Make sure to have your sts in the opposite color for row 1.
- Please note that each color’s numbers might differ from what is written in the pattern.
- Aim for evenly distributed stitches to avoid puckering or punches.
- Crocheting across the end of each row from the front panels.
Row 1: With CC1, ch 2, dc in first 12 sts, *with MC, dc in next 12 sts, with CC1, dc in next 12 sts, rep from * to the end, turn.
Rows 2 – 8 (12, 14): Repeat Row 1.
Fasten off.
Make the second panel (second front panel).
Finishing – Joining
Lay both panels from section 2 on the back panel with the plaid part placed close to each other, as seen above.
With your crochet hook, use sc to join the shoulder stitches together.
Weave in all ends.
Block to measurement.
- Lifehacks
-
 8 Necessary Tips for Baking Bread
-
 Tips & Hacks for Clean Carpets
-
 10 Uses For Old TV Armoires
- Funny Pictures
-
 Relatable and Funny Memes to Distract You From the Routine
-
 Hilarious Cat Snapchats That Will Leave You With the Biggest Smile
-
 Today’s Top Funny Tweets to Scroll Before Bed
- Knitting Ideas
-
 Knitted Star Square Dishcloth
-
 Knitted Free 2025 Year Dishcloth
-
 Knitted Ribbed Adult Hat
- DIY
-
 Crochet Titus the Barn Owl
-
 Crochet Rainbow Bunny
-
 DIY Washer Ornaments
- Recipes
-
 Cappuccino Brownies
-
 Chicken Mushroom Tortellini Bake
-
 Spinach Pie
- Crochet Ideas
-
 Crochet Watermelon Amigurumi
-
 Crochet Flower Hat for your Pet
-
 Crochet Shark Applique